


Local Control Panel Kit Installation Instructions
2
Local Control Panel Kit Install Guide
Tools and Supplies Needed
•
Phillips* (cross head) screwdriver (#1 bit and #2 bit)
•
Anti-static wrist strap and conductive foam pad (recommended)
System References
All references to left, right, front, top, and bottom assume the reader is facing the front of
the chassis as it would be positioned for rack-mount operation.
Installation Instructions for Intel® Server Chassis SC5300/
SC5400
Note: This section only applies to Local Control Panel kit installations for the Intel® Server
Chassis SC5300/SC5400. If you are installing a Local Control Panel kit into an Intel®
Entry Server Chassis SC5275-E, follow the instructions under
“Installation Instructions
for Intel® Entry Server Chassis SC5275-E” on page 12
. If you are installing a Local
Control Panel kit into an Intel® Entry Server Chassis SC5299-E, follow the instructions
under
“Installation Instructions for Intel® Entry Server Chassis SC5299-E” on page 19
.
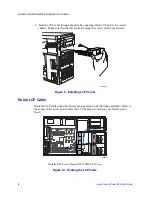
Remove Access Cover
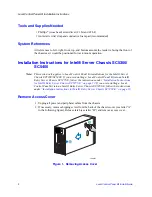
1. Unplug all power and peripheral cables from the chassis.
2. If necessary, remove shipping screw from the back of the chassis cover (see letter “A”
in the following figure). Release latch (see letter “B”) and remove access cover.
Figure 1. Removing Access Cover
TP00527
A
B


