background image

4

General Installation Process

7

Install Memory Modules

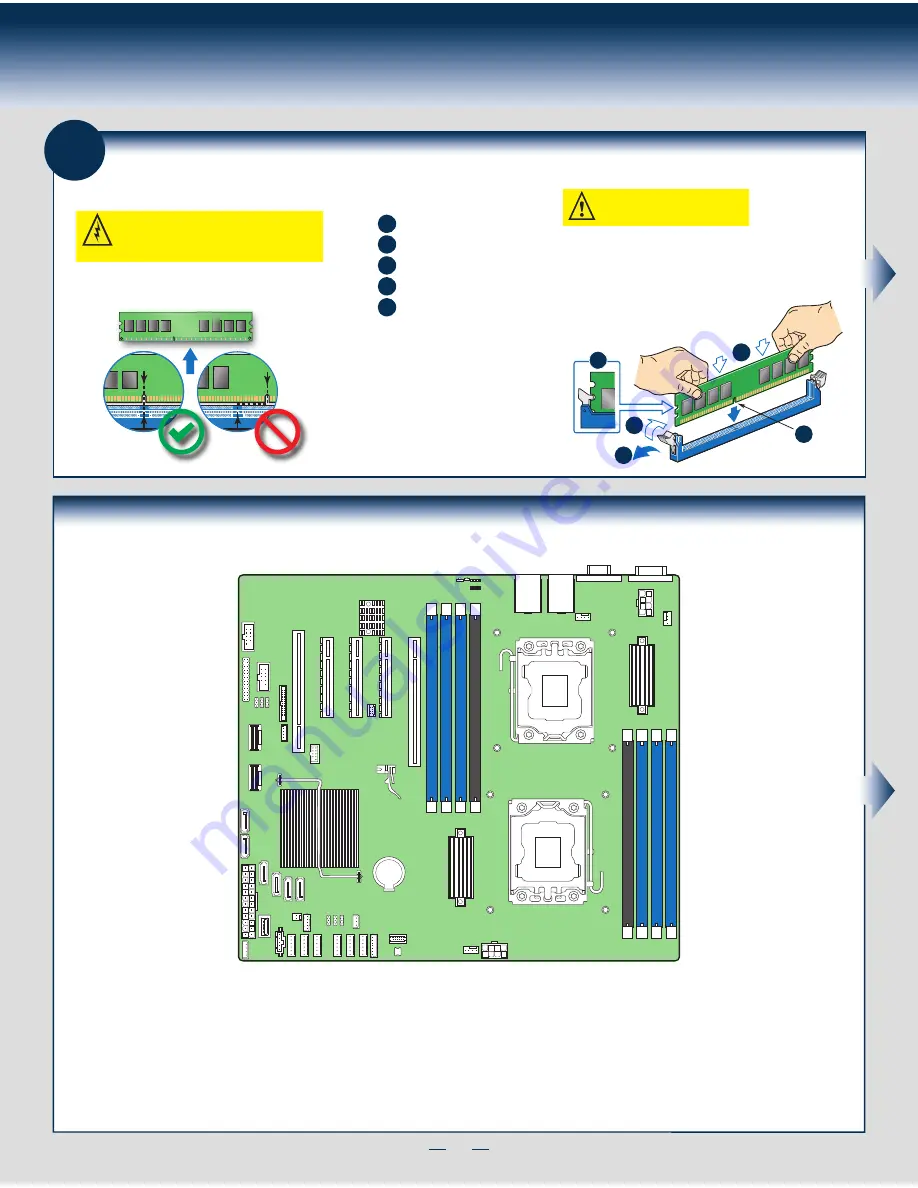
DDR3 DIMM Memory Identification:

Other

Memory

DDR3

CAUTION:  

Observe normal ESD (ElectroStatic 

Discharge) procedures to avoid possible damage to 

system components.

DIMM notch and socket bump must align as shown below.

To Install DIMMs:

Open both DIMM socket levers.

C

A

D

E

Note location of alignment notch.

B

CAUTION: Avoid touching contacts

when handling or installing DIMMs.

A

C

D

B

E

IMPORTANT!  Visually check that each latch is fully closed and correctly engaged 

with each DIMM edge slot.

Push down firmly on the DIMM until it snaps into place and both levers close.

Insert DIMM making sure the connector edge of the DIMM aligns correctly with the slot.

Install Memory Modules... 

Continued

Memory Configurations and Population Order:

Intel

®

 Server Board S2400SC

For best performance, a minimum of three DIMMs per CPU is recommended, populated in the blue slot of each memory channel.
In a single-processor configuration, always populate A1 DIMM first.
In a dual-processor configuration, always populate A1 DIMM first for CPU 1 and D1 DIMM first for CPU2. 
Note:  For additional memory configurations, see the 

Service Guide

 on the Intel

®

 Server Deployment Toolkit CD that accompanies your Intel

®

 Server System S2400SC, 

or go to 

http://www.intel.com/support/motherboards/server/

.

Memory sizing and configuration is supported only for qualified DIMMs approved by Intel. For a list of supported memory, see the tested memory list at:  

http://www.intel.com/support/motherboards/server/

.

CPU 2 Socket

CPU 1 Socket

DI

M

M

_A

1

DI

M

M

_B

1

DI

M

M

_C

1

DI

M

M

_C

2

DI

M

M

_F

2

DI

M

M

_F

1

DI

M

M

_E

1

DI

M

M

_D

1

Summary of Contents for R2000SC

Page 1: ...ts If you are not familiar with ESD Electrostatic Discharge procedures used during system integration see the complete ESD procedures described in your Service Guide This guide and other supporting do...

Page 2: ...This page is intentionally left blank...

Page 3: ...sor Heatsink s 3 Install Memory Modules 4 Install Hard Drives 5 Install Optical Drive 6 Install the Air Duct 6 Install Add in Card 7 Install Rack Handles 7 Install Intel RAID C600 Upgrade Key optional...

Page 4: ...supported maximum thermal limits the system must meet the following operating and configuration guidelines Ambient in let temperature cannot exceed 35 C and should not remain at this maximum level for...

Page 5: ...Swap Hard Drive Bays System Fans CPU1 CPU2 1 1 Redundant Power Supply Modules Server Board Air Duct Optical Drive Bay Optional Front Control Panel Useful Information The system must be configured with...

Page 6: ...or disconnected or loose cables and components that may have occurred during shipping 2 Remove the Top Cover B Remove the four screws A A B B Slide the cover backward and lift up 3 Remove the Air Duct...

Page 7: ...e the Processor Protective Cover A A Take the processor out of the box and remove the protective shipping cover A Open the Socket Lever 1 When opening a socket DO NOT TOUCH the gold socket wires 2 Whe...

Page 8: ...slot Install Memory Modules Continued Memory Con gurations and Population Order Intel Server Board S2400SC For best performance a minimum of three DIMMs per CPU is recommended populated in the blue s...

Page 9: ...k off the tab on the plastic drive blank Install 2 5 Hard Drive as option Secure the hard disk drive using the four screws for 2 5 HDD 3 5 H D D D D Install the hard disk drive using the same four scr...

Page 10: ...C Connect the cables as shown O p t i c a l D e v i c e A s s e m b l y B Data Power Optical Drive C 11 Install Add in Card A Remove the screw B Slide the retention device and lift upward A A B Insta...

Page 11: ...el RMM4 NIC Install Intel RMM4 Lite A Remove the filler Panel and Retention Device refer to STEP 11 B Connect one end of the flex cable to the RMM4 connector on the RMM4 NIC module C Attach the RMM4 m...

Page 12: ...ce the top cover on system and slide towards the front of the chassis until the recessed front edge is fully engaged Install the three screws at the front and torque to 7 9in lbs Then install the scre...

Page 13: ...he BIOS setup See the Intel Server Board S2400SC Technical Product Specification for more information Use the instructions provided with the RAID controller and with the operating system With the oper...

Page 14: ...nt control panel types The features of each are as follows A ID Button with integrated LED B NMI Button C LAN 1 Activity LED D LAN 3 Activity LED E System Cold Reset Button F System Status LED G Power...

Page 15: ...VGA SerialA SYS FAN_7 CPU 2 Power CPU 2 Fan CPU 1 Power Slot 2 PCI 32 Slot 3 PCI e Gen 2 Slot 4 PCI e Gen 3 Slot 5 PCI e Gen 3 Slot 6 PCI e Gen 3 Front Panel RMM4 NIC Storage Upgrade Key CPU 1 Fan SY...

Page 16: ...12 Reference System Cabling Diagram R2308SC2SHFN Power Supply One 600w Fixed FAN 1 FAN 2 FAN 3 8 x 3 5 HSBP 0 3 4 7 Optical Drive Front Panel Front Panel USB I2 C...

Page 17: ...13 Reference System Cabling Diagram R2308SC2SHDR FAN 1 FAN 2 FAN 3 8 x 3 5 HSBP 0 3 4 7 Optical Drive Front Panel Front Panel USB I2 C Power Supply Two 460w CRPS PDB...

Page 18: ...14 Reference System Cabling Diagram R2312SC2SHGR 12 x 3 5 HSBP Interposer Board FAN 1 FAN 2 FAN 3 Front Panel I2 C Power Supply Two 750w CRPS PDB...

Page 19: ...This page is intentionally left blank...

Page 20: ...G71872 002...

Reviews: