background image

© Intatec Ltd 2014

4

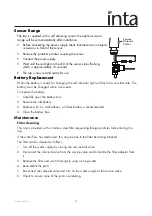
Sensor Range

   The tap is supplied with a self adjusting sensor, the optimum sensor 
   range will be set automatically after installation.

   •    Before connecting the power supply check that there are no objects

         or persons in front of the sensor.

   •    Remove the protective sticker covering the sensor.

   •    Connect the power supply

   •    Wait until the red light on the LED of the sensor stops flashing, 

         which is approximately 10 seconds.

   •    The tap is now set and ready for use.

Battery Replacement

   When the battery is ready for changing the red indicator light will flash at a constant rate. The 
   battery must be changed within two weeks.

   To replace the battery

   1.   Carefully open the battery box.

   2.   Remove the old battery

   3.   Replace with 6 x AA batteries, a lithium battery is recommended.

   4.   Close the battery box.

Maintenance


Filter cleaning

   This tap is provided with a stainless steel filter preventing foreign particles from entering the 
   tap.

   If the water flow has decreased, this may be due to the filter becoming blocked.

   The filter can be cleaned as follows;

   1.   Turn off the water supply by closing the service ball valve.

   2.   Disconnect the solenoid valve from the service valve and dismantle the filter adaptor from 

         it.

   3.   Remove the filter and wash thoroughly using running water.

   4.   Reassemble the parts.

   5.   Re-connect the solenoid valve and turn on the water supply at the service valve.

   6.   Check to ensure none of the joints are leaking.

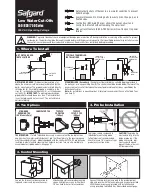
Remove

Protective

Sticker

Summary of Contents for IR120CP

Page 1: ...s possible We cannot accept any responsibility should it be found that in any respect the information is inaccurate or incomplete or becomes so as a result of further developments or otherwise Intatec...

Page 2: ...y box IR120CP Infra red basin mounted tap with electronic transformer IR121CP Check Contents Before commencing remove all components from packaging and check each component with the contents list Ensu...

Page 3: ...high visibility or other reflective clothing To prevent reflection problems it is recommended to keep a minimum distance of 1 5m between the tap and other objects Preparation for installation Flush t...

Page 4: ...occurs Step 4 Connecting the power supply 1 Install the battery box on the wall under the basin using the screws provided or the two sided adhesive foam tape 2 Wait a few seconds before activating the...

Page 5: ...eks To replace the battery 1 Carefully open the battery box 2 Remove the old battery 3 Replace with 6 x AA batteries a lithium battery is recommended 4 Close the battery box Maintenance Filter cleanin...

Page 6: ...covered by a limited warranty for one year from the date of purchase During this period Intatec Ltd undertakes at its option to repair or replace any faults caused by defective material or manufacturi...

Page 7: ...sudden increase in water supply pressure that the check valve or double check valve prevents from dropping even after the water supply pressure falls below 8 bar Connect the electronic unit s connect...

Page 8: ...co uk E O E 10 06 14 To active your product warranty please visit www intatec co uk and click on Product Registration Notes Security Mode If the sensor is covered for more than 90 seconds the tap wil...

Reviews: