background image

www.instone3d.com

7

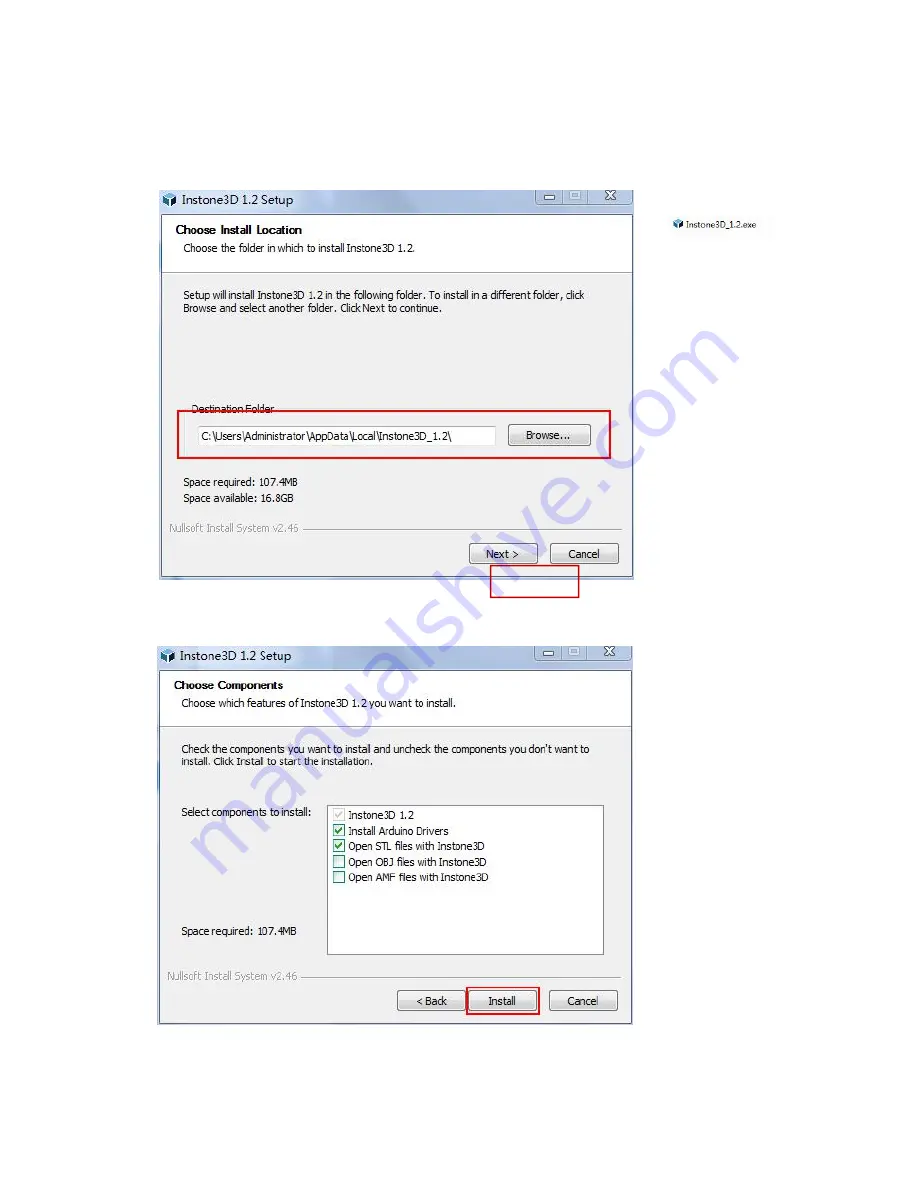
I. Installation and Operating Guide of Slicing

1. Double click the
file

in TF card to enter

software

installation

interface. User can

select installation

catalog in the red

frame, then single

click [Next]

2.Installation

option, Click

[Install] for

installation.

Summary of Contents for EASIER

Page 1: ...www instone3d com Copyright iNSTONE 3D User Manual for Mini 3D Printer ...

Page 2: ...now Well About Software Interface 10 2 Machine Settings 11 3 Load Model File 12 4 Process and Edit Model Files 12 5 Basic Parameter Setting of Slicing 14 6 Senior Parameter Setting of Slicing 15 7 Additional Parameter Setting of Slicing 16 8 Browse slicing file 18 9 Export of slicing file 18 Online Printing and Updating Firmware 20 I Online Printing 20 II Update Firmware 20 Tips 21 Service support...

Page 3: ...eters Name Mini 3D Printer Model EASIER Consumable PLA Printer size 195 210 275mm Build volume 110 110 125mm Printing accuracy 0 1mm Max Printing principle FDM Printing temperature 210 X Y Z axis position accuracy 0 1mm N W 2 4kg G W 4kg ...

Page 4: ...NI 3D Printer 1 Power Adapter 1 Power Cable 1 Printing plate 1 TF card 1 Card Reader 1 Glue Stick 1 PLA Filament 280g 1 Note Once you received the parcel please check all the parts if anything missed contact us sales01 instone3d com ASAP ...

Page 5: ...V Feed 1 Unpack the PLA filament from the package and find out the end of it 2 Bend the head material straightly and trim the end of the material with scissor 3 Press the spring of the extruder by hands then insert the filament from the hole on the bottom of the extruder to the other end of the Feed Pipe until you can t insert anymore Then hang the filament tray on the hook on side of the printer ...

Page 6: ...2 Rotate the knob select the option pause print and press the knob to pause printing IV Continue printing This function is only applicable to continue printing after pausing in condition of continuous power on 1 Press the control knob and the operation menu pops up on the display screen 2 Rotate the knob select the option continue print and press the knob to continue printing V Stop print It is no...

Page 7: ...ou 1 Press the control knob at the home page press the control knob and the main menu pops up on the display screen 2 Rotate the knob select the option heating print head and press the knob to enter into the operation 3 Processing appears on the interface at this time the printer is heating the nozzle and please wait patiently 4 When the heating is finished and the display screen returns back to t...

Page 8: ...and Operating Guide of Slicing 1 Double click the file in TF card to enter software installation interface User can select installation catalog in the red frame then single click Next 2 Installation option Click Install for installation ...

Page 9: ...www instone3d com 8 3 Installation is processing 4 Single click Next to install drive ...

Page 10: ...www instone3d com 9 5 After installing drive single click Finish 6 Single click Next to complete installation ...

Page 11: ...www instone3d com 10 II Use of Slicing Software 1 Understand and Know Well About Software Interface ...

Page 12: ...ave Gcode file Normal X Ray Overhang Layers Rotate Scale Mirror Lay flat To max Mirror X Reset Reset Mirror Y Mirror Z 2 Machine Settings Select corresponding machine for setting click the Machine and select 2Um1 Normal Print as shown in the following picture ...

Page 13: ...file 3 Drag the model file to be opened in the blue region as shown in the picture directly 4 Process and Edit Model Files User can rotate zoom mirror the model according to the demand Rotate model Y axis rotation X axis rotation Z axis rotation Zoom model Single click left key of mouse to select corresponding operation point Operation instruction Single click left key of mouse for selecting corre...

Page 14: ...ey then the menu pops up as shown in the following picture Put the model in the middle of print plate Delete model Copy multiple models quantities can be set manually Split the model into separate component Delete all the models on the platform Reload the model to software initialize Reset the position of all the models Reset the changes of all the models Z axis scale Y axis scale X axis scale Ove...

Page 15: ...t overall speed and usually set as 60 Too high speed results in bad effect of model formation Printing temperature nozzle temperature Usually PLA consumable is set as 200 It depends on the physical property of printing consumables Thermal bed temperature refers to the temperature of printing platform The machine doesn t support platform heating so the parameter is invalid Support Support type thre...

Page 16: ...dhesive force Initial layer line width line width when printing the initial layer Cut off object bottom subsidence model The subsidence part will not be printed Dual extrusion overlap the overlapping length of consumables at the joint when double color nozzle prints Speed Travel speed the movement speed of nozzle in non printing Bottom layer speed the speed of printing the first layer When it is l...

Page 17: ...certain quantity of extrusion before retract Z hop when retracting when starting retract Z axis raises slightly so as to improve the filament drawing Skirt Line count print a round of filament surrounding model at the bottom layer Start distance the distance between the skirt and the first layer of model Minimal length the minimal length of skirt Cool Fan full on at height height triggered when th...

Page 18: ...t prints Base thickness thickness of raft printing Base line width base layer lines width of raft Interface thickness thickness of the interface layer which connected the raft and the model Interface line width line width of interface layer Airgap the gap between the raft and model First layer airgap gap between the last layer of the raft and the first printing layer Surface layers amount of surfa...

Page 19: ...lick Normal to restore normal model view 9 Export of slicing file After completing all the settings please click the button indicated in the following pictures or select file Save GCode to save GCode printing file after slicing if SD card has been inserted to computer the file will be saved to SD card automatically GCode file in the cache Printing time and used quantity Click to save Gcode of fila...

Page 20: ...www instone3d com 19 ...

Page 21: ...n of computer Baud rate AUTO click OK button 4 Icon as shown in the right picture pops up When USB appears above the icon it means successful connection 5 Load model on Instone3D 1 2 software according to the Operation guide in the previous chapter Then set slicing parameter When the software slicing is finished click USB icon the printer starts heating and printing automatically II Update Firmwar...

Page 22: ...2 The TF card attached with the printer has contains some printing models which you can choose for printing please log in www instone3d com to choose more models 3 You can visit www instone3d com to download the slicing software 4 With the quick updates on product versions this guide may not reflect all the characteristics of the product please log in www instone3d com for more updates and support...

Page 23: ...e support YIWU INSTONE 3D TECHNOLOGY CO LTD Website www instone3d com Email support instone3d com Tel 86 579 89986523 Skype Instone 3D Twitter Instone 3D Facebook Instone 3D Addr Bld 2 Area B No E21 Xinke Road Yiwu Zhejiang China ...

Reviews: