background image


USER MANUAL – EN 

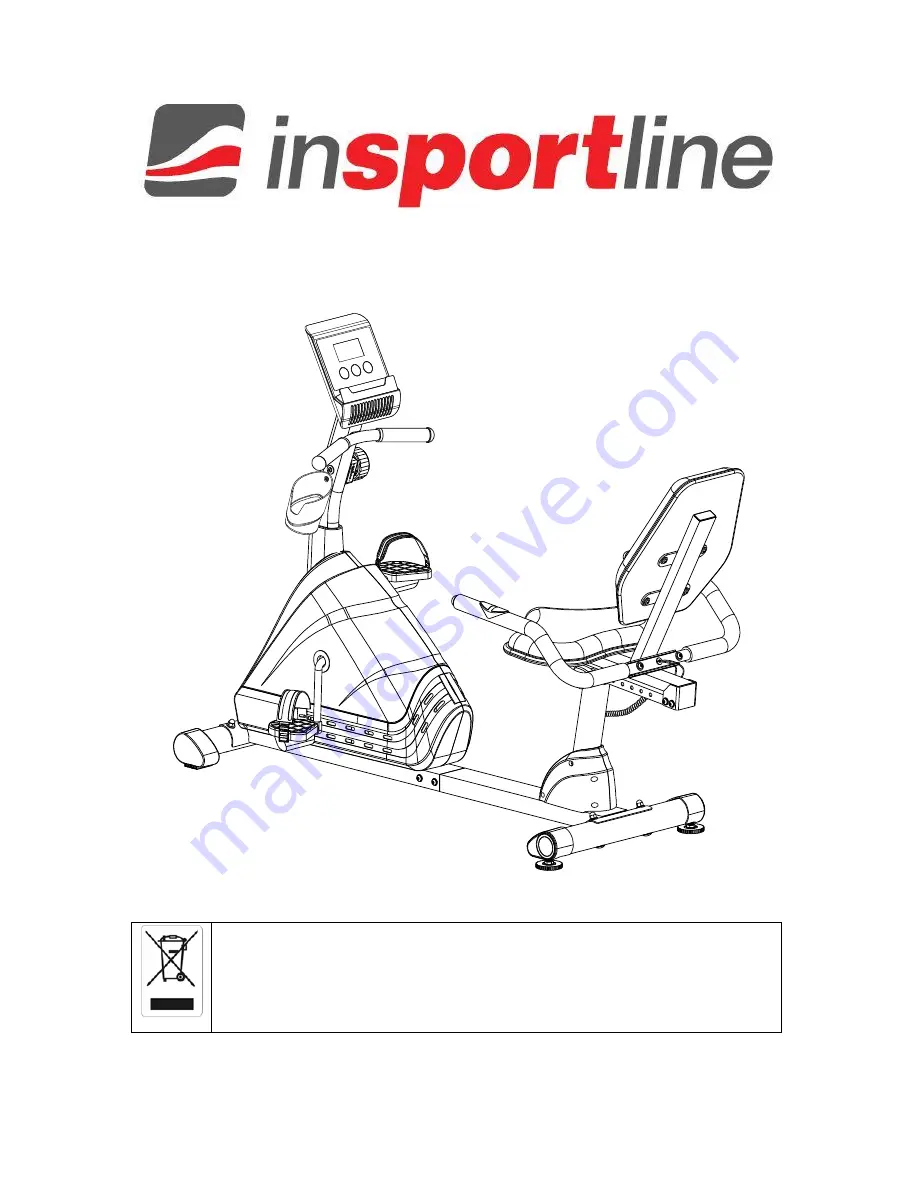
IN 5561 Recumbent inSPORTline Rapid RMB 


IMPORTANT:  Read  all  instructions  carefully  before  using  this  product.  Retain  this 
owner’s manual for future reference. 

The  specifications  of  this  product  may  vary  from  this  photo  and  are  subject  to  change 
without prior notice.                                                                                     


Summary of Contents for IN 5561

Page 1: ...RTline Rapid RMB IMPORTANT Read all instructions carefully before using this product Retain this owner s manual for future reference The specifications of this product may vary from this photo and are...

Page 2: ...HE RECUMBENT BIKE 21 MOUNTING AND DISMOUNTING THE RECUMBENT BIKE 22 OPERATING THE COMPUTER 22 ADJUSTMENTS 24 ADJUSTING THE TENSION CONTROL KNOB 24 ADJUSTING THE ADJUSTABLE LEVELER 24 ADJUSTING THE SEA...

Page 3: ...ult your local dealer 6 Do not use the equipment outdoors 7 This equipment is for household use only It is not a commercial model 8 Only one person at a time should use this equipment 9 If you feel an...

Page 4: ...30X 1 013 Crank 240 1 014 Washer 34 5x 23x25 1 015 Axle Sleeve II 15 16 1 016 Bearing 2 017 Axle Bush 2 018 Axle Sleeve I 7 8 1 019 Nut 7 8 2 020 Flywheel 230 1 021 Front Main Frame 80x40x2 1 022 Lef...

Page 5: ...x1 5 1 052 Seat Sliding Tube 53x23x2 0 1 053 Back and Seat Support Bracket 53x23x2 0 1 054 Handlebar Foam Grip 24x 30x550 2 055 Screw ST4 2x20 2 056 Hand Pulse Sensor with Wire L 750mm 2 057 Bolt M8x4...

Page 6: ...2 075 Adjustable Bolt M6x36 2 076 Screw ST2 9x12 2 077 Big Curve Washer 8 4 078 Spring Washer 6 2 079 U Bracket 2 080 Washer 10x 14x1 2 081 Washer 12x 6x1 1 082 Bolt M6x10 1 083 Water Bottle Holder 1...

Page 7: ...7 OVERVIEW DRAWING...

Page 8: ...8 ASSEMBLY INSTRUCTIONS STEP 1 Remove two M8x30 Bolts 45 four M8x15 Bolts 72 and six 8 Washers 36 from the Rear Main Frame 46 Remove bolts with the Allen Wrench provided...

Page 9: ...r Main Frame 46 to the Extension Hand Pulse Sensor Wires 70 from the Front Main Frame 21 Attach the Rear Main Frame 46 into the Front Main Frame 21 with two M8x30 Bolts 45 four M8x15 Bolts 72 and six...

Page 10: ...e Front Main Frame 21 and align bolt holes Attach the Front Stabilizer 2 onto the front curve of the Front Main Frame 21 with two M8x70 Bolts 6 two 8 Big Curve Washers 77 and two M8 Cap Nuts 3 Tighten...

Page 11: ...adjust height then tighten the M10 Nuts 66 after adjustment Position the Rear Stabilizer 64 behind the Rear Main Frame 46 and align bolt holes Attach the Rear Stabilizer 64 onto the rear curve of the...

Page 12: ...12 STEP 5 Remove one 8 Curve Washer 4 one M8x15 Bolt 72 four M8x10 Bolts 35 and four 8 Washers 36 from the Front Main Frame 21 Remove bolts with the Allen Wrench provided...

Page 13: ...31 through into the bottom hole of Front Handlebar Post 34 and pull it out from the square hole of Front Handlebar Post 34 Connect the Sensor Wire 71 and Extension Hand Pulse Sensor Wires 70 from the...

Page 14: ...of the Front Main Frame 21 and secure with one 8 Curve Washer 4 one M8x15 Bolt 72 four M8x10 Bolts 35 and four 8 Washers 36 that were removed Tighten bolts with the Allen Wrench provided Slide the Fro...

Page 15: ...orce it into the slot of metal bracket of Tension Cable 31 see Figure B Insert the metal fitting on the resistance cable of Tension Control Knob 30 into the hole at the end of the slot in the metal br...

Page 16: ...ovided Attach the Water Bottle Holder 83 onto the Front Handlebar Post 34 with two M5x15 Bolts 84 that were removed Tighten bolts with the Multi Hex Tool with Phillips Screwdriver provided STEP 10 Rem...

Page 17: ...2 into the Bushings 61 of the Rear Main Frame 46 STEP 12 Attach the Seat Sliding Tube 52 to the Back and Seat Support Bracket 53 with eight 8 Washers 36 and eight M8x15 Bolts 72 that were removed Tigh...

Page 18: ...o tighten STEP 14 Attach the Handlebar 68 onto the Back and Seat Support Bracket 53 with two M8x45 Bolts 57 two 8 Curve Washers 4 two 8 Washers 36 and two M8 Cap Nuts 3 Tighten bolts and cap nuts with...

Page 19: ...Washers 50 that were removed Tighten bolts with the Multi Hex Tool with Phillips Screwdriver provided STEP 16 Remove four M6x15 Bolts 49 and four 6 Washers 50 from the back of the Back Cushion 48 Then...

Page 20: ...he Left Foot Pedal Strap 69 onto the Left Foot Pedal 69 STEP 18 Insert the pedal shaft of Left Foot Pedal 69 into threaded hole in the left Crank 13 Turn the pedal shaft by hand in the counter clockwi...

Page 21: ...r legs should extend almost fully keeping a small bend in the knee Step on the both pedals When pedaling do not lock out your knees at the bottom of the pedaling motion there should be a slight bend i...

Page 22: ...ed by pressing the buttons or by pedaling If you leave the equipment idle for approximate 4 minutes the power will turn off automatically BUTTON FUNCTIONS MODE Press the MODE button to select each com...

Page 23: ...utton to change the calories Press the RESET button to clear the target calories to zero The pre set target calories range is from 0 0 to 999 0 calories Once you pre set target calories and then start...

Page 24: ...n the round knob in a counterclockwise direction until it can be pulled out Pull out the round knob and then slide the back and seat support bracket back or forth direction to the suitable position Lo...

Page 25: ...eries are correctly positioned and battery springs are in proper contact with batteries 3 The batteries in the computer console may be dead Replace with new batteries There is no heart rate reading or...

Page 26: ...ing and letting your mouth open Rotate your head to the left for one count then drop your head to your chest for one count SHOULDER LIFTS Lift your right shoulder toward your ear for one count Then li...

Page 27: ...on the floor then bend the left leg and lean forward by moving your hips toward the wall Hold then repeat on the other side for 15 counts TERMS AND CONDITIONS OF WARRANTY WARRANTY CLAIMS General Condi...

Page 28: ...vered by the Seller immediately after taking the responsibility for the Goods and its damages i e immediately after its delivery The Buyer must check the Goods so that he discovers all the defects tha...

Page 29: ...ranty Service Centre Cermenska 486 749 01 Vitkov Czech Republic CRN 26847264 VAT ID CZ26847264 Phone 420 556 300 970 E mail eshop insportline cz reklamace insportline cz servis insportline cz Web www...

Reviews: