
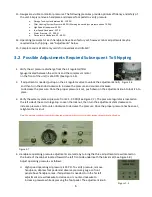


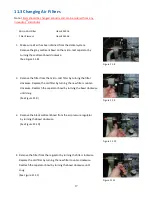
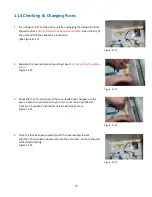


11
5.
KLAW™
Veterinary Ultrasonic Tips
5.1
KLAW
™
Tip Installation
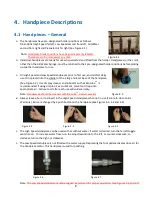
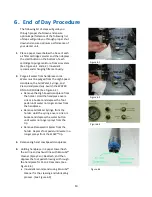
Your Veterinary Dental Cart includes three KLAW
™
tips; KLAW
™
1, KLAW
™
4 and
KLAW
™
6. To install a tip on the handpiece; hold the handpiece in one hand, place
the KLAW
™
tip on the end of the threaded shaft and then rotate the tip to the right
until it is finger tight. The tip wrench must be used to tighten the KLAW
™
until
snug to assure proper operation of the scaler (See Figure 5.1).
Note:
Do not over tighten KLAW
™
tip this may cause breakage of the handpiece stud.
5.2
KLAW
™
Tip Technique
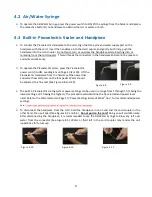
Figure 5.1
It is very important to use a feather light touch with the tips. Too much pressure can cause damage to the
KLAW
™
as well as the patient
’
s teeth. The KLAW
™
tip and the Piezoelectric scaler will do the work, it is not
necessary to apply pressure or push down. You will get great results by simply using a light paint brush stroke
with the side of the tip, gently guiding the handpiece and tip, using the same pressure as if writing with a pencil
or similar to periodontal probing
.
5.3
Power Settings & Use of KLAW™ Tips
Tip #
Power
Setting
Use
1
4-6
Universal small scaler designed for root surfaces and sub-gingival
curettage.
Note:
If used on cats or small dogs start of with power setting of 2 and adjust as needed.
2
2-3
Delicate finishing tip excellent for cats and small dogs. Left 30° angle for
difficult to reach surfaces. Recommended for R mandibular buccal
surfaces, L mandibular lingual surfaces, L maxillary buccal surfaces and
R maxillary lingual surfaces. Not for heavy calculus. Use a very light
touch.
Note:
If used on cats or small dogs start of with power setting of 2 and adjust as needed.
3
2-3
Delicate finishing tip excellent for cats and small dogs. Version of #2.
Right 30° angle tip for difficult to reach surfaces. Recommended for L
mandibular buccal surfaces, L maxillary lingual surfaces, R mandibular
lingual surfaces and R maxillary buccal surfaces. Use a very light touch.
Note:
If used on cats or small dogs start of with power setting of 2 and adjust as needed.
4
4-6
Universal tapered tip, with a 110° angle. Ideal for all surfaces, especially
inter-dental spaces and root scaling. The #4 tip can also be used for flushing
pockets.
Note:
If used on cats or small dogs start of with power setting of 2 and adjust as needed.
6
6-8
Longer shaft version of #4, with a wider diameter and knurled tip for more
aggressive removal of heavy calculus.
Note:
If used on cats or small dogs start of with power setting of 2 and adjust as needed.
•
KLAW
™
1, KLAW
™
4 and KLAW
™
6 are the most commonly used.
Warning:
Turn power to Piezoelectric Scaler off when changing KLAW
™
. If the foot pedal is accidentally
depressed while the power is on and attaching a tip, the tip could break.