background image

Revised Version/ March 2007 


User Manual


Copyright © 2007 
InnoTeletek, Inc. 

54

  5.5.11 Connecting to GPRS Network   


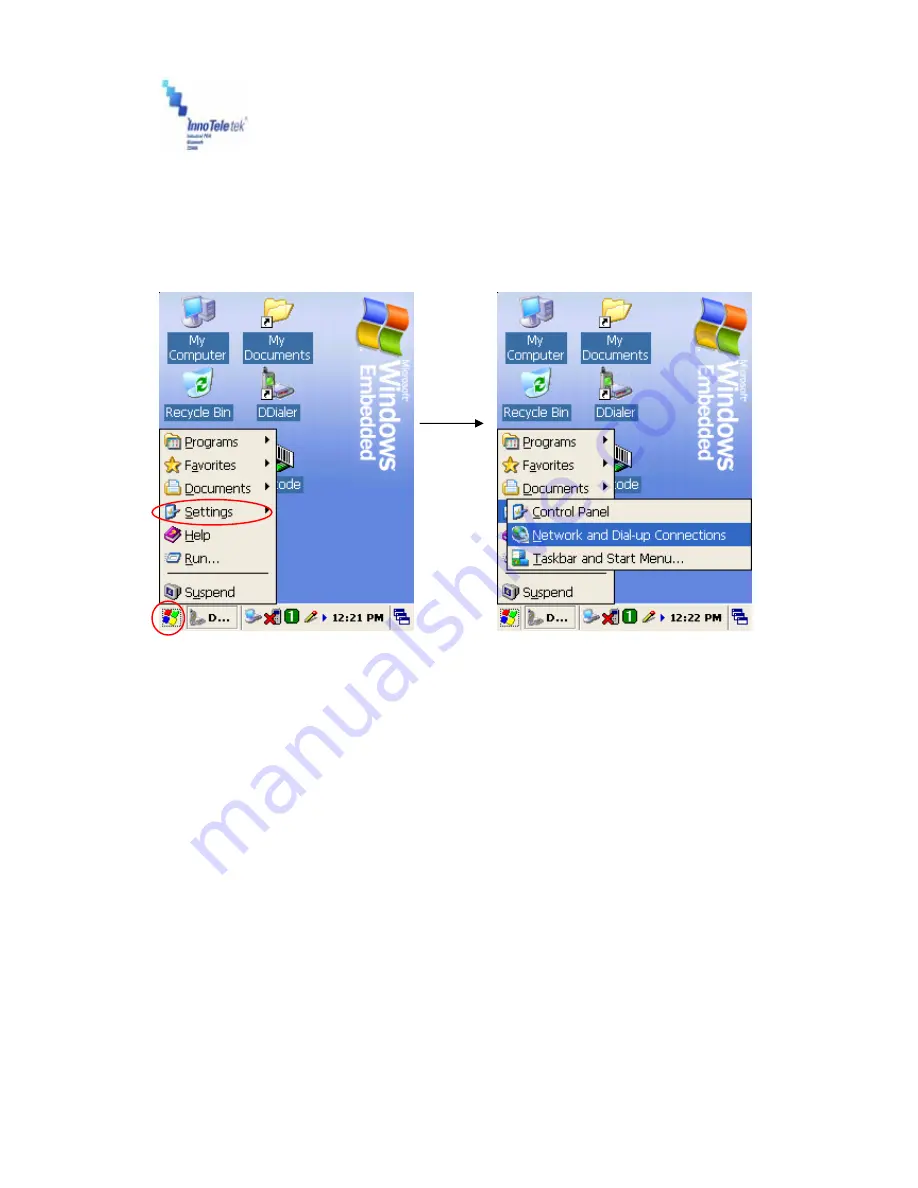
To establish a new GPRS network, you should set the Access Point Name (APN) first. After 

having it done press APN press APN Set and Save icon. 


Picture 72

 Settings tab on the Start Menu 


Picture 73

 Network Connections tab 


Summary of Contents for OPTIMUS SP5700 SERIES

Page 1: ...Revised Version March 2007 User Manual Copyright 2007 InnoTeletek Inc 1 OPTIMUS PDA SP5700 SERIES Manual Revised Version October 2006 InnoTeletek Inc ...

Page 2: ... designed to provide reasonable protection against harmful interference in a residential installation This equipment generates uses and can radiate radio frequency energy and if not installed and used in accordance with the instructions may cause harmful interference to radio communications However there is no guarantee that interference will not occur in a particular installation If this equipmen...

Page 3: ...FCC regulations Do not use the phone with a damaged antenna If a damaged antenna comes into contact with the skin a minor burn may result Please contact your local dealer for replacement antenna Body worn Operation This device was tested for typical body worn operations with the back of the phone kept 0 59 inches 1 5 cm from the body To comply with FCC RF exposure requirements a minimum separation...

Page 4: ...4 2 Calibrating the Screen 16 4 3 Resetting 17 4 3 1 Performing a Soft Reset 17 4 3 2 Performing a Hard Reset 18 5 Applications 19 5 1 Creating Documents 19 5 2 Barcode Scanning 25 5 2 1 Laser Scan Engine 25 5 2 2 Image Scan Engine 27 5 3 Connecting with a Desktop 29 5 3 1 Installing ActiveSync on a Desktop 25 5 3 2 Setting up a partnership 25 5 4 Wireless LAN 33 5 5 GSM GPRS 36 5 5 1 Initializing...

Page 5: ... Charging process 11 Picture 4 Battery cover 12 Picture 5 Power button 13 Picture 6 Desktop background 13 Picture 7 Power setting from the Control Panel 14 Picture 8 Calibration screen 16 Picture 9 Calibration settings completion 17 Picture 10 Power and Enter buttons 17 Picture 11 Reset button location 18 Picture 12 WordPad shortcut 20 Picture 13 New Document display 20 Picture 14 Drop down menu a...

Page 6: ...ess 33 Picture 35 IP address and server address assignation 34 Picture 36 Network connection icon 35 Picture 37 Connection status 35 Picture 38 Running DDialer from the desktop 36 Picture 39 Open DDialer display 36 Picture 40 Signal strength 37 Picture 41 Connection quality 37 Picture 42 Operating mode 37 Picture 43 Request for SIM card insertion 38 Picture 44 Emergency calls available 38 Picture ...

Page 7: ...ture 65 Phonebook content 46 Picture 66 Management of phonebook numbers 47 Picture 67 Tracking history records 48 Picture 68 Sound configurations 49 Picture 69 Network advanced settings 50 Picture 70 Connection to network using manual mode 51 Picture 71 Locking menu values 52 Picture 72 Settings on the Start Menu 53 Picture 73 Network Connections tab 53 Picture 74 GPRS icon 54 Picture 75 Dial up c...

Page 8: ...ST PROFITS CAUSED BY UNEXPECTED RESULTS CONCERNED WITH OMISSIONS AND THE EDITING OF THIS MANUAL THE MATERIAL IN THIS MANUAL IS SUBJET TO CHANGE TO IMPROVE RELIABILITY FUNCION OR DESIGN WITHOUT NOTICE The law protects all programs and the rights Without the permission from InnoTeletek no right to copy quote or translate this manual in whole or in part is granted except as permitted under copyright ...

Page 9: ...from temperature extremes Do not leave it on the dashboard of a car on a hot day and keep it away from heat sources Otherwise it may cause malfunction or data stored in your terminal may be lost 2 The PDA is durably made to withstand the 1 5m dropping test The touch sensitive screen of PDA is made of glass Therefore avoid dropping your terminal or expose screen display to strong impacts Otherwise ...

Page 10: ...1 TERMINAL CASE 1 STYLUS 1 The cradle box should contain optional ONE SLOT CRADLE 1 USB SYNCH CABLE 1 ADAPTER 1 POWER CORD 1 In plastic bag In case when there are damaged units or missed parts call the local agent or distributor immediately If the problem cannot be solved instantly you should return the PDA to the local agent or distributor However InnoTeletek is not liable for any damages that oc...

Page 11: ...IMUS PDA SP5700 SERIES General view Picture 1 Front and left side view 1 Indicator LED Charging Operation 2 Antenna for Wi Fi GSM 3 USB Host connector 4 Speaker 5 Scan Trigger 6 4 Way Navigation Pad 7 Power Button 8 Send End Buttons for WWAN 9 Numeric Key Pad 10 Keypad Backlight Button ...

Page 12: ...00 SERIES into the cradle and charge it Note When you are going to charge the PDA for the first time do not you remove the battery before it is fully charged as it may cause malfunction To ensure the quickest recharge time turn the PDA into a sleep mode To charge the battery Connect the cradle to the power supply source Slide your PDA into the cradle until red LED lights up To charge spare battery...

Page 13: ...ved or discharged If the PDA remains without the main battery for more than 1 hour the backup battery discharges It is highly recommended to replace the main battery within 10 minutes or keep charging the battery when the PDA is inserted in the cradle Otherwise your data may be lost CAUTION RISK OF EXPLOSION IF BATTERY IS REPLACED BY AN INCORRECT TYPE DISPOSE OF USED BATTERIES ACCORDING TO THE NAT...

Page 14: ...cture 4 Battery cover Insert the battery in the compartment in accordance with its correct positioning Ensure that the top of the battery adhere to the place first and then you can fix its bottom To close the compartment slide the cover on the right direction and lock the hook ...

Page 15: ...button to turn the PDA on If you press and then hold the Power button for about 3 seconds PDA switches into sleep mode and turns off Picture 5 Power button When the booting process is finished Windows logo will be displayed on a desktop as illustrated below Picture 6 Desktop background If the Power button does not activate your PDA you should execute a hard reset For ...

Page 16: ...ap Suspend on the start menu It is possible to set your terminal to auto suspend status or to auto turn off after specified period of time what will allow you to save the battery s power Power setting method Tap Start Settings Control Panel Double tap the Power button and select Schemes Tab Picture 7 Power setting from the control panel It is recommended to remove the battery from the PDA when it ...

Page 17: ...ower button When the system wakes up the screen will display the same view displayed before sleep mode 3 2 LCD Display 1 To save battery power it is recommended to change the backlight settings Tap Start Settings Control Panel then Double tap Display 2 Press Backlight tab and select required option 3 3 Volume Sounds To change sounds and the volume tap Start Settings Control Panel then double tap V...

Page 18: ... intended for use with the PDA touch screen Never use a pen pencil or other sharp pointers on the surface of the MC5000 OPTIMUS PDA SP5700 SERIES screen 3 Do not let children to play with the stylus Contact with the end edge may cause injury Please keep the PDA away from children 4 2 Calibrating the Screen When you tap with the stylus and programs or functions are not activated correctly you shoul...

Page 19: ...ved To perform a hard reset press Reset Button located on the right side above the Battery Cover Picture 10 Reset buttons Note Soft reset restarts MC5000 OPTIMUS PDA SP5700 SERIES and saves all stored records 4 3 2 Performing a Hard Reset By executing hard reset formats preferences date time and other settings are restored to their factory default values To perform a soft reset press reset button ...

Page 20: ... but also erases all stored records and entries in RAM Therefore perform a hard reset only in cases when a soft reset mode does not work BE CAREFUL WHEN YOU PERFORM A HARD RESET SEVERAL TIMES CONSECUTIVELY WITHIN SHORT PERIOD OF TIME IT MAY CAUSE THE SCREEN TO BECOME BLANK ACCOMANIED BY VERTICAL LINES DISPLAY ON IT ...

Page 21: ...0 OPTIMUS PDA SP5700 SERIES Data files and document uploads downloads between PDA and computer are controlled by the Microsoft ActiveSync software There are two ways to enter characters into the document using document editing programs Using the keyboard Using the handwriting recognition program Detailed method for making documents with each of the above mentioned methods are as follows Microsoft ...

Page 22: ...ut from the screen runs Microsoft WordPad the document editing program The below illustrated pictures demonstrate how to use the screen shortcut for activating WordPad By double tapping on the Microsoft WordPad icon Picture 12 the display of opened Microsoft WordPad processor will appear Picture 13 Picture 12 WordPad shortcut Picture 13 New Document display ...

Page 23: ...icture 14 Keyboard Icon Picture 15 Keyboard Panel When the keyboard display appears on the lower part of the screen tap the buttons with characters to enter text into your document Note You can also use the PDA s keypad to input characters The keypad is a numeric so that also recognizes the numbers 0 9 The keypad is color coded to indicate particular actions that are taken when the Shift key is be...

Page 24: ...007 InnoTeletek Inc 23 2 Using the character recognition program Open Microsoft WordPad the document editing program Tap on the icon located at the bottom of the screen Then options will appear Select Picture 16 Character recognition program selection ...

Page 25: ...nition modes Picture 17 Screen boxes recognition Mode Conversion Input Ctrl A shortcut key applied with Ctrl character e g writing S in the Ctrl field calls the save file dialogue box in the same way as in case of pressing simultaneously Ctrl S for the keyboard To display full screen mode for writing tap on the shaped button located on the right side of the application circled area on the Picture ...

Page 26: ...re 19 Split screen mode In order to split window tap the shaped button on the bottom menu bar at the full screen mode Now upper part of the display located above the red arrows circled in blue on the picture below is for capital letters input space and the lower part of the screen is designated for small letters input ...

Page 27: ...anning program from the shortcut on the screen Picture 20 Barcode scan Test 2 Place the scanner in alignment to the direction of a barcode and press one of trigger buttons Let RED laser beam line cover the barcode DO NOT KEEP THE SCAN BUTTON PRESSED TOO LONG IT MAY RESULT IN SCAN ENGINE FAILURE OR MALFUNCTIONING Picture 21 Barcode scanning ...

Page 28: ...ow Picture 22 Scanning result Picture 23 Barcode selection list 4 In order to accelerate decoding process you can disable imaging Click Options button from the menu bar and unmark the Enable Image command 5 Readable codes z Linear Symbologies Codabar Code 11 Code 128 Code 39 Code 93 EAN 8 EAN 13 Interleaved 2 of 5 ISBT 128 MSI Reduced Space Symbology Straight 2 of 5 IATA UPC A UPC E UPC E1 ...

Page 29: ...barcode position and press one of trigger buttons Let Green laser beam line cover the barcode DO NOT KEEP THE SCAN BUTTON PRESSED TOO LONG IT MAY RESULT IN SCAN FAILURE OR DEVICE MALFUNCTION 3 A short beep will indicate successful decoding And the result will be displayed appears in the scan window 4 In order to accelerate decoding process disable imaging by using the Option menu Using stylus tap ...

Page 30: ...2 of 5 ISBT 128 MSI Reduced Space Symbology Straight 2 of 5 IATA UPC A UPC E UPC E1 z Stacked Symbologies Codablock F Code 49 EAN UCC Composite Micro PDF417 PDF 417 TCIF Linked Code 39 TLC39 z 2D Matrix Symbologies Aztec Code Aztec Mesa Data Matrix MaxiCode QR Code z Postal Symbologies Australian Post British Post Canadian Post Japanese Post KIX Netherlands Post Planet Code Postnet z OCR Fonts OCR...

Page 31: ... SP5700 SERIES into the cradle activates a Microsoft ActiveSync window which appears on the desktop and indicates the synchronization status 5 3 1 Installing ActiveSync on a Desktop Insert the ActiveSync CD in the CD ROM drive The installation manager will lead you quickly through the installation process You can also download the latest version of the software from Microsoft Corporation website a...

Page 32: ...le which is connected to the desktop computer by a USB or RS232 cable Then the screen will display a window indicating that the PDA is being connected Picture 27 Connection process The desktop computer and your PDA will attempt to synchronize As a result the partnership window appears Tap on Yes button and then select Next Picture 28 Partnership set up window ...

Page 33: ...ttings Window appears Here select the items you want to synchronize and then press the Next button Picture 29 Synchronization options To complete the process select the Finish button Then the basic settings and configuration for a PC and the PDA connection will be established Picture 30 Setup completion ...

Page 34: ...rch 2007 User Manual Copyright 2007 InnoTeletek Inc 33 Go through the earlier steps to run ActiveSync Picture 31 Synchronization process At the end the window informs that synchronization has been successfully completed ...

Page 35: ...must be set up in accordance with the equipment specification including Hotspot that is required to access the wireless LAN To meet these needs MC5000 OPTIMUS PDA SP5700 SERIES must be properly configured Select Start Settings Control Panel and then double tap Network and Dial up Connections icon Picture 33 Network and Dial up Connections icon Select an appropriate driver to add the Wireless LAN c...

Page 36: ...DHCP server does not assign static IP addresses Static IP i Select Start Settings Control Panel then double tap Network and Dial up Connections ii Select relevant driver to add Wireless LAN card For example this unit is equipped with CISCO product iii Select the IP Address tab and then point one the Specify an IP address radio button Enter the IP Address Subnet Mask and Default Gateway data iv Pre...

Page 37: ...ormation tab The Signal Strength is indicated as Very Good or Good etc Picture 36 Network connection icon Picture 37 Connection status v Select the IP Information tab and make sure that the static IP address data has been entered correctly Note The IP address data is not lost when a soft reset is performed However it should be re entered again if a hard reset has been executed ...

Page 38: ...ion a user needs to specify Access Point Name APN user name and password and very often IP address all provided by the network operator 5 5 1 Initializing the Modem Picture 38 Running DDialer from the desktop Picture 39 Open DDialer display When PDA startup the DDialer is activated automatically and initializes GSM Module When initialization is under process you can observe the following icons in ...

Page 39: ...a and signal icon indicates GSM or DCS signal strength as follows Found signals only Found signals and identified an operator Service area not available Picture 42 Operating mode You can switch on off GSM module by pressing END button on the screen for a while After turning GSM function off you will notice a display of Modem Off message ...

Page 40: ...ne User Interface starts the program checks stored SIM data The SIM card requires PIN information and to enter it you should precede in accordance with the method depicted on the Pictures 45 and 46 Picture 43 Request for SIM card insertion Picture 44 Availability of emergency calls Picture 45 Request for PIN Picture 46 Entering PIN data ...

Page 41: ...Mid Full Ear volume status Min Mid Max SMS memory status No unread messages Single unread message Many unread messages SIM card is full or in test mode UI lock indicator Mode status UI Menu Phonebook History Message selection Phone setting menu Sound Network Version Message Locking PIN Menu Setting Display window status Modem status Signal strength Keyboard icon ...

Page 42: ...Teletek Inc 41 1 Phone Setting Menu Picture 48 Phone setup options 2 Setup options By tapping items from Phone Setting Menu you can open sound network SMS lock and version info setup windows Picture 49 Sound setup Picture 50 Network setup Picture 51 SMS setup ...

Page 43: ... To change phonebook check out history and mailbox settings tap on selected item on UI menu drop down list Picture 54 User Interface functions Picture 55 History record Picture 56 Phonebook Picture 57 Mailbox A Call Log Views call log and history B Phone Book Displays list of callers and along with their names and respective phone numbers ...

Page 44: ...ce call 4 1 Voice Dialing Getting If you want to make a call you should use the key pad or LCD touch screen driven panel Picture 58 Touch screen keypad 4 Voice call Use the keypad Send End number keys or touch screen LCD 5 Volume control Navigate through the 4 way direction key pad Up Down Picture 59 Keyboard ...

Page 45: ...ight 2007 InnoTeletek Inc 44 5 5 5 Short Message Service Reading Stored SMS texts Picture 60 Mailbox display Stored Message List Encoding types 7 bit 8 bit UCS2 Phone number field Message forwarding button Unread message Read message Sent message ...

Page 46: ...dows Tap on the icon to write a message In the Blue Box write a message by using Character recognition program or PDA s keypad Press Send Message button to initiate transmission process Select an appropriate encoding program Among SMS encoding options are 7bit standard 8bit standard and UCS2 Unicode16 Delete message icon ...

Page 47: ...ek Inc 46 Picture 62 SMS encoding program selection Picture 63 Editing text and addressing SMS The Char button displays GSM 7bit Character and symbol list The button displays address book s contents After writing a message send SMS text by pressing the Send button ...

Page 48: ...ber Picture 64 Adding a new contact Tap on the icon to add a new address 16 Enter phone number and other information into the Address Detail window 17 Specify a Quick Dial number or select primary phone number among cellular home and office phones Slide for Up Down viewing the whole list Picture 65 Phonebook content ...

Page 49: ...ting Phone Numbers Picture 66 Management of phonebook numbers Edit PhoneBook Select phone number When the Address Detail screen appears update phone number information delete selected item or save changes by tapping the icon Dial to Send SMS to Update Changes Delete Phone Number ...

Page 50: ...rch 2007 User Manual Copyright 2007 InnoTeletek Inc 49 5 5 7 History Picture 67 Tracking history records Missed call Sent call Received call Save to the PhoneBook Delete indicated items This button deletes history record ...

Page 51: ...k Inc 50 5 5 8 Sound Settings Picture 68 Sound configurations Thanks to this screen configuration tools you can change Ring Sound Message Notification Sound Connect HO Sound and Network Register Sound Hang Up and Network Unregister Sound and other volume parameters ...

Page 52: ...tting a Wireless Network Picture 69 Network advanced settings When filling in this field you will set a name for PhoneUI front screen In this example we use for InnoTeletek PhoneUI Access Point Name for GPRS Select Network Menu Operator PLMN Automatic Selection is set up as default ...

Page 53: ...re 70 Connecting to network in manual mode By selecting manual Operator mode the system will be searching operators Connected Unknown Available Forbidden Highlighted icon indicates status of the operators While pointing at Display by MCC MNC Number you will see the MCC MNC value ...

Page 54: ...right 2007 InnoTeletek Inc 53 5 5 10 How to Lock the Menu Picture 71 Locking menu values 1 Input your PIN number 2 Select PIN option check box 3 Press tab Input PIN information If you selected Change PIN Number option Select PIN option check box ...

Page 55: ...letek Inc 54 5 5 11 Connecting to GPRS Network To establish a new GPRS network you should set the Access Point Name APN first After having it done press APN press APN Set and Save icon Picture 72 Settings tab on the Start Menu Picture 73 Network Connections tab ...

Page 56: ...007 InnoTeletek Inc 55 Picture 74 GPRS icon Picture 75 Dial up connection window Then run the GPRS connecting program according to the following method Tap Start Settings Network and Dial up Connections Double tap the GPRS button and press Connect tab ...

Page 57: ... while being charged Battery does not charge I O connector is not clean Clean up the I O connector PDA is not powered on Press the Power button Characters on display are invisible Battery is not charged Charge the battery IP error Fix the static IP address Communication failure with IrDA printer IP crash Check whether more than two users work under the same static IP address The stylus pen does no...

Page 58: ...igned with a barcode Angle the barcode at 45 degrees or place scan beam against a barcode to use direct rays OPTIMUS_PDA was removed from cradle during communication process Insert you PDA into the cradle again Incorrect cable con figuration Verify cable genuineness and check the status of connection ActiveSync is incorrectly installed or configured Install the ActiveSync program again ActiveSync ...

Page 59: ...to change without prior notice 7 2 Performance CPU Intel XScale PXA270 microprocessor 520MHz Operating System Microsoft Windows CETM 5 0 Memory ROM RAM Flash ROM 128 MB SDRAM 128 MB Display 3 5 TFT Color LCD Transflective Type Resolution 240 x 320 pixels Standard Communications RS232 USB v1 1 Host Client IrDA v1 2 Sound MIC and Speaker Water proof Internal Microphone and Speaker for Voice Recorder...

Page 60: ... any product from which the serial number has been removed damaged or rendered defective a as a result of accident misuse abuse or other external causes b by operation outside the usage parameters stated in the user documentation that shipped with the product c by the use of parts not manufactured or sold by InnoTeletek or d by modification or service by anyone other than i InnoTeletek ii a InnoTe...

Page 61: ...ed AS IS However non InnoTeletek manufacturers suppliers or publishers may provide their own warranties directly to you Warranty Period The warranty period for this product is one 1 year from the date of product purchase This warranty does not extent to expendable parts Types of Warranty Service If your product needs service call the InnoTeletek After sales Service Dept in your country or state at...

Page 62: ...k com or call at 82 2 2059 8741 9 Customer Care Information InnoTeletek Inc 461 25 Junmin Dong Yusung Gu Daejon Republic of Korea 305 811 Tel 82 0 2 2059 8741 Fax 82 0 2 2059 8733 E mail service innoteletek com Information in this document is subject to change without notice Innoteletek Inc reserves the rights to make improvements in the product described in this manual at any time and without not...

Reviews: