background image

DE


INSTRUCTION MANUAL INNO

PICCO

 | 15

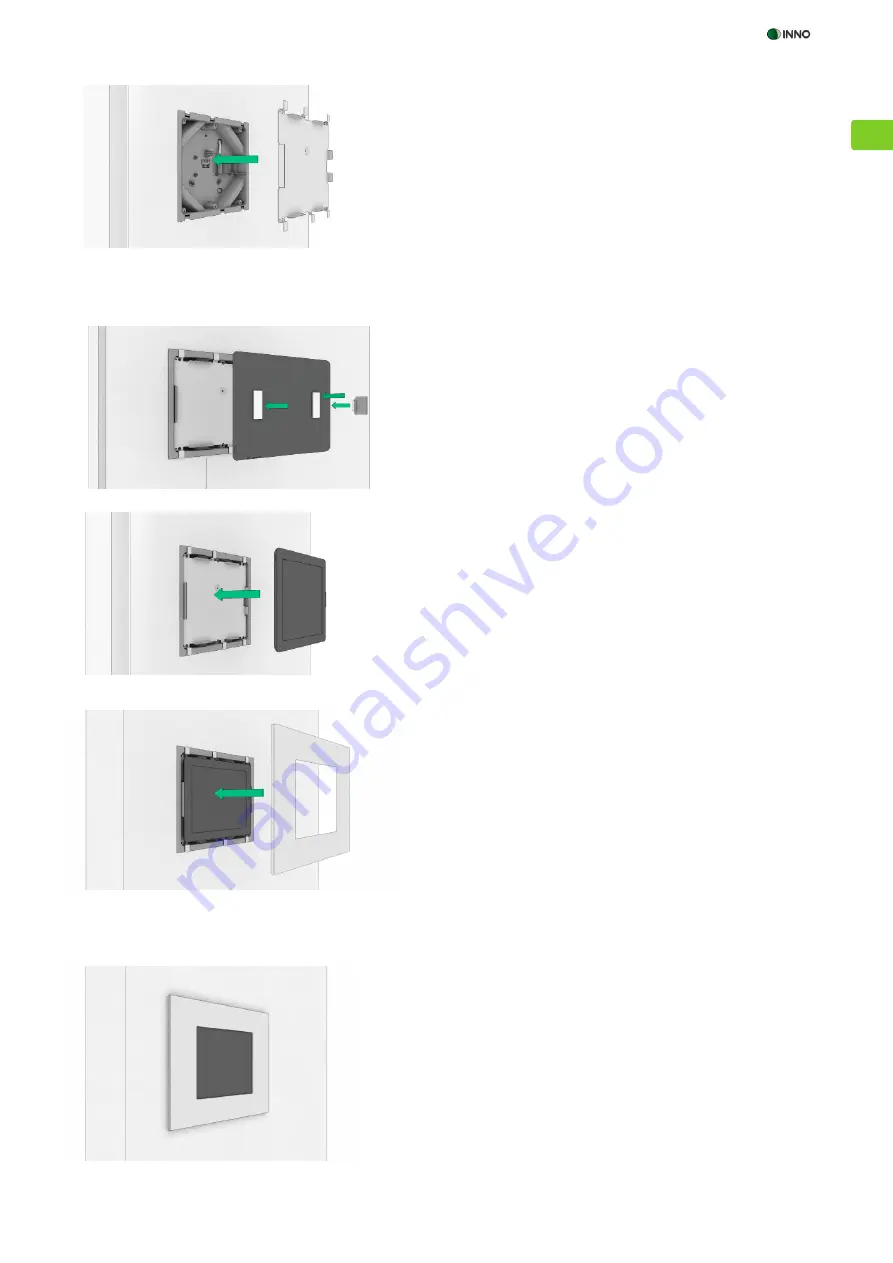
Figure 9

 Figure 10

Figure 11

6.4 FIXING THE IPAD™*

/

** / IPAD MINI™*

/

** AND DECORATIVE FRAME

*Trademark notice: iPad™ and iPad Mini

TM   

are trademarks of Apple Inc., registered in the U.S. and other countries. 

**Not included in the scope of delivery.

6.5 TURNING ON THE INNO

PICCO

9.  When using the iPad Mini

TM

* connect the Lightning charging cable of 

your iPad (not included in the scope of delivery) to the USB adapter of 
the pre-assembled power supply unit in the installation box.  Take the 
Lightning charging cable out of the installation box on the right side of 
the metal frame. Take care not to damage the Lightning charging cable. 

10.  Fit the metal support correctly into the recesses in the installation box 

and fix it with the center stop screw to the corresponding holders. Fix 
the metal support to the installation box with the remaining 4 stop 
screws. (Fig. 9)

1.  Take the magnetic adhesive foils from the packaging. Unpeel the protec-

tive foil from the adhesive area of the magnetic adhesive foil and stick it 
to the rear of the iPad™* /iPad Mini

TM

*(Fig. 10). 

2.  When using the iPad

TM

* plug the connection board into the iPad™* do-

cking connector with the circuit board facing to the rear (Fig. 10).Care- 
fully push the iPad™* into the installation box guide with the connection 
board circuit facing forward until it is flush and the magnetic adhesive 
foil on the rear of the iPad™* sticks to the metal support (Fig. 11).

  When using the iPad Mini

TM

* put the Lightning charging cable into the 

iPad Mini

TM

* docking connector. Carefully place the iPad Mini™* to the 

metal support until it is flush and the magnetic adhesive foil on the rear 
of the iPad Mini™* sticks to the metal support (Fig. 11).

3.  Clean the iPad™* display with the INNO cleaning cloth enclosed.  
4.  Carefully take the decorative frame out of the packaging and position 

the decorative frame exactly on top of the metal support (Fig. 11). 

5.  Carefully place the decorative frame onto the metal carrier along the ad-

justers until the magnets on the rear of the frame stick solidly to the 
plate (Fig. 12).

Figure 12

1.  Turn on the power supply.

2.  Turn on the iPad™* / iPad Mini

TM

* and apply the required settings.

Please refer to the manufacturers‘ operating manuals for details on           
operating the iPad™*/ iPad Mini

TM

* and installed apps. 

Summary of Contents for Picco

Page 1: ...AD UND DAS IPAD MINI Trademark notice iPad and iPad MiniTM are trademarks of Apple Inc registered in the U S and other countries BEDIENUNGSANLEITUNG INNOPICCO IN WALL SYSTEM SOLUTIONS FOR IPAD AND THE...

Page 2: ...des INNOPICCO sicher dass am Installationsort alle stromf hrenden Kabel von der Spannungsversorgung getrennt sind Das INNOPICCO ist f r den Betrieb in folgenden Spannungsbereichen ausgelegt 100 240 V...

Page 3: ...rten Haltemagneten 5 Arretierungsschraube M3 x 8 DIN 7500 Form C f r Metalltr ger 3 Gewindeschraube M3 x 8 DIN 7985 ISO 7045 Befestigung der Installationsdose an der Unterputzeinbaudose 1 Zugentlastun...

Page 4: ...TM 10 04 255 INNO PICCO f r iPad MINI TM 9 25 235 4 2 METALLTR GER 4 2 1 METALLTR GER IPADTM 4 2 2 METALLTR GER IPAD MINI TM 1 Aussparung f r Einschub Connection Board 2 Anschluss Erdungskabel R ckse...

Page 5: ...INNOPICCO Installationsdose ausgelegt und garantiert einen exakten und sicheren Sitz der kompletten INNO IN WALL SYSTEML SUNG Die UP Dose ist nicht im Lieferumfang enthalten und kann optional bestellt...

Page 6: ...erden 5 Alle elektrischen Installationsarbeiten sind von ausgebildeten Elektrikern fachgerecht durchzuf hren K rzen Sie nun das Stromkabel auf eine pas sende L nge und befestigen Sie es unter Ber cksi...

Page 7: ...onnection Boards voraus b ndig in die F hrungsschiene der Installationsdose so dass die Magnet klebefolien auf der R ckseite des iPad auf dem Metalltr ger haften Abb 11 Bei Verwendung des iPad Mini st...

Page 8: ...n autorisiertem Kundendienst vorgenommenen Funkti onspr fung wird fest gestellt ob der Defekt aufgrund von Material oder Verarbeitungsm ngeln innerhalb der Gew hrleistungsfrist aufgetreten ist und som...

Page 9: ...INNOPICCO IN WALL SYSTEM SOLUTIONS FOR IPAD AND IPAD MINI Trademark notice iPad and iPad MiniTM are trademarks of Apple Inc registered in the U S and other countries EN INSTRUCTION MANUAL PICCO...

Page 10: ...lified electrician in compliance with the general regulations for electrical connections Prior to installing the INNOPicco ensure that all live cables at the installation site are disconnected from th...

Page 11: ...1 USB adapter included only when using iPadTM with Lightning charging cable 1 Metal support 2 Magnetic adhesive foils 1 Decorative frame with 6 integrated magnets 5 M3 x 8 DIN 7500 form C stop screws...

Page 12: ...CCO for iPad TM 10 04 255 INNO PICCO for iPad MINI TM 9 25 235 4 2 METAL SUPPORT 4 2 1 METAL SUPPORT IPADTM 4 2 2 METAL SUPPORT IPAD MINI TM 4 5 5 5 4 3 3 3 2 4 5 5 5 4 4 1 3 3 4 4 4 5 5 5 4 3 3 3 2 4...

Page 13: ...lete INNO IN WALL SYSTEM SOLUTION is perfectly aligned and seated securely This item is not included in the scope of delivery but can be ordered separately product number INN PAD UP 99 99 02 00 1 Take...

Page 14: ...ation box with the tensi on relief Fig 5 Fig 6 The tension relief can be adjusted for various ca ble diameters by rotating the tension relief lever 5 All electrical installations must be carried out b...

Page 15: ...e rear of the iPad iPad MiniTM Fig 10 2 When using the iPadTM plug the connection board into the iPad do cking connector with the circuit board facing to the rear Fig 10 Care fully push the iPad into...

Page 16: ...your dealer and provide the original sales receipt and serial number as well as a description of the fault The manufacturer or its authorised customer service provider checks all functions and deter...

Reviews: