−6−
Open the vehicle rear hatch to ensure it does
not hit the rod box. If it does, change position
of either the rod box or the base rack.
3
Confirm that the base rack is correctly
installed, and temporarily place the rod box
on the base rack.
1
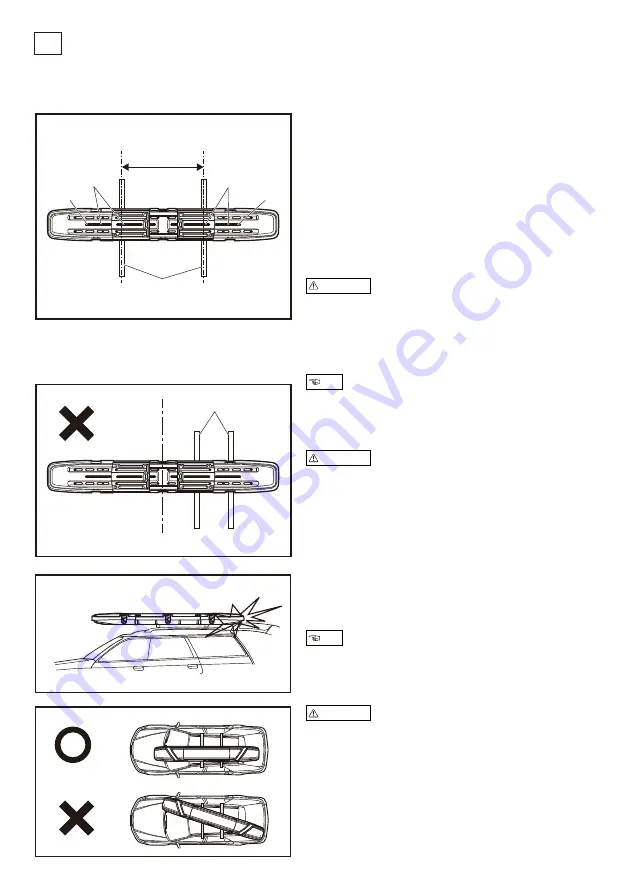
Open Cover A, B and C. Adjust the position
of the product so that the slits are placed on
the base rack. If the base rack is adjusted
beneath the outer slit, remove the mold S to
install.
2
Deciding the installation position of the Rod Box
3
Base rack
Base rack
Midpoint
Distance between
the base racks
Slit
Mold S
Mold S
Slit
Distance between the base racks
Short position
Medium position
Long position
24” to 31” / 35” to 55”
24” to 67”
24” to 82”
If adjustable, allow as long a distance as possible between
the base racks. A longer distance will stabilize the rod box,
and keep the vehicle cross bars under less stress.
Some vehicle types have specific installation positions of the
base rack, and touching the rear hatch is unavoidable.
Open the rear hatch carefully not to damage the rod box.
Make sure the distance between the base racks is more than
24 " (600 mm).
If the distance is too narrow, too much pressure will be
exerted on the rod box, which may cause it to fall off the
vehicle.
Ensure the midpoint of the product is aligned with right
between the base racks.
Make sure to install the rod box so that it runs parallel with the
direction of the vehicle.
Precautions
Precautions
Precautions
Note
Note

