background image

User’s manual

Using the system

23

Inim Cloud:

Access to the system points and some of these functions become available via:

Manage System

 > select one of the available control panels > 

Zones

6.3

Management of the remote communicator

Previdia Compact allows you to view and manage a remote communicator. "Remote communicator" defines the remote
notification functions performed by the PREVIDIA-C-DIAL communicator module, via the telephone line or 3G line, by
the TCP-IP digital communicator on-board the control panel, or by any external communication device connected to
the control panel or to the optional PREVIDIA-C-COM board.

In the “Communicator“ section, which can be reached through the system-viewing menu via the
System status button 

System status

 (

paragraph 5.3

), or by selecting the icons related to the alarm or

fault communicator on the status bar, you can view the status and manage the remote
communicator.

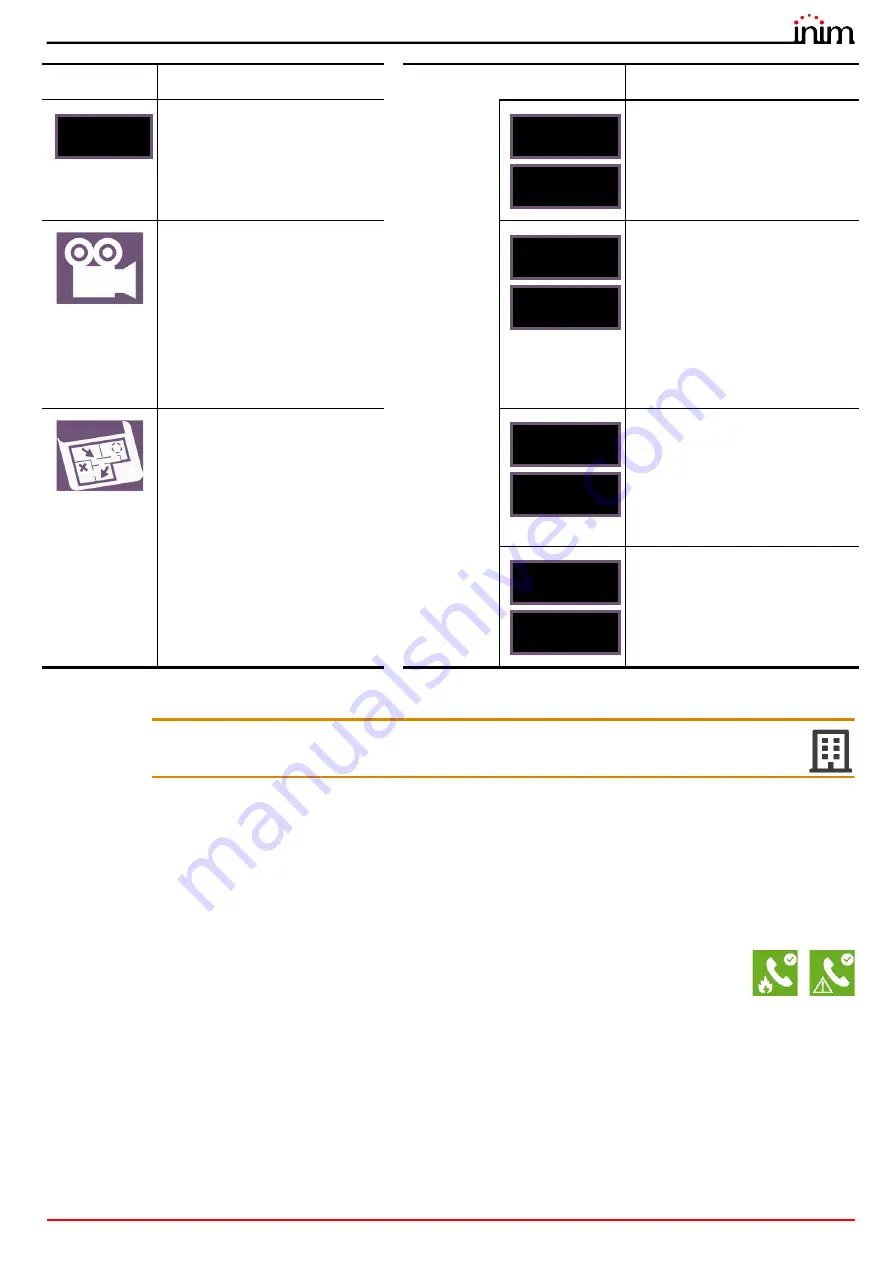
If this button is pressed, a graph 

will be displayed in the section on 

the left showing the value 

detected by the selected device 

through time.

Button for manual switching on/off 

of the device output.

If appropriately set up, this button 

opens a window that shows 

images taken by a camera, with a 

specific preset and a renewal of 

images every 5 seconds.

This function allows video 

verification of the conditions in 

the environment where the device 

is installed.

A single tap on the screen will 

close the window.

Button for manual switching on/off 

of the green LED of the device.

If appropriately set up, this button 

will open a window showing an 

image of the layout of the partition 

where the device is installed, with 

a point indicating the location of 

the device itself.

A single tap on the screen will 

close the window.

Button to disable/enable the 

selected point.

Button to disable/enable the zone 

the selected device belongs to.

Button

Function

Button

Function

Real-time

Turn On output

Release output

Turn On LED

Release LED

Disable point

Enable point

Disable zone

Enable zone

Summary of Contents for PREVIDIA C Series

Page 1: ...USER S MANUAL EN 54 2 EN 54 4 EN 54 21 EN 12094 1 ANALOG ADDRESSABLE FIRE ALARM CONTROL PANEL EXTINGUISHANT SYSTEM CONTROL PANEL ALARM TRANSMISSION AND FAULT WARNING ROUTING EQUIPMENT 0051 0051 CPR 14...

Page 2: ...en goods or claims by any other party caused by defective products or otherwise arising from the incorrect or otherwise improper installation or use of this product This warranty applies only to defec...

Page 3: ...s 9 3 2 Function buttons and LEDs 10 3 3 Screen in standby status 11 3 4 Status Bar 12 Chapter 4 Inim Cloud Fire 14 4 1 User interface home page 14 4 2 Registration of a control panel to the Inim Clou...

Page 4: ...4 Table of contents Fire detection and extinguishant system...

Page 5: ...and touch screen to scroll through the information Level 1 allows the following operations only mute buzzer test signalling LEDs activate alarm signalling when an early warning process is running Leve...

Page 6: ...automatic control and delay device integrated for fire detection and fire alarm systems installed in buildings and for gas extinguishing systems installed in buildings and part of a complete system E...

Page 7: ...EU Countries 1 4 3 Documents for the users Declarations of Performance Declarations of Conformity and Certificates concerning to INIM Electronics S r l products may be downloaded free of charge from t...

Page 8: ...s of the control panel during the interval delay which runs between the detection of an alarm condition and the actual signalling of the alarm delay Investigate This command is activated by a supervis...

Page 9: ...th different user interfaces PREVIDIA Cxxxxx Standard model PREVIDIA CxxxxZx Model with LED indicators for signalling the status of the zones PREVIDIA CxxxxZEx Model with LED indicators for signalling...

Page 10: ...rtain models Status LED Colour On solid Flashing Alarm Red Fire alarm running Fire alarm memory Fault Yellow A fault of any type is present on the system The details of any active faults are shown on...

Page 11: ...d to stop the audible and visual signalling devices Pressing this button again will reactivate the silenced audible and visual signalling devices Reset Yellow The reset function is disabled The sounde...

Page 12: ...of the detectors is set in day mode Night Mode early warnings are not run the sensitivity of the detectors is set in night mode in the event of an alarm if the sounders are silenced they will reactiv...

Page 13: ...communication has been sent and confirmed by the recipient A fault has occurred on at least one remote alarm communicator device At the same time another remote alarm signalling device is operating pr...

Page 14: ...ace which provides all the tools required for supervision of all the control panels registered by the user In order to use the Inim Cloud services registration must be carried out also by the user par...

Page 15: ...then Cloud then the Enroll option 6 Enter the OTP password and wait for the registration result The result of the procedure will be shown with one of the following messages Account created the control...

Page 16: ...y dangerous conditions which require maximum attention When an alarm occurs the section below the event buttons B shows the pre alarm time count in progress and then alarm over the summary of informat...

Page 17: ...ault status Blue event selected by tapping on the screen In the case of an event generated by a loop device you access the management page via the device itself refer to paragraph 6 2 Device managemen...

Page 18: ...control panel being viewed D Button for displaying the firmware revision of the control panel in use Button Display Section Section for the selection of the control panel whose parts you wish to view...

Page 19: ...e relative functions Section for the management of the output groups of the selected control panel The section is divided into pages that show a maximum of 80 groups navigable by means of the arrow sc...

Page 20: ...by colour Green line in standby Yellow line in fault status or bypassed Red line in alarm status Blue selected line By selecting a line and pressing the Activate Deactivate button it will be possible...

Page 21: ...t Deactivate for the deactivation of the selected element Other system elements which influence on the selected element timers inputs detectors etc will be able to activate it By accessing the System...

Page 22: ...atus The function buttons B that operate on the device vary depending on the type of device shown or the user access level A Data relative to the selected device address label serial number type etc B...

Page 23: ...mote communicator If this button is pressed a graph will be displayed in the section on the left showing the value detected by the selected device through time Button for manual switching on off of th...

Page 24: ...6 4 Managing the extinction channel The front plates of control panels from the Previdia Compact range equipped with fire extinction channels provide signals via the LED indicators From the Extinctio...

Page 25: ...cess level of the user Disable Enable Extinguishing button to disable enable the extinction channel Disable Enable Automatic Extinguishing button to switch the extinction channel from automatic mode t...

Page 26: ...26 Using the system Fire detection and extinguishant system...

Page 27: ...sounders 4 Verify signalling on the display 5 In the event of false alarm press the reset button In the event of danger activate manual evacuation Sequence in the event of FAULT 1 Mute the buzzer 2 P...

Page 28: ...uishant system Centobuchi via Dei Lavoratori 10 63076 Monteprandone AP Italy Tel 39 0735 705007 _ Fax 39 0735 704912 info inim biz _ www inim biz DCMUINE0PREVIDIAC 110 20200115 ISO 9001 Quality Manage...

Reviews: