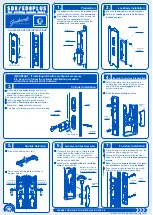
IMPORTANT:
DO NOT handle the circuit board
unless you are wearing the wrist strap included in the
kit.
1.
Attach WRIST STRAP.
Follow the instructions included with the wrist strap.
2.
Insert MEMORY BUTTON(s).
3.
Perform a J2 MASTER CLEAR.
a.
Touch the tip of a screwdriver against both the J2-1
and the J2-2 pins. Listen for a single beep.
b.
Once you hear a single beep, remove the screwdriver
and listen for a double beep. The double beep means
that the master clear is complete.
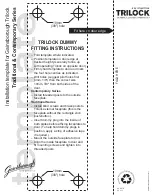
1.
Install FOUR (4) AA BATTERIES and replace
ELECTRONICS COVER.
NOTE: Ensure proper polarity when installing batteries.
Check the battery contacts and make sure they are
touching both ends of the battery.
2.
Reconnect TARGET and MOTOR wires to the
Y-cable.
a.
Connect the target wire (violet wire) to the violet side
of the Y-cable.
b.
Connect the motor wire (red wire) to the red side of
the Y-cable.
CAUTION:
Make sure that wires are not pinched during
installation of screws.
3.
Insert and tighten the two (2) ESCUTCHEON
SCREWS.
3.
Test LOCK for proper operation.
a.
Touch the BLUE test key to the touch receptor.
b.
Check lever for correct lock operation.
4.
Install INSIDE LEVER.
a.
Insert lever onto spindle.
b.
Using a spanner wrench, tighten bushing.
Upgrade Lock
2
Replace Inside Trim
3
Y-Cable
J2-1
J2-2
SCHLAG
E
SCHLAG
E
ESD Warning
©2001 Schlage Lock Company
Printed in U.S.A.
P512-024 Rev. 05/01