Only allow
Ingersoll Rand
trained technicians to perform maintenance on this product. For additional information contact
Ingersoll Rand
Factory or nearest
Distributor.
For additional supporting documentation refer to Table 1 ‘Product Information Manuals’ on page 2.
Manuals can be downloaded from www.irtools.com.
The use of other than genuine
Ingersoll Rand
replacement parts may result in safety hazards, decreased performance and increased maintenance and will invalidate all warranties.
The original language of this manual is English.
Refer all communications to the nearest
Ingersoll Rand
Office or Distributor.
Table 1: Product Information Manuals
Publication
Part/Document Number Publication
Part/Document Number
Product Safety Information Manual
MHD56295
Product Information Manual
MHD56414
Product Parts Information Manual
MHD56415
INSPECTION
Perform frequent inspections on equipment in regular service. Refer to Product
Information Manual.
n
Periodic Inspection
Refer to Table 2 ‘Inspection Classifications’ on page 2 for suggested inspection
classifications for Periodic Inspection Intervals. Select conditions most appropriate
to application.
Table 2: Inspection Classifications
Conditions
Normal
Heavy
Severe
Typical Use (operating time)
Infrequent
Regular
Continual/Constant
Load Range
60% of Capacity 75% of Times Used
80% of Capacity 75% of Times Used
100% of Capacity 75% of Times Used
Installation
Protected/Enclosed/Dry
Not Sheltered/Exterior
Full Exposure
Atmosphere
Clean/Non-Corrosive
Dirty/Non-Corrosive/Freshwater Marine
Dirty/Corrosive/Saltwater Marine
Climate
Dry/Stable Temperature
Wet/Moderate Temperature Fluctuations
Wet/Severe Temperature Fluctuations
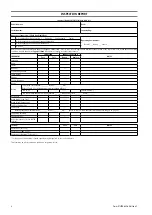
Maintain written records of periodic inspections to provide a basis for continuing
evaluation. Inspect all items listed in ”Frequent Inspection”. Refer to Product
Information Manual. Also inspect the following at the suggested intervals
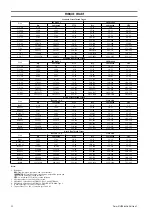
recommended in Table 5, ‘Maintenance Interval Chart’ on page 3.
1.
Fasteners.
Check all rivets, split pins, capscrews and nuts. Replace if missing or
tighten if loose.
2.
All Components.
Inspect for wear, damage, distortion, deformations and
cleanliness. If external evidence indicates the need, disassemble. Check gears,
shafts, bearings, sheaves, chain guides, springs and covers. Replace worn or
damaged parts. Clean, lubricate and reassemble.
3.
Hooks.
Inspect hooks carefully for cracks using magnetic particle or other
suitable non-destructive method. Inspect hook retaining parts. Tighten or repair
if necessary.
Table 3: Hook Throat Normal and Discarded Width
Hoist Model
Capacity metric tons
Throat Width
Discard Width
in.
mm
in.
mm
LCA750T
7.5
5.98
152
6.85
174
4.
Load Chain Sprocket.
Check for damage or excessive wear. Replace if necessary.
Observe the action of load chain feeding through hoist. Do not operate a hoist
unless load chain feeds through hoist and hook block smoothly and without
audible clicking or other evidence of binding or malfunctioning.
5.
Motor.
If performance is poor, disassemble motor and check for wear or damage
to bearings and shafts. Parts should be cleaned, lubricated and reassembled.
Replace worn or damaged parts.
6.
Brake.
Raise a load equal to rated capacity of hoist a few inches (cms) off the
floor. Verify hoist holds the load without drift. If drift occurs, disassemble.
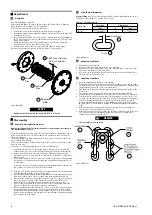
Remove brake discs as described in “MAINTENANCE” on page 5. Check and clean
brake parts each time hoist is disassembled. Replace brake discs if grooves are
no longer visible.
7.
Supporting Structure.
Check for distortion, wear and continued ability to support
a load.
8.
Trolley
. Check that the trolley wheels track beam properly and trolley is correctly
adjusted in accordance with manufacturer’s literature. Check that wheels and
beam are not excessively worn and inspect side plates for spreading due to
bending. Do not operate hoist until problem has been determined and corrected.
9.
Labels and Tags.
Check for presence and legibility. Replace if necessary.
10.
Load Chain End Anchors.
Ensure both ends of load chain are securely attached.
Secure if loose, repair if damaged, replace if missing. Check chain stoppers are
correctly installed and functional.
11.
Load Chain.
Check the chain for stretching. Measure the load chain over five link
sections all along chain, paying particular attention to the most frequently reeved
links. Refer to Dwg. MHP0041 on page 2,
A:
Gauge Length. When any five links
in the working length reach or exceed the discard length, replace entire chain.
Refer to Table 4 ‘Load Chain Normal and Discard Length’ on page 2. Always use
genuine
Ingersoll Rand
replacement chain. Zinc plated load chain is standard on
Liftchain hoists.
Table 4: Load Chain Normal and Discard Length
Hoist Model
Chain Size
Normal Length
Discard Length
mm
in.
mm
in.
mm
LCA750T
32 x 90
17.72
450
18.03
458
Gauge Length
A
(Dwg. MHP0041)
12.
Chain Container
(optional feature). Check for damage or excessive wear and that
chain container is securely attached to the hoist. Secure or replace if necessary.
13.
Limit Switch.
Check limit switches function correctly.
14.
Emergency Stop.
During hoist operation verify emergency shut-off by activating
button. All operation must stop quickly. Stop button must reset properly.
n
Records and Reports
Inspection records, listing all points requiring periodic inspection should be
maintained for all load bearing equipment. Written reports based on severity of
service, should be made of the condition of critical parts as a method of documenting
periodic inspection. These reports should be updated, signed by the person who
performed the inspection, and kept on file where they are readily available for review.
2
Form MHD56416 Edition 1


