background image

40

U

s

i

n

g


t

h

e


P

r

o

j

e

c

t

o

r

Summary of Contents for LP920

Page 1: ...Copyright 2000 by InFocus Wilsonville Oregon All rights reserved ...

Page 2: ...erference in which case the user will be required to correct the interference at his own expense Canada This Class A digital apparatus complies with Canadian ICES 003 Cet appareil numérique de la classe A est conforme à la norme NMB 003 du Can ada Safety Certifications UL CUL TÜV NOM EN 55022 Warning This is a Class A product In a domestic environment it may cause radio interfer ence in which case...

Page 3: ...22 1992 Class A EMC EN 50082 1 1992 IEC 801 2 IEC 801 3 IEC 801 4 Directive 73 23 EEC Amended by 93 68 EEC Safety EN 60950 1992 A1 A2 A3 A4 1997 October 2000 Trademarks Apple Macintosh and PowerBook are trademarks or registered trademarks of Apple Computer Inc IBM and PS 2 are trademarks or registered trademarks of International Business Machines Inc Microsoft PowerPoint and Windows are trademarks...

Page 4: ......

Page 5: ... BNC Cables 13 Connecting a Computer with an RS 232 Cable 14 Connecting a Video Player 14 Connecting a Video Player using BNC Cables 15 Connecting External Speakers 16 Connecting the Remote Control Cable 16 Powering up the Projector and Adjusting the Image 17 Turning Off the Projector 18 Using the Projector 19 Basic Image Adjustment 19 Adjusting the Projector 20 Using the Remote Control 22 Using t...

Page 6: ...on Lamp 41 Replacing the Batteries in the Remote Control 44 Using the Security Lock 44 Troubleshooting 45 Appendix 49 Specifications 49 Accessories 50 Portable and Laptop Activation Chart 52 Using Video Mirroring with a PowerBook Computer 57 Projected Image Sizes 58 RS232 Terminal Specifications 59 Index 63 ...

Page 7: ...y Caution Statements identify conditions or practices that could result in damage to your equipment Safety Symbols Attention For information about usage of a feature please refer to the User s Guide Warning Hot surface Do not touch An arrow pointing to the lamp door on the projector Warning Laser radiation Do not stare into laser beam Safety Terms Warning Don t look directly into the lens when the...

Page 8: ...ay damage your projector Caution Don t place the projector on a hot surface or in direct sunlight Caution Do not drop the projector Transport the projector in an InFocus approved case see page 50 for a list of cases Caution For ceiling mount installations please use the ceiling mount recommended in this User s Guide on page 50 and fol low all instructions provided with it Important Operating Consi...

Page 9: ...t is free between 6 a m and 6 p m PST Monday through Friday Support is available in North America after hours and weekends for a fee at 1 888 592 6800 Or send us an e mail at techsupport infocus com In Europe call InFocus in The Netherlands at 31 35 6474010 In Asia call InFocus in Singapore at 65 332 0659 ...

Page 10: ...vi S a f e t y I n s t r u c t i o n s ...

Page 11: ...olution before you connect the projector Compatibility The projector is compatible with a wide variety of computers and video devices including IBM compatible computers including laptops up to 1280x1024 resolution NOTE The projector is compati ble with 1080i HDTV format Apple Macintosh and PowerBook computers up to 1280x1024 resolution Most standard VCRs DVD players HDTV sources camcord ers and la...

Page 12: ...ration you ve ordered FIGURE 1 Shipping box contents NOTE Long throw zoom wide angle zoom and ultra wide angle lenses are also available See page 50 for details 1 LP920 projector lens cap 2 Power cord 3 Remote control p o w e r st a n d b y fr e e ze l a se r c o m p b rig h tn e ss vo l u m e vi d e o 1 2 3 ...

Page 13: ...t a minute before attempting to turn it back on Handle the projector as you would any product with glass components Be especially careful not to drop it Avoid leaving the projector in direct sunlight or extreme cold for extended periods of time If this happens allow it to reach room temperature before use Transport the projector in a vendor approved hard or soft case Part numbers for these cases a...

Page 14: ...InFocus Customer Service directly at 1 800 799 9911 Call between 6 a m and 6 p m PST Monday through Friday Service is available in North America after hours and on weekends for a fee at 1 888 592 6800 In Europe call InFocus in The Netherlands at 31 35 6474010 In Asia call InFocus in Singapore at 65 332 0659 Or send us an e mail at techsupport infocus com Our World Wide Web address is http www info...

Page 15: ...he projector the desired distance from the screen The distance from the lens of the projector to the screen and the zoom lens setting determine the size of the projected image Table 1 shows example projected image sizes and minimum and maximum distances to the screen The formulas for distance to the screen are Max distance ft diagonal image size ft 49 Min distance ft diagonal image size ft 69 NOTE...

Page 16: ...ion height move the image along the wall without moving the projector while still maintaining a perfectly square image Turn the lens shift knob on the side of the projector to make this adjustment Figure 4 FIGURE 4 Adjusting the lens shift L L In out In In L BNC BNC R R R A 0 A 0 R s R G G B B minimum L 14 maximum L 20 distance between lens and screen L zoom adjustment range 90º 90º 20 14 ...

Page 17: ...rallel with the lens FIGURE 5 Lowest image projection angle FIGURE 6 Highest image projection angle Once you know the diagonal image size you can figure out the width and height using these formulas width inches diagonal inches x 0 8 height inches width inches x 0 75 L L In out In In L BNC BNC R R R A 0 A 0 R s R G G B B 10 high image bottom of image 5 below lens H lens center L L In out In In L B...

Page 18: ...ted use the upper edge of the screen as the base line Table 2 Lens Shift Positions for Desktop Setup Diagonal Image Size inches Distance from lens center to lower edge of screen H Lower lens shift position inches Upper lens shift position inches 300 90 0 240 72 0 180 54 0 144 43 0 120 36 0 96 29 0 72 22 0 60 18 0 48 14 0 Table 3 Lens Shift Positions for Ceiling Mounted Setup Diagonal Image Size in...

Page 19: ...ling mounted installations and can be used with a 60 extension cable See Optional Accessories on page 50 This input is designated Computer CableWizard Steps for connecting the different types of equipment are given on the pages listed below high edge of screen H lens center lens center Equipment you want to connect Page Computer with M1 DA cable page 11 Computer with VESA cable page 13 USB type B ...

Page 20: ... Analog Digital CableWizard remote USB S video Composite 3 BNCs Video Source Video Audio Computer RGBHV 3 Single ended analog RGB 2 H V sync 5 BNCs Left and right line level 2 RCAs Computer VESA VESA Single ended analog RGB HD 15 Left and right line level 2 RCAs Computer M1 M1 DA Single ended ana log or digital Left and right line level 2 RCAs Computer CableWiz ard CableWizard Analog RGB Combined ...

Page 21: ...xternal video port when a sec ondary display device such as a projector is connected Refer to your computer manual for the command that activates the exter nal video port Activation com mands for some laptop computers are listed in the Appendix of this manual on page 52 2 Plug the end of the M1 DA analog computer cable into the video connector on your computer FIGURE 9 Connecting the projector to ...

Page 22: ...o the mouse connector on your computer Do you want to play your computer s audio on the projector 1 Plug an audio cable not supplied into the audio connector on your computer NOTE You do not need to restart your computer after connecting a USB mouse to use it it is hot pluggable 2 Plug the other end of the audio cable into a In connector on the projector Now you re ready to power up the projector ...

Page 23: ...a VESA cable NOTE When all 5 BNCs are con nected the projector handles sepa rate synch on H and V When 4 BNCs are connected the projector handles a composite sync on H When 3 BNCs are connected the projector handles a composite sync on G Connecting a USB type B mouse You can control the computer s mouse with the projector s key pad or remote by connecting a USB mouse cable to the USB con nector on...

Page 24: ...g the computer inputs not the video inputs All analog computer inputs can display HDTV See the previous pages for computer connection instructions 1 Plug the A V cable s yellow connector into the video out connector on your video player Figure 11 This connector may be labeled To Monitor If you re using an S video cable connect it to the S video out connector on the video player Figure 12 2 Plug th...

Page 25: ... DO NOT use this to connect to the projector The projector is compatible with these major broadcast video standards NTSC NTSC 4 43 PAL PAL M PAL N PAL 60 and SECAM It automatically adjusts to optimize its performance for the incoming video The input signal for SECAM video is similar to other video signals and cannot be automatically detected therefore SECAM must be chosen manually See Video Stan d...

Page 26: ...e the remote s signal as may be the case if you re using rear projection connect the remote directly to the projector with the optional remote cable See Optional Accessories on page 50 NOTE For more information on using the remote see page 22 1 Plug the remote cable into the wired remote connector on the projector 2 Plug the other end into the connector on the remote FIGURE 14 Connecting the remot...

Page 27: ...active press the source button on the keypad page 26 or the video button on the remote to dis play your video image You can select a default source to determine which source the projector examines first during power up for active video see Default Source on page 36 Use the volume buttons to adjust the volume 5 Turn on your computer NOTE With some computers the order in which you power up the equip...

Page 28: ...the standby time the projector shuts off To exit standby mode press the standby button again It may take several seconds for the pro jection lamp to reach full power and project the image again NOTE Lamp life will be extended if you turn the projector off then wait 1 minute while the lamp cools before unplugging the projector To completely power off the projector press the Power button The lamp tu...

Page 29: ... the projector page 20 or center the image by adjusting its horizontal or vertical position page 34 Be sure the projector is at a 90 degree angle to the screen 3 If the image is out of focus rotate the focus lens page 20 4 If the image appears to shimmer or if it has blurry vertical bars after you have adjusted the focus turn Auto Image page 32 off and then back on to reset the automatic sync and ...

Page 30: ...ithout affecting focus FIGURE 15 Focus ring and zoom ring The projector is equipped with a projection angle lens shift knob that provides adjustment from horizontal This allows you to adjust the projection height without moving the projector see page 8 for lens shift values It also has a height adjustment foot an elevator button and a leveling knob FIGURE 16 Adjusting the lens shift focus ring zoo...

Page 31: ...height then release the button to lock the foot into position Rotate the leveling knob if necessary to adjust the angle of the projected image FIGURE 17 Adjusting the height of the projector FIGURE 18 Leveling knob elevator button elevator foot L L In out In In L BNC BNC R R R A 0 A 0 R s R G G B B leveling knob ...

Page 32: ...e is not supported on the Macintosh platform Point the remote control at the projection screen or at the top of the projector The range for optimum operation is about 25 feet If you point the remote at the projection screen the distance to the screen and back to the projector must be less than or equal to 25 feet For best results point the remote directly at the front or the rear of the projector ...

Page 33: ...ng buttons To use the laser pointer press and hold the laser button The laser goes off when the button is released If you are creating presentations in Microsoft PowerPoint you can use the remote s mouse buttons to navigate through your presentation while in Slide Show mode To configure PowerPoint for this choose Options from the Tools menu click the View Tab de select the Popup Menu on Right Mous...

Page 34: ... menus are displayed the volume source and standby buttons on the keypad act as menu navigation buttons See Using the On Screen Menus on page 27 for details FIGURE 20 Keypad buttons FIGURE 21 Remote buttons source standby volume volume menu power right mouse button left mouse button ...

Page 35: ...beam that can be used as a pointing device To use the laser press and hold the laser button The laser goes off when the button is released Menu Press menu to open the on screen menus Press menu again to close the menus When you close the menus the projector saves any changes you made For more information about the on screen menus see page 27 Power The power button turns the projector on and off Wh...

Page 36: ...s off after the standby time Source keypad only or Comp and Video remote only When you have more than one source computer and video con nected to the projector select between them by pressing the source button on the keypad or the comp or video button on the remote Press comp to display your computer image Press comp again to toggle among the computer sources The sources switch in this order Compu...

Page 37: ...e remote To select a menu move the cursor left or right to highlight the menu you want The drop down menu appears FIGURE 22 Keypad navigation buttons and drop down menu To change a menu setting use the up and down navigation but tons on the keypad or the disk mouse on the remote to move the cursor up and down to the item you want to change the selected item is highlighted then use the left and rig...

Page 38: ... white in the image Press the left mouse button to decrease the contrast Press the right mouse button to increase the contrast making the blacks appear blacker and the whites appear whiter Tint The tint adjusts the red green color balance in the projected image Changing the Tint setting has no effect on PAL or SECAM video sources Press the left mouse button to increase the amount of green in the i...

Page 39: ...n to increase the amount of red in the image Sharpness This setting adjusts the sharpness of a video image Press the left mouse button to decrease the sharpness Press the right mouse button to increase the sharpness Blank Screen Blank Screen determines what color is displayed when there is no active source and when the projector is in standby Click the left or right mouse button to toggle between ...

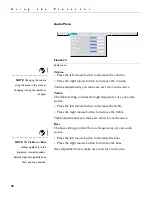
Page 40: ... left mouse button to decrease the treble Press the right mouse button to increase the treble Treble adjustments you make are saved for each source Bass The bass setting controls the low frequencies of your audio source NOTE The Treble and Bass settings apply only to the projector s internal speakers External speakers typically have their own tone controls Press the left mouse button to decrease t...

Page 41: ...coming from the external speakers Audio Source Select This setting allows you to match a computer or video input to an audio input The projector has four computer and three video inputs but only four audio inputs NOTE Audio cables must be con nected in order to hear sound from the projector except for the CableWizard input Select among audio sources 1 2 and 3 and CableWizard The CableWizard comput...

Page 42: ...es not apply to video sources If you want to adjust these features manually you must turn off Auto Image first by highlighting Auto Image in the Image menu and clicking the left or right mouse button to select off NOTE When you connect an HDTV source the projector automatically displays the image in 16x9 format Resize This option works differently for computer and video sources For computer source...

Page 43: ...ojected computer image looks fuzzy or streaked try turning Auto Image off then back on again If the image still looks bad try adjusting the signal synchronization manually NOTE The Manual Sync Manual Tracking Horiz Posi tion and Vert Position options are available only for computer sources The projector sets these options automatically for video sources 1 Turn Auto Image off 2 Highlight Manual syn...

Page 44: ...justments are saved when you power off the pro jector Zoom NOTE The Zoom feature is only available when a computer source is active It is not available for video sources This option allows you to digitally zoom a computer image Highlight Zoom then press either mouse button A rectangle appears on the screen Use the arrow buttons on the keypad or the disk mouse on the remote to move the rectangle to...

Page 45: ...he correct standard the colors might not look right or the image might appear torn If this happens manually select a standard by clicking the left or right mouse but ton and cycling through the standards Standby Time This option lets you select how long the lamp stays on and the blank screen is displayed when the projector enters standby mode before the projector turns off Select among instant 1 5...

Page 46: ...to toggle among the options Auto Source Select This setting toggles between On and Off When this feature is Off the projector defaults to the source selected in Default Source To display another source you must manually select one by press ing the source button on the keypad or the computer or video but ton on the remote When this feature is On the projector automatically finds the active source c...

Page 47: ...e 13 for details This feature is available for PC Computer RGBHV VESA and CableWizard sources only It is not supported on the Macintosh platform Display Messages This setting toggles between On and Off When this feature is On status messages such as No signal detected or Standby Active appear in the lower right corner of the screen Click the left or right mouse button to turn this feature off and ...

Page 48: ...tatus window select Show status from the menu then click the left or right mouse button To remove the window click the left or right mouse button FIGURE 28 Status menu English Francais Deutsch Espanol Display Audio Image Controls Language Status Display Audio Image Controls Language Status Show status Lamp hours used Computer resolution Horizontal refresh rate Vertical refresh rate Mute status Sou...

Page 49: ...audio is muted Mute is only available on the optional remote Source Indicates the active source Computer RGBHV Computer VESA Computer M1 Analog or Computer M1 Digital Computer CableWizard Component Video Composite Video or S Video Speakers Indicates if external speakers are connected Software version Indicates the projector s software version This information is useful when contacting your dealer ...

Page 50: ...40 U s i n g t h e P r o j e c t o r ...

Page 51: ...the projector immediately replace the lens cap Replacing the Projection Lamp WARNING To avoid burns allow the projector to cool for at least 30 minutes before you open the lamp module door Never extract the lamp module while the lamp is operating The lamp hour counter in the Status menu counts the number of hours the lamp has been in use Replace the lamp when the brightness is no longer acceptable...

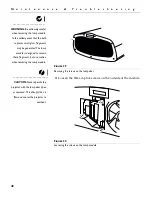
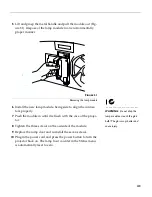
Page 52: ...d The lamp module is designed to contain these fragments but use caution when removing the lamp module FIGURE 29 Removing the screws on the lamp door CAUTION Never operate the projector with the lamp door open or removed This disrupts the air flow and causes the projector to overheat 4 Loosen the three captive screws on the outside of the module FIGURE 30 Loosening the screws on the lamp module ...

Page 53: ...may shatter and cause injury 6 Install the new lamp module being sure to align the connec tors properly 7 Push the module in until it is flush with the case of the projec tor 8 Tighten the three screws on the outside of the module 9 Replace the lamp door and re install the seven screws 10 Plug in the power cord and press the power button to turn the projector back on The lamp hour counter in the S...

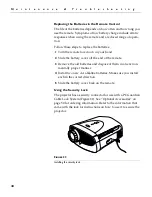
Page 54: ...he battery cover off the end of the remote 3 Remove the old batteries and dispose of them in an environ mentally proper manner 4 Install two new AA alkaline batteries Make sure you install each in the correct direction 5 Slide the battery cover back on the remote Using the Security Lock The projector has a security connector for use with a PC Guardian Cable Lock System Figure 32 See Optional Acces...

Page 55: ...blem Color or text not being projected You might need to adjust the brightness up or down until the text is visible Refer to Brightness on page 28 for more infor mation Problem The screen resolution is not right Make sure the computer s video card is set for a resolution of no greater than 1280x1024 Problem Image isn t centered on the screen Move the projector to reposition the image Reposition th...

Page 56: ... Windows 98 1 Open My Computer icon the Control Panel folder and then the Display icon 2 Click the Settings tab 3 Verify that the Desktop area is set to 1280x1024 or less Problem Image is too wide or narrow for screen Adjust the zoom or projector placement Adjust the resolution of your video card if it s greater than 1280x1024 Problem Image is out of focus Turn the projection lens to focus the ima...

Page 57: ...synchronization and track ing manually to find an optimal setting See Manual Sync on page 33 and Manual Tracking on page 33 The problem could be with your computer s video card If possible connect a different computer Problem Projected colors don t match the computer or video player s colors Just as there are differences in the displays of different moni tors there are often differences between th...

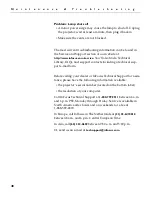
Page 58: ... a technical sup port e mail form Before calling your dealer or InFocus Technical Support for assis tance please have the following information available the projector s serial number located on the bottom label the resolution of your computer Call InFocus Technical Support at 1 800 799 9911 between 6 a m and 6 p m PST Monday through Friday Service is available in North America after hours and on ...

Page 59: ...158 F 20 to 70 C Humidity Operating and non oper 10 to 90 relative humidity non condensing Dimensions 16 5 x 8 25 x 19 5 inches cm Weight 25 5 lbs 11 5 kg unpacked Altitude Operating 0 to 10 000 feet 3 048 meters Non operating 0 to 20 000 feet 6 096 meters Optics Focus Range 3 3 40 feet 10 12 m Lamp Type 220 watt UHP lamp Input Power Requirements 100 120VAC 5A 50 60Hz 200 240VAC 3A 50Hz ...

Page 60: ... 0029 xx Danish Power Cord 210 0030 xx Swiss Power Cord 210 0031 xx Shipping Case ATA approved CA C204 900 Series Long Throw Zoom Lens HW LENS LL02 900 Series Wide Angle Zoom Lens HW LENS LW01 900 Series Ultra Wide Angle Lens rear projec tion HW LENS LR01 M1 DA Digital Computer Cable w USB SP DVI D M1 to VGA USB A Cable SP DVI A Macintsoh adapter SP MACADPT CableWizard 3 SP CW3 CableWizard 2 SP CW...

Page 61: ...eceiver HW EXRCVR PC Guardian Projector Cable Lock SP LOCK 40 Diagonal Portable Projection Screen HW PORTSCR40 50 Diagonal Portable Projection Screen HW PORTSCR50 60 Diagonal Portable Projection Screen HW DLXSCRN 84 Diagonal Pull Down Projection Screen HW WALLSCR84 Portable Projector Stand SP STND Deluxe Wheeled Projector and Computer Cart HW CART Appian Traveler Digital Analog CardBus PC Card SP ...

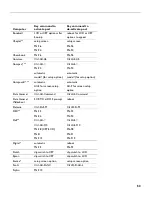
Page 62: ...d pressing it a third time activates the internal port Refer to your computer s documentation for details on your specific model Computer Key command to activate port Key command to de activate port Acer Ctrl Alt Esc for setup Ctrl Alt Esc for setup AST FN D or Ctrl D FN D or Ctrl D Ctrl FN D Ctrl FN D FN F5 FN F5 type from A IVGA CRT type from A IVGA CRT FN F12 FN F12 AMS FN F2 FN F2 AMT setup sc...

Page 63: ...creen setup option Data General Ctrl Alt Command Ctrl Alt Command Data General Walkabout 2 CRT X at DOS prompt reboot Datavue Ctrl Shift M Ctrl Shift M DEC FN F5 FN F5 FN F4 FN F4 Dell Ctrl Alt Ctrl Alt Ctrl Alt F10 Ctrl Alt F10 FN F8 CRT LCD FN F8 FN D FN D FN F12 FN F12 Digital automatic reboot FN F2 FN F2 Dolch dip switch to CRT dip switch to LCD Epson dip switch to CRT dip switch to LCD Everex...

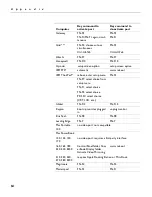
Page 64: ...elect choice PS 2 SC select choice CRT LCD etc Infotel FN F12 FN F12 Kaypro boot up monitor plugged in unplug monitor Kris Tech FN F8 FN F8 Leading Edge FN T FN T Mac Portable 100 no video port not compatible Mac PowerBook 140 145 150 170 no video port requires a 3rd party interface 160 165 180 520 540 5300 Control Panel folder Pow erBook Display folder Activate Video Mirroring warm reboot 210 230...

Page 65: ...tup screen option setup screen option Sanyo setup screen option setup screen option Sharp dip switch to CRT dip switch to LCD Sun SPARC Dataview Ctrl Shift M Ctrl Shift M Tandy Ctrl Alt Insert Ctrl Alt Insert setup screen option setup screen option Tangent FN F5 FN F5 Texas Instru ments setup screen option setup screen option Top Link setup screen option setup screen option FN F6 FN F6 Toshiba Ctr...

Page 66: ...e type of display device is attached These manufacturers offer more than one key command depend ing on the computer model Wyse software driven software driven Zenith FN F10 FN F10 FN F2 FN F2 FN F1 FN F1 Zeos Ctrl Shift D FN F1 Ctrl Shift D FN F1 Computer Key command to activate port Key command to de activate port ...

Page 67: ...ors control panel again When using video mirroring and high color graphics such as slide shows the projected image occasionally might turn black and white If this happens perform the following steps 1 Turn off video mirroring 2 Open the Monitors control panel 3 Move the white menu bar to Monitor 2 to set the projector as the primary monitor 4 Restart the PowerBook Using SimulScan Some newer PowerB...

Page 68: ...imum distance feet Minimum Distance feet 300 240 33 28 240 192 27 22 180 144 20 17 144 115 16 13 120 96 13 11 96 77 11 9 72 58 8 7 60 48 7 6 48 38 5 4 Table 5 Diagonal Image Size and Width at Maximum and Minimum Distance to Screen Long Throw Lens Diagonal Image Size inches Distance to screen Image Width inches Maximum distance feet Minimum Distance feet 300 240 86 51 240 192 69 41 180 144 52 31 14...

Page 69: ...d format All commands consist of 3 alpha characters followed by a request all enclosed in parentheses The request can be a read request indicated by a or a write request indicated by 1 to 4 ASCII digits A read request format AAA where starts the command AAA denotes the command denotes the read request ends the command Setting Value Bits per second 19 200 Data bits 8 Parity None Stop bits 1 Flow co...

Page 70: ...m range is received it is auto matically set to the maximum number for that function If a com mand is received that is not understood a is returned With absolute settings 0 is off 1 2147483647 is on The one exception is the Power command where 0 is off and 1 is on Supported commands Function Command Response Brightness BRT 0 22 10 Volume VOL 0 80 0 Lamp hours LMP 0 9999 421 Function Command Respon...

Page 71: ...igital 4 Computer CableWizard 5 Component Video 6 Composite Video 7 S video Source SRC 0 7 same designations as Default Source Volume VOL 0 100 Mute MTE 0 1 Balance BAL 0 60 Fade FAD 0 60 Image Position IPO 0 2 Treble TRB 0 100 Bass BAS 0 100 Mute MTE 0 1 Auto Image AIM 0 1 Resize ARZ 0 1 Manual Sync Setting MSS 0 20 Manual Tracking Setting MTS 800 2112 Horizontal Position Setting HPS 0 256 USB In...

Page 72: ...onnection Status VCS 0 2147483647 TV Connector Control TVC 0 3 Color Temperature TMP 0 63 System State SYS 0 2147483647 Sharpness SHP 0 10 Standby Time SBT 0 7 Power Off Time POT 0 7 Plug and Play PAP 0 1 Overscan OVS 0 1 Menu MNU 0 1 Splash Screen DSU 0 1 Display Message DMG 0 1 Blank Screen Color BSC 0 1 Audio Select ASL 0 3 Audio Mode AMO 0 2147483647 Audio Connection Status ACS 0 2147483647 Ce...

Page 73: ...r 25 Menu 25 Power 25 Source 26 Standby 26 Volume 26 C cables audio 12 13 15 CableWizard extension 50 extension 50 ordering 50 power 50 remote control 16 CableWizard extension cable 50 CableWizard connector 9 ceiling mounted projection 36 50 centering the image 34 cleaning the projection lens 41 color adjusting 29 colors don t match monitor colors 47 not displayed 45 compatibility IBM compatible 1...

Page 74: ... cable 50 external speakers connecting 16 F fade adjusting 31 focusing the image 20 Freeze button 25 freezing the projected image 25 fuzzy lines 33 H HDTV 1 14 32 I IBM compatible computers compatibility 1 icons on the projector 10 image adjusting 17 19 centering 34 colors don t match computer s 47 focusing 20 fuzzy lines 33 has lines or spots 47 not centered 45 not displayed 45 out of focus 46 qu...

Page 75: ...ning on 17 M Macintosh computers compatibility 1 connecting 13 Menu 25 Menu button 25 27 menus See on screen menus monitor projected colors don t match 47 mouse connecting 12 connecting USB type B 13 N NTSC video 35 O on screen menus Audio menu 30 changing language of 38 Controls menu 35 Display menu 28 displaying 27 Image menu 32 Language menu 38 making changes to menu functions 27 Status menu 38...

Page 76: ...owerBooks 57 Source button 26 specifications 49 Standby button 26 Standby Time 35 startup screen 37 Status menu 38 T Technical Support in Europe 4 in Singapore 4 in USA 4 information to have on hand before you call 48 temperature limits 49 test pattern 45 text not visible 45 tint adjusting 28 treble 30 troubleshooting 45 turning off the projector 18 turning on the projector 17 U USB mouse 12 USB t...

Page 77: ...duct When sending your unit in for repair please ship your unit in its original packing material or an InFocus approved ATA Shipping Case or have a professional packaging com pany pack the unit Please insure your shipment for its full value A return authorization number issued by the InFocus customer service department must also be clearly displayed on the outside of the shipping carton containing...

Page 78: ...ENUES OR LOST SAVINGS THE PRICE STATED FOR THE PRODUCT IS A CONSIDERATION IN LIMITING INFOCUS LIABILITY NO ACTION REGARDLESS OF FORM ARISING OUT OF THE AGREEMENT TO PURCHASE THE PRODUCT MAY BE BROUGHT BY PURCHASER MORE THAN ONE YEAR AFTER THE CAUSE OF ACTION HAS ACCRUED SOME STATES DO NOT ALLOW THE EXCLUSION OR LIMITATION OF INCIDENTAL OR CONSEQUENTIAL DAMAGES SO THE ABOVE LIMITATION OR EXCLUSION ...

Reviews: