background image

24

U

s

i

n

g


t

h

e


P

r

o

j

e

c

t

o

r

Using the On-Screen Menus

The projector


has six drop-down menus that allow you to make 

image adjustments and change a variety of settings. Most of these 
adjustments aren’t available directly from the keypad or remote. 

To open the on-screen menus, press the 

menu


button on the 

remote or keypad. Press 

menu

 again when you want to close the 

menus and save any changes.

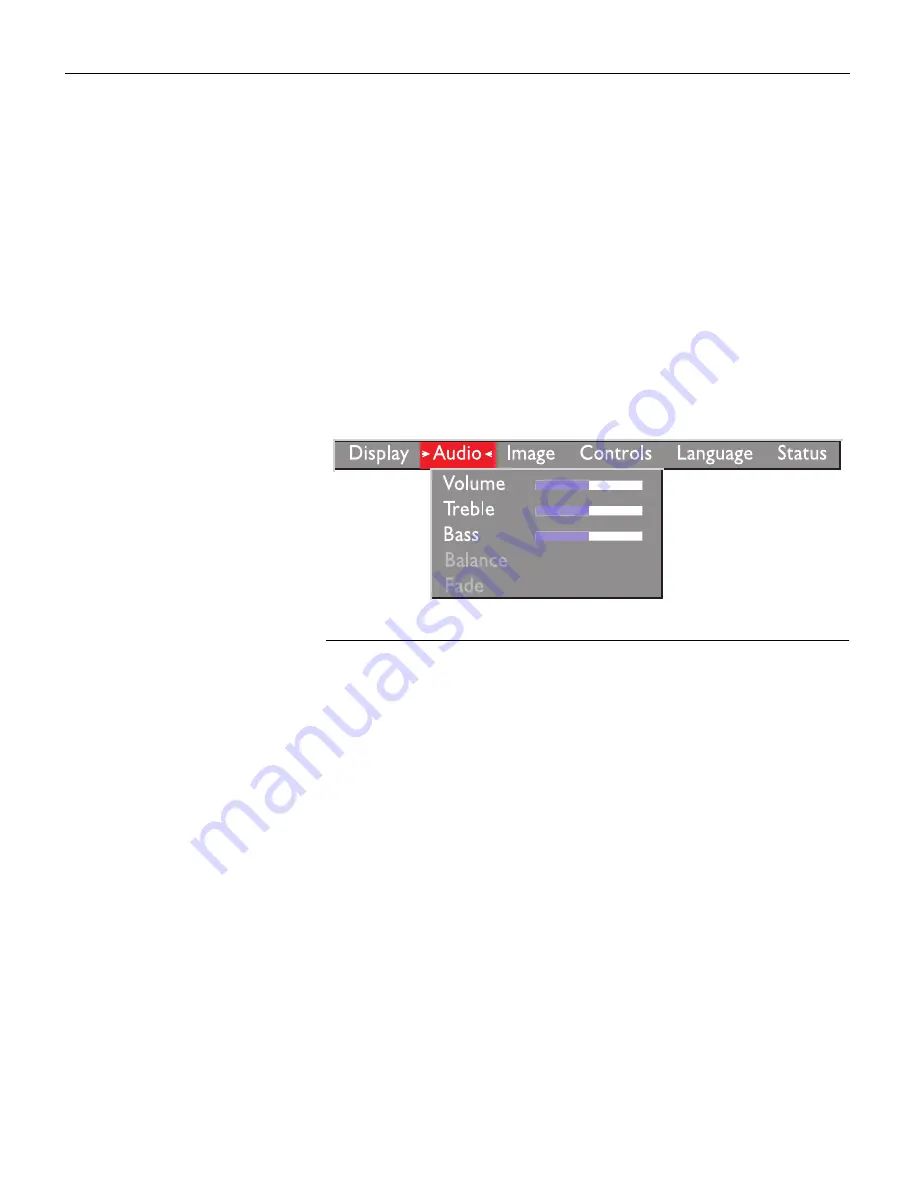
To select a menu, use the arrow keys on the keypad or disk 
mouse on the remote to move the cursor left and right to 
highlight the menu you want. The drop-down menu appears

.

F

IGURE

 20

Drop-down menu

To change a menu setting, use the up and down arrow keys on 
the keypad or the disk mouse on the remote to move the cursor 
up and down to the item you want to change (the selected item is 
highlighted red), then use the left and right mouse buttons (not 
the left and right arrow buttons) to adjust a setting. Some sub-
menus, such as Brightness, consist of a slider bar you use to 
increase or decrease a value; some submenus, such as Standby 
Time, consist of options you scroll through to select the desired 
one. All changes are saved when you close the menus.

To access another menu, use the left and right arrow buttons to 
move left or right to another menu.

Summary of Contents for LP 750 LiteMount

Page 1: ...cting a Laptop Computer 8 Connecting a Desktop Computer 10 Connecting a Computer Using a VESA cable 12 Connecting a Video Player 13 Connecting an External Speaker 15 Powering up the Projector and Adjusting the Image 15 Turning Off the Projector 16 Using the Projector 17 Basic Image Adjustment 17 Using the Remote Control 17 Adjusting the Projector 19 Using the Keypad and Remote Buttons 21 Using the...

Page 2: ...cing the Projection Lamp 37 Replacing the Batteries in the Remote Control 39 Using the Kensington Lock 39 Troubleshooting 40 Solutions to Common Problems 41 Appendix 47 Specifications 47 Accessories 49 Portable and Laptop Activation Chart 51 Using Video Mirroring with a PowerBook Computer 55 Projected Image Size 56 Index 59 ...

Page 3: ...on openings Warning To replace the lamp turn the power off and unplug the power cord To avoid burns wait 30 minutes before opening the lamp door Follow all instructions provided in this User s Guide Warning Please use the power cord provided Connect the power cord to a receptacle with a protective safety earth ground terminal Warning Visible laser radiation Do not stare into beam Warning Refer all...

Page 4: ...urface Do not touch An arrow pointing to the lamp door on the projector Warning Laser radiation Do not stare into laser beam Customer Service If you need assistance call In Focus Customer Service directly at 1 800 799 9911 Support is free between 5 a m and 5 p m PST Monday through Friday Support is available in North America after hours and weekends for a fee at 1 888 592 6800 Or send us an e mail...

Page 5: ...not compress screen reso lutions above 1280x1024 If your computer s screen resolution is higher than 1280x1024 reset it to a lower resolution before you connect the projector Compatibility The projector is compatible with a wide variety of computers and video devices including IBM compatible computers including laptops up to 1280x1024 resolution at 75 Hz Apple Macintosh and PowerBook computers up ...

Page 6: ...ntents 1 LP750 projector and lens cap 7 VESA cable 2 Soft carry case 8 VESA audio cable 3 LP750 documentation User s Guide Quick Start card online CD 9 CableWizard3 4 power cord 10 CableWizard USB mouse cable 5 remote and batteries 11 CableWizard PS 2 mouse cable 6 RCA audio video A V cable 12 CableWizard audio cable 1 2 3 4 5 6 7 8 9 10 11 12 ...

Page 7: ...s you would any product with glass components Be especially careful not to drop it Avoid leaving the projector in direct sunlight or extreme cold for extended periods of time If this happens allow it to reach room temperature before use This projector is not intended for use in a mainframe computer room as defined in the Standard for the Protection of Electronic Computer Data Processing Equipment ...

Page 8: ...5 p m PST Monday through Friday Service is available in North America after hours and on weekends for a fee at 1 888 592 6800 In Europe call In Focus in The Netherlands at 31 35 6474010 In Singapore call 65 332 0659 Or send us an e mail at techsupport infocus com Our World Wide Web address is http www infocus com Warranty This product is backed by a limited two year warranty The details of the war...

Page 9: ...the projector on the ceiling refer to the LP750 Ceiling Mount Installation Guide that comes with the Ceiling Mount Kit for more information To turn the image upside down see Ceiling Projection on page 31 The Ceil ing Mount Kit is sold separately see page 50 2 Position the projector the desired distance from the screen The distance from the lens of the projector to the screen determines the size of...

Page 10: ... LED that lights solid green when the projector is on and CableWizard is functioning prop erly A slowly blinking LED indicates CableWizard is waiting to initialize with the projector a rapidly blinking LED indicates a problem with CableWizard Connect the end of the CableWizard cable to the connector on the projector s connector panel Figure 4 NOTE The LP750 is optimized for use with newer CableWiz...

Page 11: ...ven on the pages listed below NOTE In some older computers the monitor connector does not have a hole for Pin 9 If you have trouble connecting the CableWiz ard cable to your computer con tact In Focus Technical Support FIGURE 5 Connector panel NOTE If you are connecting an older Macintosh computer that does not have a 15 pin connector you must use Mac adaptors ordered separately Equipment you want...

Page 12: ...ant audio or mouse control you can use a simplified cable called CableWizard Lite ordered separately See Optional Accessories on page 50 1 Plug either end of the CableWizard audio cable into the audio connector on your computer 2 Plug the other end of the audio cable into the connector on the CableWizard Do you want to control the computer s mouse from the projector s remote or keypad If your comp...

Page 13: ...ug the end of the CableWizard mouse cable into the connector on the CableWizard You must have the appropriate USB drivers installed on your computer to use the USB feature Windows 98 ships with the appropriate drivers NOTE A USB mouse is hot plug gable meaning you do not need to re boot your computer after con necting the mouse to use it A PS 2 mouse is not hot pluggable Now you re ready to power ...

Page 14: ...ctor on your computer FIGURE 8 Connecting the CableWizard cable to a desktop computer Do you want to display the image on your computer s monitor as well as on the projection screen NOTE The projector must be turned on to display the image on your monitor 1 Plug your monitor s cable into the connector on the CableWizard Do you want to play your computer s audio on the projector 1 Unplug the audio ...

Page 15: ...ard FIGURE 9 Connecting the CableWizard monitor audio and mouse cables to a desktop computer If your computer has a USB connector and is running Windows 98 use the USB mouse cable NOTE The USB mouse is sup ported for use with Windows 98 only 1 Plug the end of the CableWizard mouse cable into the mouse connector on your computer 2 Plug the end of the CableWizard mouse cable into the connector on th...

Page 16: ... one end of the VESA cable into the video connector on your computer 3 Plug the other end of the VESA cable into the HD 15 connec tor on the projector Do you want to play your computer s audio on the projector 1 Unplug the audio cable if present from your computer 2 Plug either end of the CableWizard audio cable into the audio connector on your computer 3 Plug the other end of the audio cable into...

Page 17: ...50 2 Plug the A V cable s yellow connector into the video out port on your video player Figure 11 This port may be labeled To Monitor If you re using an S video cable connect it to the S video out connector on the video player Figure 12 3 Plug the other yellow connector into the composite connector on the projector If you re using S video plug the other end of the cable into the S video connector ...

Page 18: ...axial cable connection DO NOT use this to connect to the projector If you re using an S video cable the yellow connectors on the A V cable remain unused Figure 12 5 Plug the A V cable s other white and red connectors to the left and right audio in ports on the projector The projector is compatible with these major broadcast video standards NTSC NTSC 4 43 PAL PAL M PAL N and SECAM It automatically ...

Page 19: ...run at low speed After the projector has initialized the Power LED Figure 18 on page 21 lights solid green 3 Turn on the projector by pressing the power button on the remote or keypad CAUTION If the lamp LED remains solidly lit after the projec tor has powered on the lamp needs to be replaced Refer to Replacing the Projection Lamp on page 37 for more information The In Focus startup screen display...

Page 20: ...ss the menu button on the keypad Then select the Display menu or the Image menu For more infor mation about the menus see page 24 If you don t want to hear the sound from your computer press the mute button Turning Off the Projector If you want to turn off the projector for a short period of time press the standby button on the remote or keypad The Standby LED on the keypad lights solid green This...

Page 21: ...after you have adjusted the focus turn Auto Image page 29 off and then back on to reset the automatic sync and tracking If that doesn t clear up the image adjust the sync page 29 and or the tracking page 30 manually 5 If the colors don t look right adjust the brightness page 22 and tint page 25 Using the Remote Control NOTE If you can t aim the remote control at the projector so that its signal is...

Page 22: ...e lights up The light goes off 10 seconds after you stop pressing buttons To use the laser press and hold the laser button The laser goes off when the button is released If you are creating presentations in Microsoft PowerPoint you can use the remote s mouse buttons to navigate through your presentation while in Slide Show mode To configure PowerPoint for this choose Options from the Tools menu cl...

Page 23: ...image rotate the zoom ring This adjusts the image size without affecting focus FIGURE 15 Focus ring zoom ring and elevator button The projector is equipped with a self locking quick release eleva tor foot and button Figure 15 and a leveling knob Figure 16 FIGURE 16 Leveling knob focus ring zoom ring elevator button ...

Page 24: ... into position 3 If necessary use the leveling knob Figure 16 to adjust the angle of the projected image FIGURE 17 Adjusting the height of the projector To lower the projector 1 Press and hold the elevator button 2 Lower the projector to the height you want then release the button to lock the elevator foot into position 3 If necessary use the leveling knob Figure 16 to readjust the angle of the pr...

Page 25: ...ad and Remote Buttons This section provides an alphabetical reference to the keypad and remote buttons FIGURE 18 Keypad FIGURE 19 Remote power LED lamp LED standby LED right mouse button left mouse button arrow buttons ...

Page 26: ...e screen allowing you to perform other operations on the computer without the audience seeing them Press freeze again when you want the image to return to normal Help keypad only Press help to display the on screen help information Laser remote only The laser button activates a laser beam that can be used as a pointing device To use the laser press and hold the laser button The laser goes off when...

Page 27: ...screen is displayed for 15 minutes The Standby LED lights while the projector is in standby After 15 minutes the lamp goes out if you haven t pressed standby again You can change the amount of time the projector stays in standby mode see Standby Time on page 31 for details If you press standby again within 15 minutes the projector returns to normal operations immediately After 15 minutes the proje...

Page 28: ...hlight the menu you want The drop down menu appears FIGURE 20 Drop down menu To change a menu setting use the up and down arrow keys on the keypad or the disk mouse on the remote to move the cursor up and down to the item you want to change the selected item is highlighted red then use the left and right mouse buttons not the left and right arrow buttons to adjust a setting Some sub menus such as ...

Page 29: ... PAL or SECAM video sources Press the left mouse button to increase the amount of green in the image Press the right mouse button to increase the amount of red in the image Contrast The contrast controls the degree of difference between the lightest and darkest parts of the picture Adjusting the contrast changes the amount of black and white in the image Press the left mouse button to decrease the...

Page 30: ...left mouse button to decrease the amount of red in the image Press the right mouse button to increase the amount of red in the image Blank Screen Blank Screen determines what color is displayed when there is no active source and when the projector is in standby Click either mouse button to toggle between the two options Reset All Click either mouse button to reset all the options except Lan guage ...

Page 31: ...ur audio source NOTE The Treble and Bass set tings apply only to the projector s internal speaker External speakers typically have their own tone con trols Press the left mouse button to decrease the treble Press the right mouse button to increase the treble Treble adjustments are saved for each source you have connected Bass The bass setting controls the low frequencies of your audio source Press...

Page 32: ...m the left external speaker Press the right mouse button to increase the amount of sound coming from the right external speaker Fade The fade setting controls the balance between the internal and external speakers The setting appears gray and won t highlight if external speakers aren t connected Fade applies to all sources you have connected Press the left mouse button to increase the amount of so...

Page 33: ...lly resizes the image by scaling it up or down It only affects computer images that are not 1024x768 the projector s native resolution When Auto Resize is on the projector makes the best fit of the image to the screen If you turn Auto Resize off by highlighting it in the Image menu and clicking either mouse button to select off the image may be either cropped or too small for the screen Manual Syn...

Page 34: ... ually 1 Turn Auto Image off 2 Highlight Manual tracking then press either mouse button repeatedly until the fuzzy vertical bars are gone Horizontal position Follow these steps to manually adjust the horizontal position 1 Turn Auto Image off 2 Highlight Horizontal position then press the left mouse but ton to move the image right or press the right mouse button to move the image left Positioning a...

Page 35: ... correct standard the colors might not look right or the image might appear torn If this happens manually select a standard by clicking either mouse button and cycling through the standards Standby Time This option lets you select how long the lamp stays on and the blank screen is displayed when the projector enters standby mode before the projector turns off Select among 1 5 10 and 15 minutes and...

Page 36: ...this feature on and off Plug and Play This setting toggles between On and Off When it is On most new computers will automatically recognize the LP750 then set the monitor resolution and refresh rate accordingly You need to set the Plug and Play setting to Off for the LP750 to display prop erly on some older computers The Plug and Play setting does not affect video images If the LP750 display const...

Page 37: ...the cursor to the language you want then click either mouse button The menus redraw immediately Status Menu This is a read only menu for informational purposes To display the status window select Show status from the menu then click either mouse button To remove the window click either mouse button FIGURE 26 Status menu ...

Page 38: ...er s Control Panel and adjust the resolution in the Display tab See your computer s user s guide for details Horizontal refresh rate The time period that one horizontal line is displayed Vertical refresh rate The time period that one video frame is displayed Mute status Indicates if the audio is muted Software version Indicates the projector s software version This information is useful when conta...

Page 39: ...ive humidity non condensing Dimensions 5 2 x 11 7 x 14 7 inches 13 x 29 5 x 36 7 cm Weight unpacked 9 7 pounds 4 4kg Altitude Operating 0 to 10 000 feet 3048 meters Non operating 0 to 40 000 feet 12 192 meters Optics Focus Range 4 40 feet 1 2 12m Lamp Type 120 watt UHE Remote Control Battery Two 2 AA alkaline cells Laser Class II laser product wavelength 670nm maximum output 1mW Input Power Requir...

Page 40: ... RCA jack CableWizard Audio Input Input Impedance 10K ohm nominal AC coupled Maximum Input Voltage LIN RIN PEAK 4 5 V for THD 0 3 LIN or RIN 2 0 Vrms for THD 0 3 Sensitivity 100 mV at 1 KHz for 88 dB SPL at 1 meter Connector Type 3 5 mm 1 8 inch stereo phone jack Audio Output Frequency Response 10 Hz 20 KHz Output Impedance 1 2 K ohm nominal Output Voltage 2 Vrms maximum open circuit Connector Typ...

Page 41: ...W3 CableWizard Audio Cable 2 ft 210 0079 xx CableWizard USB Cable 2 ft 210 0100 xx CableWizard PS 2 Mouse Cable 1 5 ft 210 0145 xx VESA Cable HD 15 to HD15 6 ft 210 0119 xx VESA Audio Cable 6 ft 210 0118 xx Projection Lamp Module SP LAMP LP7P Lens Cap 505 0363 xx Audio Video Cable 9 ft 210 0053 xx Remote Control and 2 Batteries 590 0275 xx Online User s Guide CD ROM 010 0116 xx North American Powe...

Page 42: ...tallation Extension Cable 70 5 ft SP CW2 IEXT Two button Executive Remote Control SP EXREM Remote Cable 50 ft 210 0088 xx Kensington MicroSaver Security System SP KENLOC Rhapsody II Speakers SP R2SPKR JBL Subwoofer SP JBLSUB Portable Projector Stand SP STND LP750 Tripod Mount Kit SP TRIP LP750 S Video Cable 515 0027 xx LP750 Ceiling Mount LiteMount 750 SP CEIL LM750 LiteMount False Ceiling Plate S...

Page 43: ... On some laptops the activation function key is labeled with an icon for example or the text CRT LCD Computer Key command to activate port Key command to de activate port Acer Ctrl Alt Esc for setup Ctrl Alt Esc for setup AST FN D or Ctrl D FN D or Ctrl D Ctrl FN D Ctrl FN D FN F5 FN F5 type from A IVGA CRT type from A IVGA CRT FN F12 FN F12 Advanced Logic Research Ctrl Alt V Ctrl Alt V Altima Shi...

Page 44: ...lt Ctrl Alt Ctrl Alt F10 Ctrl Alt F10 FN F8 CRT LCD FN F8 FN D FN D FN F12 FN F12 Digital automatic reboot FN F2 FN F2 Dolch dip switch to CRT dip switch to LCD Epson dip switch to CRT dip switch to LCD Everex setup screen option setup screen option For A Ctrl Alt Shift C Ctrl Shift Alt L Gateway FN F1 FN F1 again simul taneous FN F1 Grid FN F2 choose auto or simultaneous FN F2 Ctrl Alt Tab Ctrl A...

Page 45: ...Control Panel folder Pow erBook Display folder Activate Video Mirroring warm reboot 210 230 250 270 280 2300 requires Apple Docking Station or Mini Dock Magitronic FN F4 FN F4 Mastersport FN F2 FN F1 Micro Express automatic warm reboot Microslate automatic warm reboot Mitsubishi SW2 On Off Off Off SW2 Off On On On NCR setup screen option setup screen option NEC setup screen option setup screen opt...

Page 46: ...ch to CRT dip switch to LCD Sun SPARC Dataview Ctrl Shift M Ctrl Shift M Tandy Ctrl Alt Insert Ctrl Alt Insert setup screen option setup screen option Texas Instru ments setup screen option setup screen option Top Link setup screen option setup screen option FN F6 FN F6 Toshiba Ctrl Alt End Ctrl Alt Home FN End FN Home FN F5 FN F5 setup screen option setup screen option Twinhead FN F7 FN F7 FN F5 ...

Page 47: ... control panel again When using video mirroring and high color graphics such as slide shows the projected image occasionally might turn black and white If this happens perform the following steps 1 Turn off video mirroring 2 Open the Monitors control panel 3 Move the white menu bar to Monitor 2 to set the projector as the primary monitor 4 Restart the PowerBook Using SimulScan Some newer PowerBook...

Page 48: ...nd the tables on the next page to help you determine projected image sizes NOTE You can access a Microsoft Excel Image Size Calculator at our web site at http www infocus com It is in the Technical Library under Service and Support FIGURE 32 Projected image size ...

Page 49: ...2 46 15 115 92 69 20 154 123 92 25 192 154 115 30 230 184 138 35 269 215 161 40 307 246 184 Table 2 Image Size Width and Height for Lens at Minimum Image Size Distance to Screen feet Maximum Diagonal inches Maximum Width inches Maximum Height inches 4 24 19 14 10 59 47 35 15 88 70 53 20 118 94 71 25 147 118 88 30 176 141 106 35 206 165 124 40 235 188 141 ...

Page 50: ...he lens Abrasive cleaners solvents or other harsh chemicals might scratch the lens 2 Lightly wipe the cleaning cloth over the lens 3 If you don t intend to use the projector immediately replace the lens cap Cleaning the Fan Intake Filter The fan intake filter on the bottom of the projector catches dust and particles in the air If the filter becomes clogged the projector does not cool properly and ...

Page 51: ...Using a screwdriver or your hand push the tab on the filter door forward and lift the door out 4 Clean the filter Use a vacuum cleaner set on low power to remove the dust and dirt FIGURE 28 Cleaning the air filter 5 Replace the filter First insert the side with the tabs then press the other end in place ...

Page 52: ...e lamp should be replaced at this time You can order new lamp modules from your In Focus dealer See Accessories on page 49 for information Follow these steps to replace the projection lamp 1 Turn off the projector and unplug the power cord 2 Wait 30 minutes to allow it to cool thoroughly 3 Using a small flat blade screwdriver loosen the screw on the outside of the lamp door Figure 29 4 Pull the la...

Page 53: ...r and cause injury 7 Align the new lamp module in the correct direction 8 Gently push the module in as far as it goes 9 Tighten the screws on the outside of the module 10 Reposition the lamp door 11 Tighten the lamp door screw 12 Plug in the power cord and turn the projector back on The lamp monitor light and lamp hour counter in the Status menu are automatically reset ...

Page 54: ...over off the end of the remote by pressing on it with the heel of your hand 3 Remove the old batteries 4 Install two new AA alkaline batteries Make sure you install each in the correct direction 5 Slide the battery cover back on the remote Using the Kensington Lock The projector has a Kensington Security Standard connector for use with a Kensington MicroSaver Security System Figure 31 Refer to the...

Page 55: ... If the problem still exists unplug the cable from the computer and check the computer monitor s display The maximum res olution that the projector can display is 1280x1024 pixels pref erably 1024x768 The problem might be with the graphics controller in your computer rather than with the projector When you reconnect the projector remember to turn the com puter and monitor off before you power up t...

Page 56: ...ojection Lamp on page 37 Make sure that the CableWizard and the cables do not have any bent pins Check the power cord for bent pins also Problem Color or text not being projected You might need to adjust the brightness up or down until the text is visible Refer to Brightness or on page 22 for more information Verify that the appropriate input source is selected See Com puter on page 22 or Video on...

Page 57: ... is especially important that you follow this sequence for Macintosh computers Make sure your computer s graphics board is installed and configured correctly If you re using Windows 3 x 1 In the Windows Program Manager double click the Win dows Setup icon in the Main program group 2 Verify that the Display setting is 1280x1024 or less If you re using Windows 95 or Windows 98 1 Open My Computer ico...

Page 58: ...blem Image and menus are reversed left to right Rear projection mode is probably turned on Switch back to for ward projection from the Controls menu The image should immediately return to forward projection See Rear Projec tion on page 32 Problem Image and menus are upside down Ceiling mode is probably turned on Turn off the mode from the Controls menu The image should immediately return to forwar...

Page 59: ... and or contrast from the Display menu Just as there are differences in the displays of different monitors there are often differences between the computer image and the projected image See Brightness or on page 22 Tint on page 25 and Contrast on page 25 Problem Lamp seems to be getting dimmer The lamp begins to lose brightness when it has been in use for a long time Replace the lamp as described ...

Page 60: ...abel the resolution of your computer Call In Focus Technical Support at 1 800 799 9911 Support is free between 5 a m and 5 p m PST Monday through Friday Support is available in North America after hours and on weekends for a fee at 1 888 592 6800 Or send us an e mail at techsupport infocus com In Europe call In Focus in The Netherlands at 31 35 6474010 In Asia call 65 332 0659 ...

Page 61: ...s adjusting 22 25 buttons on keypad and remote Brightness 22 Computer 22 Freeze 22 Help 22 Laser 22 Menu 22 Mute 22 Power 23 Standby 23 Video 23 Volume 23 C cables A V 13 49 CableWizard 2 6 49 CableWizard extension 50 composite video 13 extension 5 50 mouse 9 ordering 49 50 power 49 remote control 50 S video 13 50 VESA 12 CableWizard cables 2 6 49 connecting to equipment 7 connecting to the projec...

Page 62: ...en 26 Brightness 25 Color 26 Color temperature 26 Contrast 25 Reset All 26 Tint 25 Display Messages 32 Display Startup Screen 32 displaying on screen help information 22 on screen menus 22 startup screen 32 status messages 32 E extension cable 5 50 external speakers connecting 15 F fade adjusting 28 filter cleaning 35 Freeze button 22 freezing the projected image 22 fuzzy lines 30 H Help button 22...

Page 63: ...g 35 leveling the projector 19 LP 750 cases 50 ceiling mounted 5 31 not working 40 project from behind the screen 31 32 setting up 5 specifications 47 turning off 16 turning on 15 M Macintosh computers compatibility 1 Menu 22 Menu button 22 24 menus See on screen menus monitor projected colors don t match 44 Mute button 22 N NTSC video 31 O on screen menus Audio menu 27 changing language of 33 Con...

Page 64: ... Standby Time 31 startup screen 15 32 42 Status menu 33 S video connecting 13 ordering cable 50 T Technical Support in Asia 4 in Europe 4 in USA 4 information to have on hand before you call 45 things to try before you call 40 temperature limits 47 text not visible 41 tint adjusting 25 treble adjusting 27 troubleshooting 40 turning off projector 16 sound 22 turning on the projector 15 U USB mouse ...

Reviews: