iNFinuvo CLEANMATEQQ5 User Manual Download Page 14

Scheduler Operations

:

:

:

:

TIP : The scheduler function must have "Day of week" setting. 
TIP : You can push "Hour" button to "---:---" pattern of LCD, to stop scheduler 
          function. 
TIP : If the "scheduling clean time" was not complete setting and over 60 sec. 
         The LCD will regain "Local time" display.

Anytime Go cleaning button :
1. Push button ( Just one shoot ) : 
    When QQ5 is charging fully, it will leave charging-base to cleaning 
     automatically.
2. Push button (Over 3 sec). 
    If QQ5 seated on charging-base, it will leave base and cleaning immediately.

   Day of week button : Setting the day of week timing.

   Hour button : Setting the hour of day timing.

   Minute button : Setting what minutes of hour timing.

:

:

Display Pattern of LCD :

When you push "Start" button (just one shoot), the"           

will show on LCD.

During QQ5 charged fully,"           "


"Full" will show on LCD.

Step 4 : Push "Min." button, same as above, setting "minutes" of cleaning time.
Step 5 : Push "              " again, when you completed the cleaning time setting.
              The ":" pattern of LCD will regain blinking. 

:

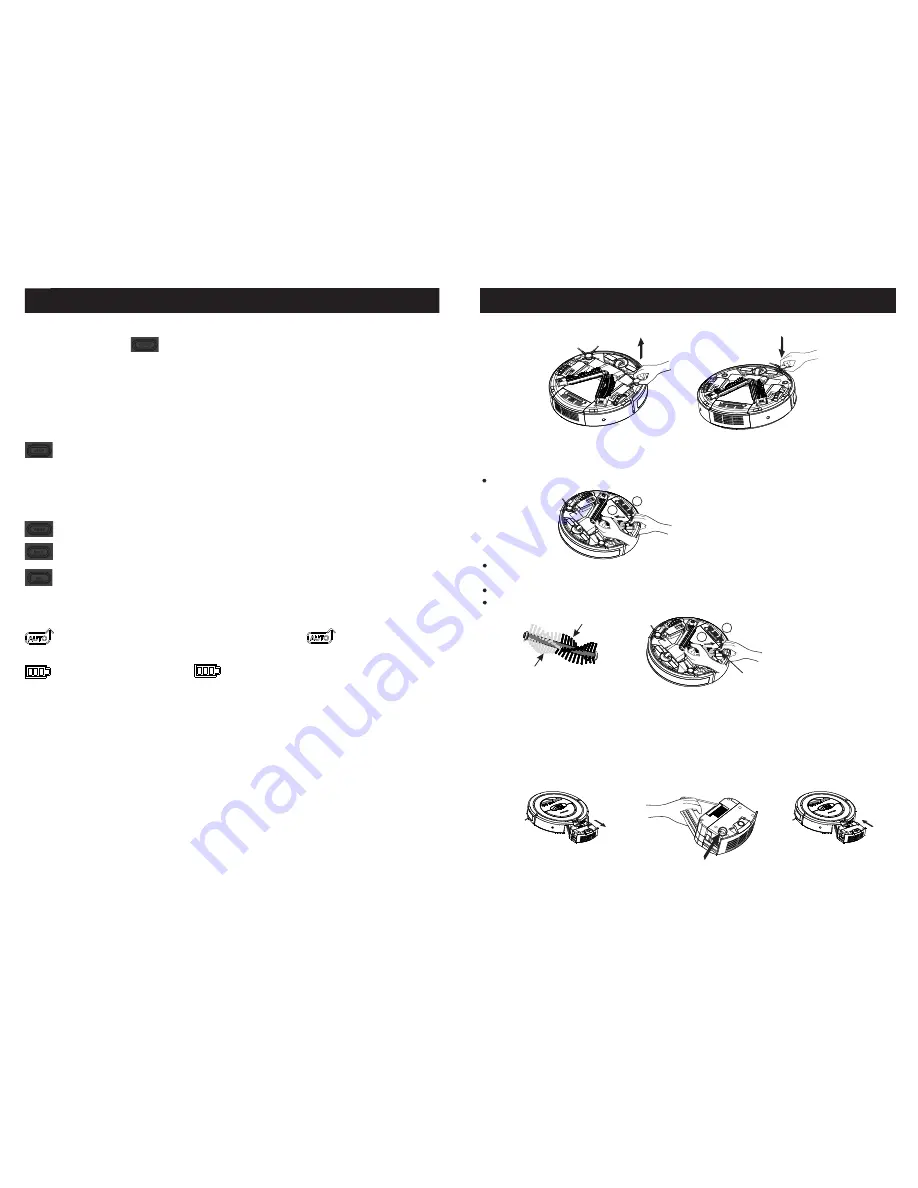
Installing Accessories

Roller Brush Installation and Removal

Push down button(do not release), then pull out roller-brush.

1

2

There are 2 color hairs on roller-brush, one is white, another is black.Also, there are 2 
color push-buttons on QQ5 bottom.
Match the hairs color with push-button color. 
Push down button(do not release), then insert roller-brush.

White

Black

1

2

Roller-brush Button

Fragrance Installation and Removal

This Intelligent Automatic Vacuum has a compartment built into it for adding fragrance 
to the air as the unit cleans. Any solid scent packet, insert, or dryer sheet can be used.
DO NOT use any type of Liquid or Oil Fragrance with this unit.

Step 1

Step 2

Step 3

Side-brush Installation and Removal

12

1 3

Summary of Contents for CLEANMATEQQ5

Page 1: ......

Page 2: ...Table of Content 1 1 2 2 3 4 7 8 9 10 11 13 14 15 17 19 21 22 Setting ID with Main unit...

Page 3: ...24 Safety Precautions Safety Instruction...

Page 4: ...ral movement Used remoter Mode 1 from inside to outside cycling All cleaning parts could renew from unit outside and by yourself Cleaning a wide variety of floor types Optimum dimension 33 8cm 13 3 1i...

Page 5: ...e parts 4 Remote control 5 Sonic wall 6 Battery pack 7 Charger 8 Manual 2 9 Cleaner brush 10 Rolling brush cleaner 4 1 6 8 5 2 7 3 Spare parts box On the top of dust bin On the back of Charging base 3...

Page 6: ...unction display Universal Wheel Side Brush Charging Pad Rolling Brush Air outlet UV Light Rolling Brush Switch Drop Sensor 6 Wheel set Dust bin button Remote control Power switch Dust bin unit Main Un...

Page 7: ...up QQ5 Timer Movement Mode Error display 1 Timer Yon can use remote controll setting clean time 80 60 40 20 80 repeat During cleaning the timer will be countdown the setting time When next time turns...

Page 8: ...ion fan is activated You can push Fan button of remote controll to ON OFF it UV Light The blue symbol light up the UV Light is activated You can push UV button of remote controll to ON OFF it When QQ5...

Page 9: ...light up before you start setting please clear previous ID of Main unit You can follow the step of instruction f c Let the sonic wall start to study If the three symbol are all light up please clear...

Page 10: ...een used yet Tip Each one main unit at most can be equipped with one remote control two charging stations and 3 sonic walls at the same time Step Each one of main unit remote control charging station...

Page 11: ...ng it means battery low 1 2 3 4 5 When QQ5 cleaning the Sonic Wall position must be away from charging base at least 1m 3 ft and avoid face to charging base When QQ5 complete cleaning you can power of...

Page 12: ...e Self Charging Base and turn it on Now press the Home key on remote control The QQ5 should return to the Home Base automatically for self charging Make necessary adjustment to the Home Base if the QQ...

Page 13: ...r Min button to update local time For example Push week button will show Monday push again will show next day of week Choose the true day then push button again The pattern will regain blinking the Da...

Page 14: ...ring QQ5 charged fully Full will show on LCD Step 4 Push Min button same as above setting minutes of cleaning time Step 5 Push again when you completed the cleaning time setting The pattern of LCD wil...

Reviews: