iNFinuvo CLEANMATEQQ5 User Manual Download Page 12

Self Charging Home Base

1.

1.

1.

2.

2.

2.

3.

Preparations

Find a proper place(we recommend a hard surface floor)to put the Self-Charging 
Home Base in the room. Leave about 60cm (2ft) clearance around the Home Base.
Connect the battery charger to the power input socket on the back of home base first. 
Then, place home base against the wall. Don’t leave loose wire around the wall. 
Finally, plug battery charger to AC power outlet on the wall. 
Make sure the LCD display on the Home Base is on. This means that the Home Base 
has been powered on, and it is ready to charge the QQ5. 

60cm

60cm

Wire slot

charger socket

Please settle down the cable of charger into the back side slot of base.

Charger plug-in socket

Testing the Home Base

Battery Charging Methods

Put the QQ5 on the floor close to the Self-Charging Base and turn it on Now press the 
"Home" key on remote control. The QQ5 should return to the Home Base 
automatically for self-charging.
Make necessary adjustment to the Home Base if the QQ5 can not dock on the Home 
Base properly.

Put the QQ5 on the floor close to the Self-Charging Base and turn it on Now press the 
"Home" key on remote control. The QQ5 should return to the Home Base 
automatically for self-charging.
Make necessary adjustment to the Home Base if the QQ5 can not dock on the Home 
Base properly.

back and bottom of the unit.

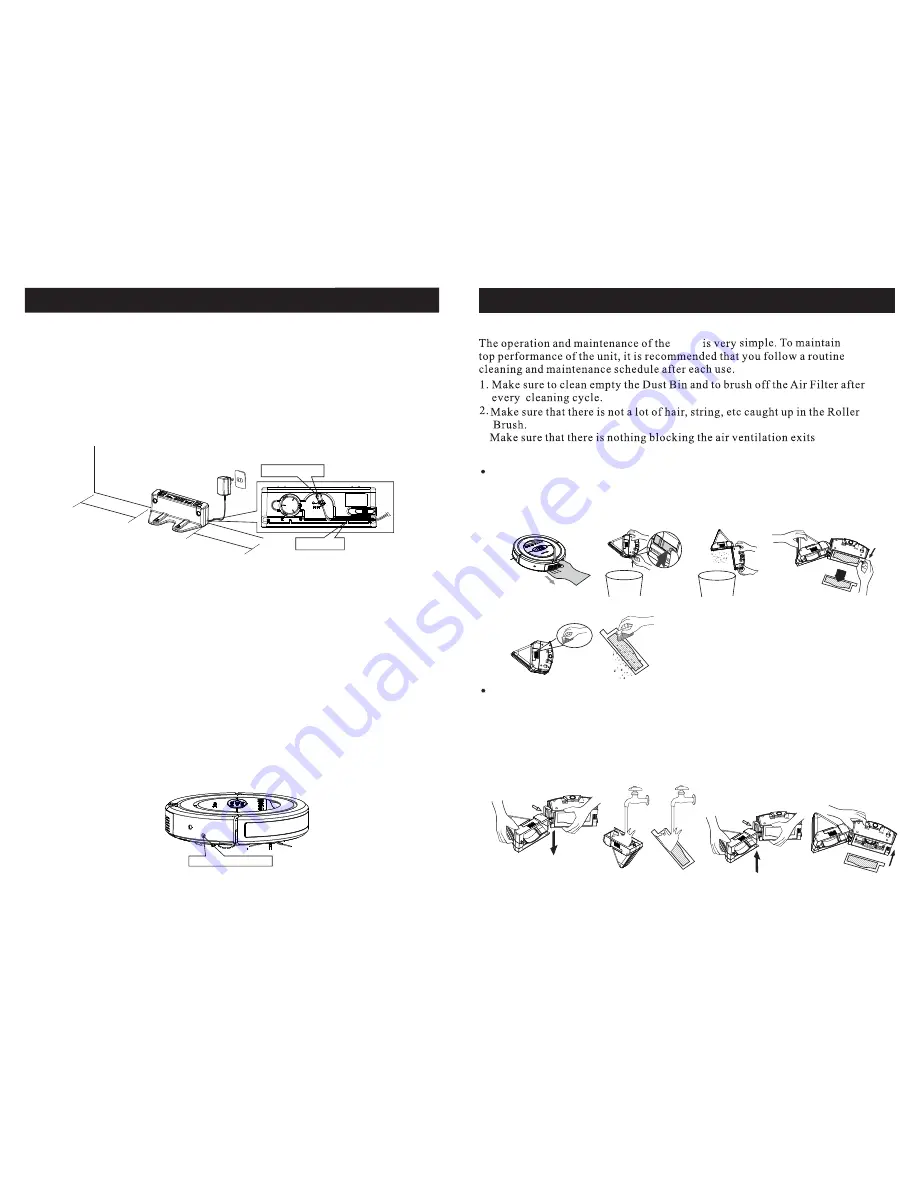
Cleaning Dust Bin and Air Filter

Washing Dust Bin and Air Filter

Please follow Fig.1 to Fig.6 to clean it.
(In Fig.2, you can see Open-button at side of dust bin)  

Fig


1

Fig


5

Fig


6

Fig


2

Fig


3

Fig4

Please follow Fig.7 to separate Dust Bin and suction motor unit.
Follow Fig.8, 9 to wash it.
Follow Fig.10, 11 to install it.

Slot

Slot

Fig


10

Fig


11

Fig


7

Fig


8

Fig


9

Cleaning and Maintenance

Cleaning and Maintenance

3.

on the

10

15

QQ5

Summary of Contents for CLEANMATEQQ5

Page 1: ......

Page 2: ...Table of Content 1 1 2 2 3 4 7 8 9 10 11 13 14 15 17 19 21 22 Setting ID with Main unit...

Page 3: ...24 Safety Precautions Safety Instruction...

Page 4: ...ral movement Used remoter Mode 1 from inside to outside cycling All cleaning parts could renew from unit outside and by yourself Cleaning a wide variety of floor types Optimum dimension 33 8cm 13 3 1i...

Page 5: ...e parts 4 Remote control 5 Sonic wall 6 Battery pack 7 Charger 8 Manual 2 9 Cleaner brush 10 Rolling brush cleaner 4 1 6 8 5 2 7 3 Spare parts box On the top of dust bin On the back of Charging base 3...

Page 6: ...unction display Universal Wheel Side Brush Charging Pad Rolling Brush Air outlet UV Light Rolling Brush Switch Drop Sensor 6 Wheel set Dust bin button Remote control Power switch Dust bin unit Main Un...

Page 7: ...up QQ5 Timer Movement Mode Error display 1 Timer Yon can use remote controll setting clean time 80 60 40 20 80 repeat During cleaning the timer will be countdown the setting time When next time turns...

Page 8: ...ion fan is activated You can push Fan button of remote controll to ON OFF it UV Light The blue symbol light up the UV Light is activated You can push UV button of remote controll to ON OFF it When QQ5...

Page 9: ...light up before you start setting please clear previous ID of Main unit You can follow the step of instruction f c Let the sonic wall start to study If the three symbol are all light up please clear...

Page 10: ...een used yet Tip Each one main unit at most can be equipped with one remote control two charging stations and 3 sonic walls at the same time Step Each one of main unit remote control charging station...

Page 11: ...ng it means battery low 1 2 3 4 5 When QQ5 cleaning the Sonic Wall position must be away from charging base at least 1m 3 ft and avoid face to charging base When QQ5 complete cleaning you can power of...

Page 12: ...e Self Charging Base and turn it on Now press the Home key on remote control The QQ5 should return to the Home Base automatically for self charging Make necessary adjustment to the Home Base if the QQ...

Page 13: ...r Min button to update local time For example Push week button will show Monday push again will show next day of week Choose the true day then push button again The pattern will regain blinking the Da...

Page 14: ...ring QQ5 charged fully Full will show on LCD Step 4 Push Min button same as above setting minutes of cleaning time Step 5 Push again when you completed the cleaning time setting The pattern of LCD wil...

Reviews: