background image

Linea Pro 7 User Manual 

Page 22 of 30

UM-00028  Version:  A

SERVICING YOUR LINEA PRO 7

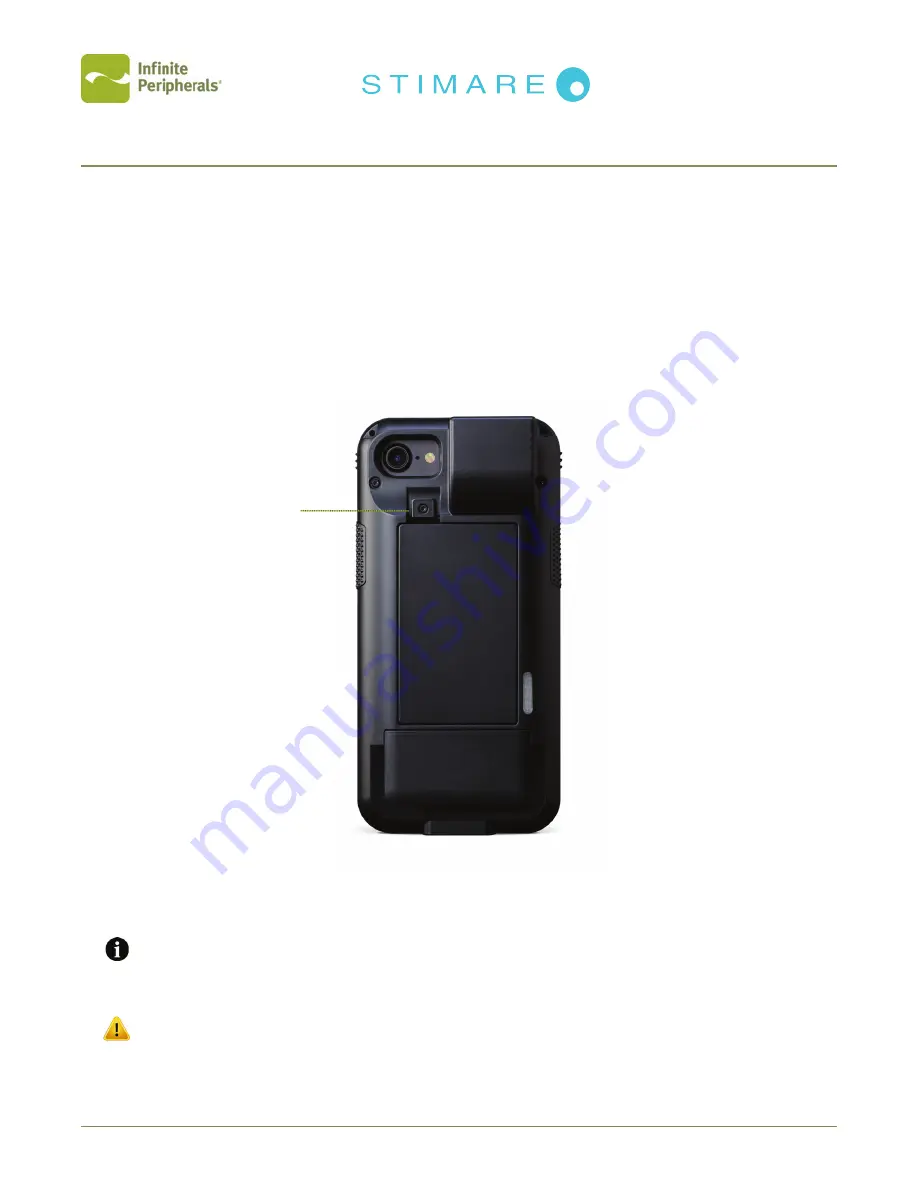
Battery Replacement

The Linea Pro 7 is designed with a user replaceable 2100mAh battery.

To Replace the Battery:

1. Using a T5 x 40mm Torx Driver, remove the torx screw from the back cover.
2. Gently pull tab in then up to remove back cover.
3. Lift up on battery to remove, then insert replacement battery ensuring battery contacts are

aligned.

4. Replace battery cover, then insert the (2) torx screws into place and tighten using the torx driver.

Battery Cover

Torx Screw

Figure 16:  Battery Replacement

T5 x 40mm Torx Driver not included.

Linea Pro 7 with encrypted functionality has special key protection features. If battery 

is removed from the unit for more than one (1) hour, it may result in the erasure of the 

encryption key and disabling of the card reading features. See SRED Encrypted MSR 

Information below for additional information.

Summary of Contents for Linea Pro 7

Page 1: ...Linea Pro 7 USER MANUAL Linea Pro 7 ...

Page 2: ...PSU TUJNBSF OFU 5FKPO 4USFFU FOWFS 0 64 1IPOF 6OJU SBNCFS PVSU SBNCFS 3PBE POEPO 8 18 6OJUFE JOHEPN 1IPOF 1BUSJDL 4USFFU VO BPHIBJSF P VCMJO SFMBOE 1IPOF 8FC FOFSBM FORVJSJFT 4VQQPSU 6OJUFE 4UBUFT 6OJUFE JOHEPN SFMBOE Page 1 of 30 Linea Pro 7 User Manual UM 00028 Version A CONTACT INFORMATION ...

Page 3: ...on of this device or its compliance with safety and regulatory standards Please note that the use of this accessory with iPhone may affect wireless performance COMPATIBILITY Made for iPhone 7 mobile digital device iPhone 6s mobile digital device iPhone 6 mobile digital device TRADEMARK CREDITS Infinite Periperhals Mobilize Your Enterprise Linea Pro Infinea Infinea Tab and Infinea Omni are trademar...

Page 4: ...ING YOUR LINEA PRO 7 10 Figure 6 Linea Pro 7 Assembly 10 CHARGING YOUR LINEA PRO 7 11 Charging the Linea Pro 7 through the USB Port 11 Figure 7 USB Type C Sync Charge Port 11 Battery Status Indicators 12 Figure 8 Battery Status Indicators 12 DEVELOPING APPLICATIONS FOR YOUR LINEA PRO 7 13 PROGRAMMABLE OPTIONS 13 POWERING ON YOUR LINEA PRO 7 14 Dual Purpose Scan Buttons 14 Figure 9 Dual Purpose Sca...

Page 5: ... YOUR LINEA PRO 7 22 Battery Replacement 22 Figure 16 Battery Replacement 22 SRED Encrypted MSR Information 23 Troubleshooting Card Reading 24 Troubleshooting Barcode Scanning 24 Troubleshooting Contactless Card Reading 25 TECHNICAL DATA 26 WARRANTY 28 DISCLAIMER 28 PRODUCT RETURNS AND SERVICING 28 To Request an RMA 28 SYMBOLS FOR USE 29 FEDERAL COMMUNICATIONS COMMISSION 30 Federal Communications ...

Page 6: ...t the contents inside of the packaging for any signs of damage If there are signs of damage DO NOT attempt to use the unit Notify your account executive or contact IPC techni cal support at support ipcmobile com Ensure the battery is fully charged prior to initial use Your Linea Pro 7 includes the items listed below Linea Pro 7 1 Standard Battery 1 Security Torx Screws 2 USB Type C Charge Sync Cab...

Page 7: ... iOS applications Before using your Linea Pro 7 the battery should be properly charged The following table will help you get the Linea Pro 7 ready for use Step Purpose Additional Informa tion 1 Assemble your Linea Pro 7 with iOS device Connecting your Linea Pro 7 to your iPhone See manual section ASSEMBLING YOUR LINEA PRO 7 2 Charge your Linea Pro 7 The battery should be fully charged before use t...

Page 8: ...e reader The card reader incorporates a 3 track bi directional magnetic read head requiring a single swipe to read field data from all three tracks Contactless Card Reader RFID The Linea Pro 7 has an RFID tag card reader with read and write capability at 13 56 MHz The RFID reader incorporates several RFID formats depending on the model of your Linea Pro 7 Bluetooth Compatibility Available Bluetoot...

Page 9: ...rsion A LINEA PRO 7 PRODUCT OVERVIEW 9 pin Lightning Connector iOS Camera Opening Audio Pass through Volume Controls Top Cover Figure 1 Front View Figure 2 Side View Scan Engine USB Sync Charge Port Reset Button Figure 3 Top View Figure 4 Bottom View ...

Page 10: ...er Manual Page 9 of 30 UM 00028 Version A Magnetic Stripe Reader RFID Antenna Battery Status Button Indicators Battery Compartment Scan Button Scan Button Top Cover Torx Screw Top Cover Torx Screw Figure 5 Back View ...

Page 11: ...d then up to insert the iOS device 2 Connect the iOS device by firmly sliding it onto the Lightning Connector 3 Tilt the top cover down and slide it back until it clicks into place To secure the Linea Pro 7 insert the 2 torx screws provided with the device on the backside side of the unit near the top Top Cover Figure 6 Linea Pro 7 Assembly ...

Page 12: ...nea Pro 7 Single or 5 Unit Charging Station Due to current charging limitations the Linea Pro 7 should not be charged via USB from a PC Mac connection To Charge the Linea Pro 7 1 Connect the USB Type C charger cable to the USB port shown in the figure below USB Sync Charge Port Figure 7 USB Type C Sync Charge Port The battery should be charged in an ambient operating temperature of 10 C to 40 C If...

Page 13: ...ble below identifies the battery charge status by number of LED indicators illuminated on the device Battery Status Button Indicators Figure 8 Battery Status Indicators Battery Charge Status 1 LED 1 25 charge 2 LED 26 50 charge 3 LED 51 75 charge 4 LED 76 100 charge The iPhone 7 is not required to be connected to the Linea Pro device to check the battery status ...

Page 14: ... charge the iPhone 7 using its internal battery by enabling the setCharging setting When the Linea Pro 7 battery is above 20 it will then start to charge the iPhone 7 battery Enable Scan Button In order to scan the Enable Scan Button option must be set in the SDK Scan Mode Linea Pro 7 the following Scan modes Single Scan Scanning a single barcode by pressing and releasing either Scan button Multi ...

Page 15: ...o Power on the Linea Pro 7 1 With the Linea Pro 7 powered off press one of the Scan Buttons until a single beep is sounded This indicates that the Linea Pro 7 is now ready for use 2 Press either Scan Button a second time to activate the scanner for normal barcode scanning Scan Button Located on each side Figure 9 Dual Purpose Scan Buttons When the Linea Pro 7 is left idling for an extended period ...

Page 16: ...ion LED lighting indicators provide information regarding connection status charging and or low battery conditions The following table explains these conditions and their corresponding LED indication Operating Status No LEDs are lit Linea Pro 7 is in sleep or ready mode Multiple LEDs are lit Linea Pro 7 is displaying battery level status One LED is flashing Linea Pro 7 is charging and syncing ...

Page 17: ...e reader varies depending on the barcode size To Scan a 1D Barcode 1 Activate the Linea Pro 7 by pressing either Scan Button 2 Position the scan head as close to the barcode label as possible so that the scan line crosses both ends of the barcode as shown in the figure below 3 Slowly pull the unit back increasing the distance between the barcode and scan head until the barcode has been read by the...

Page 18: ...arcode reader varies depending on the barcode size To Scan a 2D Barcode 1 Activate the Linea Pro 7 by pressing either Scan Button 2 Position the scan head so that the pointer is aimed at the barcode and the barcode is within the width of the red illumination box 3 Slowly pull the unit back gradually increasing the distance between the barcode and scanner until the barcode has been read by the scan...

Page 19: ...esignated Infinite Peripherals key injection facility Please contact an Infinite Peripherals account representative for more information To Use the Magnetic Stripe Reader 1 Activate the Linea Pro 7 by pressing either Scan Button 2 Insert the card into either end of the reader then swipe the card through toward the other end of the reader Figure 12 Magnetic Stripe Reader The magnetic stripe must fa...

Page 20: ...er Scan Button 2 Place the RFID tag card over the receiver transmitter as indicated by the RFID label The data will be sent from the Linea Pro 7 Tab contactless reader to the iOS Device Figure 13 RFID Reader Keep the face of the tag card flat with the receiver transmitter as close as possible Depending on the type of RFID tags cards being used it may be necessary for tags cards to make direct cont...

Page 21: ...a Pro 7 to a computer by plugging a USB Type C cable into the USB port The Linea Pro 7 should now be in Sync mode USB Sync Charge Port Figure 14 Syncing through USB Port To disable Sync mode exit iTunes and unplug the USB Type C cable from the Linea Pro 7 Please refer to the iTunes documentation for additional instruction on syncing your iPhone If the Pass through Sync setting is enabled and the U...

Page 22: ... the iOS device The soft reset feature cycles the power allowing the firmware of the Linea Pro 7 to restart To Reset the Linea Pro 7 1 Locate the small pinhole near the USB port 2 Insert the end of a paperclip or pin to restart the Linea Pro 7 Reset Button pin entry Figure 15 Reset Function If the Linea Pro 7 does not restart promptly repeat steps as needed ...

Page 23: ...n insert replacement battery ensuring battery contacts are aligned 4 Replace battery cover then insert the 2 torx screws into place and tighten using the torx driver Battery Cover Torx Screw Figure 16 Battery Replacement T5 x 40mm Torx Driver not included Linea Pro 7 with encrypted functionality has special key protection features If battery is removed from the unit for more than one 1 hour it may...

Page 24: ...sent back to Infinite Peripherals for servicing To prevent downtime caused by the magnetic read head security feature becoming disabled Always place the Linea Pro 7 on charging station when not in use for extended periods DO NOT allow the user replaceable battery to fully discharge DO NOT remove the user replaceable battery from the unit for more than one 1 hour Upon removal of the user replaceabl...

Page 25: ... Cause Scanner does not power on Linea Pro 7 battery is too low Linea Pro 7 is not powered on by the software Faulty scan engine No barcode data being returned during scanning Unreadable barcode Linea Pro 7 battery is too low Faulty scan engine Software decoding incorrectly Partial barcode data returned during scanning Unreadable barcode Linea Pro 7 battery is too low Faulty scan engine Software d...

Page 26: ...card Linea Pro 7 battery is too low Faulty RFID reader Software decoding incorrectly Partial RFID data returned during reading Unreadable RFID tag card Linea Pro 7 battery is too low Faulty RFID reader Software decoding incorrectly Unable to read some RFID Tags Cards RFID type is not compatible RFID type is not supported See Technical Data section for additional information If you continue having ...

Page 27: ...odes Battery Capacity Rechargeable Li ion Battery 3 7V 2100 mAh Battery management via Micro controller Battery Life Up to 16 850 scans in a period approximately 26 hours on a full charge Power Supply 5V through USB Type C cable 5V through single or 5 station charger Card Reader Magnetic Card Reader 3 track bidirectional reading capabilities Type ISO 7810 7811 7813 1 000 000 magnetic card swipes C...

Page 28: ... SPP Indicators Visual 4 LEDS for battery status Audio Electromagnetic Buzzer CERTIFICATIONS General Apple MFi FCC Payment PCI PTS 3 x SRED optiona Drop Test 1 2m 3 9 ft ENVIRONMENT Operating Environment Temperature 10 C to 40 C 14 F to 104 F Humidity 5 to 90 RH Storage Environment Temperature 20 C to 50 C 4 F to 122 F Humidity 5 to 90 RH ...

Page 29: ...nges in specifications and other information contained in this document without prior notice and the reader should in all cases consult Infinite Peripherals Inc to determine whether any such changes have been made Infinite Peripherals Inc shall not be liable for technical or editorial errors or omissions contained herein nor for incidental or consequential damages resulting from the furnishing per...

Page 30: ...of 30 UM 00028 Version A SYMBOLS FOR USE Symbol Definition Consult Instructions for Use Manufacturer Manufacture Date Caution Serial Number P N Part Number Waste Electrical and Electric Equipment Complies with part 15 of the FCC rules ...

Page 31: ...is equipment does cause harmful interference to radio or television reception which can be determined by turning the equipment off and on the user is encouraged to try to correct the interference by one or more of the following measures Reorient or relocate the receiving antenna Increase the separation between the equipment and receiver Connect the equipment into an outlet on a circuit different f...

Reviews: