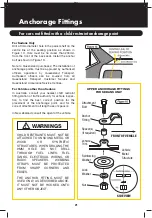
Infasecure CS5413 Instruction Manual Download Page 15

Figure 5

SAFE GRIP 

BELT CLAMP

It is important that the lap belt must be 

firmly across 

the thighs

. The 

Safe Grip locks the lap belt

 to 

ensure a firm fit across the thighs, and avoids slack in 
the lap belt. This fit ensures that the lap belt 

does not 

ride up

 into the soft abdominal region of the child, 

which may cause internal injury.

To install the 

Safe Grip

 (red belt clamp);

Continue from

 Step 6: 

while holding the belts tight 

open the Safe Grip and clamp the “sash section” of 
the vehicle seat belt by closing the barrel section of 
the red belt clamp in the direction of arrow 3 (refer 
Figure 6) and then locking with the toggle section 
by pushing in the direction of arrow 4 (refer Figure 
6) Note: Positioned as close as possible to the 
buckle and tongue. When the 

Safe Grip

 (red belt 

clamp) is secured in place, the lap section is now 
tightly holding your child in place, independent of 
the sash section. 
The 

Safe Grip

 (red belt clamp) can be left located 

on the sash belt when the child is removed from the 
booster. It is then ready for the next use. Reposi-
tioning of the 

Safe Grip

 (red belt clamp) may be 

required as the child grows. The 

Safe Grip

 (red belt 

clamp) must be removed when the child restraint is 
not installed to allow other users to use the seat 
belt as a lap/sash seat belt. Always keep the 

Safe 

Grip

 (red belt clamp) in pocket provided when not in use.

Use

Using lap-sash seat belt 

Safe Grip (if supplied)

Booster Car Seat

LAP SECTION 

SAFE GRIP (B)

(red belt clamp)

SASH SECTION

BUCKLE (A)

(AND TONGUE)

3

BARREL
SECTION

4

TOGGLE

SECTION

ATTACH TO

SASH SECTION

ONLY

Figure 6

Pull the lap belt tight by first pulling on the lap belt in 
the direction of arrow 1 (refer Figure 4). Pull the sash 
belt tight in the direction of arrow 2. 

REMOVE ALL 

SLACK FROM 

SEATBELT

WARNING

!

• ALWAYS USE THE SASH GUIDE

*Can be purchased separately visit http://store.infasecure.com.au/

NOTE:

 Do not place the 

Safe Grip

 (red 

belt clamp) around both the lap and 
sash sections of the belt. This could 
cause the 

Safe Grip

 (red belt clamp) to 

break.

14

Summary of Contents for CS5413

Page 1: ...dren of average proportions Children vary in shapes and sizes The photo displayed is indicative of the type of restraint and may vary slightly depending on the model Booster Seat FORWARD FACING CHILD...

Page 2: ...of Restraint Care and Maintenance Cleaning Extension Straps Accessories Anchorage Fittings Insurers Information Lifetime Warranty 1 2 3 5 6 7 9 10 11 11 13 16 17 18 18 19 20 22 26 Booster Seat Conten...

Page 3: ...integrated child restraints start their life as an actual pillow of air This pillow is moulded into a child restraint retaining the pillow like construction while adding incredible strength and struct...

Page 4: ...her chemicals Destroy the restraint if it has been in a severe crash even if no damage is visible DO NOT USE THIS RESTRAINT WITHOUT THE COVER Always secure the loose end of the top tether strap Do not...

Page 5: ...INT FITTING STATION IF NO ANCHORAGE POINTS ARE IN THE MOTOR CAR Always secure the loose end of the top tether strap to prevent it hanging out of the car or being accessible by the child Do not use the...

Page 6: ...ARS ZERO TO 8 CONVERTIBLE CAR SEAT TYPE A1 B E BIRTH TO 8 YEARS IMPORTANT Research has shown that the likelihood of an accessory child safety harness being used incorrectly is very high and the risk o...

Page 7: ...seat THIS RESTRAINT MUST BE USED IN CARS WITH FORWARD FACING SEATS WITH A LAP SASH SEATBELT THIS BOOSTER SEAT IS NOT SUITABLE FOR USE WITH A CHILD HARNESS The use of child restraints in the front sea...

Page 8: ...rom forward facing child restraint with an inbuilt harness the child s shoulders will need to be inline or above the lower label with the headrest in the lowest position If the child s shoulders are b...

Page 9: ...type of restraint UPPER LABEL Shoulder height markers are provided on this restraint for a visual indication that the child is safe to travel in this restraint Taller Child up to approximated 8 years...

Page 10: ...Clamp if supplied 4 Vehicle Seat Belt 5 BOOSTER SEAT BELT PATH Marker each side of restraint coloured red 6 Comfort Cover Headrest Backrest Seat Base 7 Top Tether Assembly Tether Strap Adjuster Attac...

Page 11: ...lap belt sitting low across the hips touching the thighs refer Figure 4 Can the child stay seated like this for the whole trip refer Figure 5 Five Step Test Step 1 Step 2 Step 3 Step 4 Step 5 Refer t...

Page 12: ...ITH JUST A LAP BELT You must use a lap sash seat belt Booster Car Seat Installation Installing in Vehicle Figure 9 Figure 2 Figure 9 Figure 1 Place the child restraint in the car in a forward facing s...

Page 13: ...he car or being accessible by the child IMPORTANT Tighten till slack is removed In certain vehicles an extension strap may be needed Do not overtighten Top Tether strap Ensure Top Tether strap is pass...

Page 14: ...and on the head rest Use Using lap sash seat belt Booster Car Seat IMPORTANT Ensure that you use the BOOSTER SEATBELT PATH identified by the following label BOOSTER BELT PATH Figure 1 Figure 2 Figure...

Page 15: ...e Grip red belt clamp can be left located on the sash belt when the child is removed from the booster It is then ready for the next use Reposi tioning of the Safe Grip red belt clamp may be required a...

Page 16: ...G OR Check the position of the headrest and adjust if needed refer Page 9 Thread the sash belt through the sash guide on the bottom of the headrest Use Using lap sash seat belt Booster Car Seat DO NOT...

Page 17: ...fastened around it and engaged Always use lap sash seat belt and upper anchorage strap to attach the child restraint to the vehicle Do not use the restraint without the upper anchorage strap correctly...

Page 18: ...estraint will ensure safety of your child Check the webbing for fraying Check the upper anchorage attachment clip to ensure retainer clip is still present Ensure there are no cracks in moulding or the...

Page 19: ...s as the cover may be damaged soak in water and gently remove Only machine wash on gentle cycle hand washing is recommended When washing the covers ensure the hook and loop attachment strips are conne...

Page 20: ...on the back section up the seat back and use the plastic buckle webbing strap to attach around the vehicle seat headrest if the rear vehicle seat does not have a headrest then the strap could be used...

Page 21: ...0mm Extension strap CS113 200 900mm Adjustable Extension strap Anchorage Fittings WARNING If A D R anchorage point is recessed spacer s may be required Spacer Part No s are as follows 10mm CCS001 5mm...

Page 22: ...ervice Centres For Vehicles other than Sedans In Australia consult your nearest child restraint fitting station of traffic authority for vehicle inspec tion to find the best correct position for the p...

Page 23: ...se users of child restraints to Destroy the entire restraint if it has been in use in a severe crash even if no damage is obvious The Australian New Zealand Standards committee advise that this statem...

Page 24: ...Notes...

Page 25: ...Notes...

Page 26: ...Notes...

Page 27: ...acceptable quality and the failure does not amount to a major failure Additional Warranty on Blow Moulded Child Restraints Our blow moulded child restraints are covered against faulty materials and m...

Page 28: ...to keep our little ones safe INFASECURE PTY LTD ABN 52 149 173 660 Head Of ce and Registered Address 110 114 Old Bathurst Rd Emu Plains NSW 2750 P O Box 487 Emu Plains NSW 2750 HEAD OFFICE Phone No 6...

Reviews: