background image

C510

 - Check backup data carrier

Orientation

If data from the control is lost, the backup CD/DVD always provides the ability to 

quickly restore the operation of the machine.

Therefore, regularly checking this data carrier is essential.

Procedure

1. Check the existing backup data carrier for readability. Insert the data carrier 

into the appropriate drive of a standard PC.

2.

If the data carrier is not recognized, it is damaged. To create a 

new backup data carrier, contact the machine manufacturer.

If the data carrier is recognized, make a copy to the hard disk. Create a folder 

named “Backup Copy” at a suitable location in the directory tree.

3. Copy the entire contents of the backup data carrier to this folder. If the copying 

process finished without displaying an error message, the data carrier is fine.

4. Delete the folder on your hard disk.

Maintenance Summary - 2.000 Operating hours

44

Maintenance Instructions

B500

DIE219EN - 05.06.2019

Summary of Contents for B500

Page 1: ...Maintenance Instructions B500 OPERATING INSTRUCTIONS Maintenance Instructions DIE219EN 05 06 2019 11 05 2020 Sp Wartungsanleitung 20159322 ...

Page 2: ...advances A Word on Copyright This document is proprietary and was originally written in German Its reproduction and distribution in whole or in individual parts without permission of the copyright owner is prohibited and will be prosecuted under criminal or civil law All rights reserved including for translation Copyright by INDEX Werke GmbH Co KG Hahn Tessky ...

Page 3: ...ck work area light visual inspection 24 A210 Check hydraulic shock absorbers and rubber pads on the telescopic plates 25 A267 Cleaning the chip conveyor 27 Service Interval 2 000 Operating hours 29 Maintenance Summary 2 000 Operating hours 30 C010 Check maintenance logs of servicing activities 31 C020 Clean and check wipers and guide rails of the work area door 32 C035 Check work area door optiona...

Page 4: ... Check fire extinguishing system visual inspection 64 D347 Replace belts and check belt tension 65 D457 Replacing hydraulic fluid 67 D500 Perform data backup 70 D520 Check control cabinet and cable assemblies visual inspection 71 D540 Check motor protection switch setting and load tap 73 D550 Check air conditioners in the control cabinet 74 Service Interval 5 Years 75 Maintenance Summary 5 Years 7...

Page 5: ...intenance activities carried out The maintenance intervals are given based on the operating hours counter Hydraulic system On operating condition Do not clean the machine with compressed air Raised dirt particles may cause breathing difficulties or injuries especially of the sensory organs Furthermore raised dirt particles or chips may reach spots where they cause technical problems Do not use cot...

Page 6: ...ries These maintenance activities must be carried out with special care Prior to working on the machine it must be allowed to cool down as hot parts may be located under the covers All maintenance work on the machine must be carried out with utmost care Fasteners must be loosened carefully and parts must be secured against falling down When elastic items springs are removed replaced appropriate de...

Page 7: ...ormed Additionally the general safety precautions in the operating manual Safety instructions for CNC turning machines must be observed The safety precautions as a separate document are part of the INDEX TRAUB user documentation When carrying out maintenance work on fluid systems hydraulic lubrication and pneumatic systems make sure before starting the work that the respective system has been depr...

Page 8: ...Preface 4 Maintenance Instructions B500 DIE219EN 05 06 2019 ...

Page 9: ...Service Interval Care activities Service Interval Care activities 5 Maintenance Instructions B500 DIE219EN 05 06 2019 ...

Page 10: ...wing glass A023 Check hydraulic system visual inspection A043 Check pneumatic system visual inspection A048 Check the lubrication system visual inspection A070 Check filter on air conditioner cooling fan A080 Clean and lubricate clamping device A090 Check electrical lines visual inspection A095 Visual inspection of all fluid lines and electrical cables A097 Clean cooling lubricant outlet on clampi...

Page 11: ...is accelerated even further If the viewing glass is damaged it must be replaced This is necessary regardless of the extent of damage Even with minimal damage the impact resistance of the glass can no longer be guaranteed Heavily soiled or damaged wipers may cause damage to the inner pane Moreover it may be possible that the work area door can be moved only with considerable effort due to heavy sol...

Page 12: ...ved only with effort determine the cause Possible causes include depending on the work area door defective or improperly adjusted wipers Chips on the guide bar or between the door and wiper or in the guide rollers of the work area door Maintenance Summary Care activities 8 Maintenance Instructions B500 DIE219EN 05 06 2019 ...

Page 13: ...the information in the document Notes on Operating Materials must be observed Example Hydraulic unit B400 B500 B500 a Filler neck hydraulic fluid b Fill level indicator c Accumulator drain valve d Monitoring level and temperature e Oil drain plug f Electrical monitoring contamination indicator g Pressure gauge system pressure h Pressure accumulator i Safety valve j Electrical monitoring system pre...

Page 14: ...nd immediately determine the cause and correct the error If in doubt take a sample for analysis and contact the manufacturer of the hydraulic fluid 3 Check pressure setting on pressure gauge and adjust if necessary The value to be checked here is specified see hydraulic diagram and should be between 70 80 bar 4 Check supply and fluid lines damage and leakage Supply and fluid lines must be checked ...

Page 15: ...turers be sure to review the respective manufacturer s documentation The following components are used on the system maintenance unit X and the extension for sealing air on the glass scales Y X System maintenance unit 1 Switch on valve manual 2 Pressure regulating valve system pressure 6 bar 3 Pressure gauge for system pressure 4 Filter insert with retained particle size 40 µm with automatic conde...

Page 16: ...ements on the pneumatic system must be replaced Filters are hazardous waste and must be disposed of in a controlled manner Requirement Service and maintenance are to be carried out according to the manufacturer s specifications Procedure 1 Check pressure setting on pressure gauge and adjust if necessary An operating pressure of 6 bar has been set at the factory 2 Check supply and fluid lines damag...

Page 17: ... necessary When disassembling the filter bowl make sure that sealing rings and O rings 1 3 are also installed Unscrew filter bowl Y from filter base X and remove activated carbon filter cartridge 2 Check sealing rings and O rings 1 3 replace if necessary Reinstall all parts in reverse order Maintenance Summary Care activities 13 Maintenance Instructions B500 DIE219EN 05 06 2019 ...

Page 18: ...filter replace if necessary When removing the filter bowl make sure to include the O ring 5 separating disk 2 and filter holder 4 Unscrew filter bowl 1 from filter base body and remove filter cartridge 3 check and replace if necessary Check O ring 5 replace if necessary Reinstall all parts in reverse order Maintenance Summary Care activities 14 Maintenance Instructions B500 DIE219EN 05 06 2019 ...

Page 19: ...e sure to review the respective manufacturer s documentation Example Lubrication system B400 B500 by BIJUR DELIMON Sure Fire II The following components must be checked on the lubrication system Z a Filler neck b Pressure gauge for system pressure 20 bar Procedure 1 Check oil level 2 Check pressure setting on pressure gauge 20 bar Maintenance Summary Care activities 15 Maintenance Instructions B50...

Page 20: ...t the opening of the air outlet Use only the original filters according to the spare or wear parts list Otherwise the machine is at risk of sustaining serious damage due to overheating Requirement A sufficient number of filters must be available Procedure 1 Remove cover frame 2 Check the filters replace if necessary 3 Reinstall all covers Maintenance Summary Care activities 16 Maintenance Instruct...

Page 21: ... the materials to be machined e g brass cast iron and the number of shifts per day more frequent cleaning of the chuck is necessary For this the clamping device must be removed and completely cleaned Here also the labyrinth ring spindle cover and the space behind the ring must be cleaned Requirement Example Three jaw chuck from different manufacturers Do not use cotton waste for cleaning When clea...

Page 22: ...follow manufacturer s instructions 2 Lubricate clamping devices according to manufacturer s instructions 3 Clean labyrinth ring and space behind the labyrinth ring Maintenance Summary Care activities 18 Maintenance Instructions B500 DIE219EN 05 06 2019 ...

Page 23: ...cal lines Electric shock Switch off machine and accessory units and arrange for immediate replacement of damaged lines by an electrically trained technician Check electrical lines to chip conveyor 2 Check electrical lines to cooling lubricant system 3 Check electrical lines to workpiece feeder 4 Check electrical lines to workpiece discharge unit 5 Electrical leads for the pedal switches 6 Check el...

Page 24: ...ause leakage of fluids under high pressure Be sure to use personal protective equipment during visual inspection Requirement Should defective points be found on fluid lines or electrical cables during the visual inspection the machine must be switched off and the damaged lines or cables must be promptly replaced Replaced fluid lines must be tightened to the torque specified by the manufacturer Pro...

Page 25: ...gular intervals Procedure 1 Disassemble the machine enclosure in the area ofthe spindles 2 If necessary remove the acrylic glass cover on the cooling lubricant collection bin 3 Example Cooling lubricant outlet B400 B500 Clean cooling lubricant collection bin Check that the cooling lubricant outlet X is free of chips or other debris 4 Reinstall the acrylic glass cover if applicable Maintenance Summ...

Page 26: ...etermine the cause of the oil ingression Synthetic cooling lubricants or cooling lubricant based on esters are not admissible If the type of cooling lubricant or the manufacturer is changed make sure that the cooling lubricant meets the required specifications See the manufacturer s documentation for the fill quantities Regularly checking the cooling lubricant is necessary in particular if cooling...

Page 27: ...s Supply and fluid lines must be checked for damage Pre damage such as kinks or abrasions should be logged and replacement should be initiated Maintenance Summary Care activities 23 Maintenance Instructions B500 DIE219EN 05 06 2019 ...

Page 28: ...aced immediately Be sure to follow the manufacturer s documentation According to the manufacturer this lighting fixture is maintenance free Procedure 1 Example Work area light R200 R300 photo Herbert Waldmann GmbH Co KG Check all lamps visual inspection Check lamp protective glass for damage If cooling lubricant has already penetrated into the work area light the lamp must be repaired Maintenance ...

Page 29: ...ng or hard impact of the telescopic plates The machine must not be operated with defective or missing rubber pads or hydraulic shock absorbers Example View of the telescope on the main spindle side viewing from the drive area 1 Hydraulic shock absorber 2 Rubber pad Example View of the telescope on the counter spindle side viewing from the drive area The hydraulic shock absorbers and rubber pads ca...

Page 30: ...aced immediately After the installation the shock absorbers must be adjusted Use the nut size 23 to adjust the working area of the absorber and use left worm screw to adjust the damping of the cylinder Be sure to follow the manufacturer s documentation for this 2 Example Pads Check rubber pads on the telescopic plates visual inspection If the rubber pads are worn they must be replaced immediately ...

Page 31: ...ith operating materials the information in the data sheets of the respective manufacturers and the information in the document Notes on Operating Materials must be observed Requirement Be sure to interrupt the motion of the conveyor belt by opening the work area door or switching off the chip conveyor before commencing cleaning work around the discharge chute The conveyor belt can only move when t...

Page 32: ...icant is insufficient the filter basket on the cooling lubricant pump must be cleaned Remove cooling lubricant pump Remove and clean filter basket on the cooling lubricant pump Alternatively the following procedure can be used Extract cooling lubricant remove screen directly from the cooling lubricant pump and clean it Maintenance Summary Care activities 28 Maintenance Instructions B500 DIE219EN 0...

Page 33: ...Service Interval 2 000 Operating hours Service Interval 2 000 Operating hours 29 Maintenance Instructions B500 DIE219EN 05 06 2019 ...

Page 34: ...work area door C035 Check work area door optionally with electr drive and viewing glass C080 Check all electrical connections and drive belts of the drive motors C140 Check cooling unit for cooling lubricant C160 Checking the guidance and support elements as well as the slidable lattice grate of the telescopic cover C510 Check backup data carrier C525 Check control cabinet C540 Check cable and hos...

Page 35: ...nce intervals The logs may contain important indications as to work that may be necessary beyond the maintenance activities Similarly the logs can be used for determining the cause of malfunctions due to incorrect or inadequate maintenance activities carried out Procedure 1 Check maintenance or inspection logs Maintenance Summary 2 000 Operating hours 31 Maintenance Instructions B500 DIE219EN 05 0...

Page 36: ...sed only with increased effort it can be expected that the wipers are already destroyed by accumulation of chips and swarf compaction Requirement Example Chip hook and chip brush Use appropriate tools to remove coarse chips chip nests and other debris Procedure 1 Example 1 Removing chip nest using appropriate tools e g chip hooks Maintenance Summary 2 000 Operating hours 32 Maintenance Instruction...

Page 37: ...hip brush for this purpose 3 Example 3 upper wipers G300 Clean wipers Alternatively the following procedure can be used In case of heavy soling or adhesion of chips to the wipers the wipers and associated cover plates should at any rate be completely removed and cleaned In this case also clean the area behind the wipers 4 Make sure that the wipers evenly contact the work area door before tightenin...

Page 38: ...se again without much effort as usual 5 If cleaning or replacement of the wipers has not resulted in tangible improvement the soiled rollers and the guide rail of the work area door must also be cleaned Clean rollers and guide rail of the work area door Maintenance Summary 2 000 Operating hours 34 Maintenance Instructions B500 DIE219EN 05 06 2019 ...

Page 39: ... inspection Through contact with cooling lubricant the aging process is accelerated even further If the viewing glass is damaged it must be replaced This is necessary regardless of the extent of damage Even with minimal damage the impact resistance of the glass can no longer be guaranteed Heavily soiled or damaged wipers may cause damage to the inner pane Moreover it may be possible that the work ...

Page 40: ... 1 Year of manufacture 2 Protection class and EN standard 3 Manufacturer 4 INDEX part number Check safety label replacement interval every 8 years 5 Check wipers Remove and clean the wipers If the wipers are severely deformed or damaged they must be replaced To be able to clean the door panels evenly be sure to reinstall the wipers after their removal aligned in parallel and ensure that they snugl...

Page 41: ...auses are defective or improperly adjusted wipers or chips on the guide bar or in the guide rollers of the work area door 7 Danger Pinching of limbs due to faulty obstacle detection on the work area door Check obstacle detection Use only appropriate tools such as a broom handle wooden beams or similar for checking The machine must be switched on and fully functional for this test Maintenance Summa...

Page 42: ...g a broomstick see example is held into the travel path of the work area door while it is closing When the work area door contacts the broom stick in the closing area the obstacle detection is triggered and the door should stop its forward movement Maintenance Summary 2 000 Operating hours 38 Maintenance Instructions B500 DIE219EN 05 06 2019 ...

Page 43: ...ion pulley Visual inspection of the drive of the automatic work area door This is in particular an assessment of the toothed belt 2 condition tension Also the condition of the two deflection pulleys 1 4 and the actuator 3 Maintenance Summary 2 000 Operating hours 39 Maintenance Instructions B500 DIE219EN 05 06 2019 ...

Page 44: ...sual inspection Requirement Move the tool carriers to a suitable position It may also be necessary to remove various covers or plates for carrying out a visual inspection Furthermore a special pair of pliers is needed for tightening the power and encoder connections Example Special pliers for tightening power and encoder connections on the motors Procedure 1 Loosen connector and check for corrosio...

Page 45: ...en done checking reconnect plugs and tighten with special pliers see the example 3 Check belt on drive motors for any damage or deterioration Maintenance Summary 2 000 Operating hours 41 Maintenance Instructions B500 DIE219EN 05 06 2019 ...

Page 46: ...e technical data of the respective equipment If in doubt contact the manufacturer of the equipment or the cooling lubricant vendor Requirement Prerequisite for effective operation within the cooling circuit is the condition of the cooling lubricant To check the condition of the cooling lubricant a refractometer is required With the help of this instrument it is possible to determine the concentrat...

Page 47: ...over 2 Example Telescopic cover with slidable lattice grate in the drive area Check guidance and support elements of the telescopic cover 3 Check the slidable lattice grate for wear Alternatively the following procedure can be used To do so position the respective tool carrier in the center between the two end positions and determine the sag of the slidable lattice grate If the sag is more than 5 ...

Page 48: ... PC 2 If the data carrier is not recognized it is damaged To create a new backup data carrier contact the machine manufacturer If the data carrier is recognized make a copy to the hard disk Create a folder named Backup Copy at a suitable location in the directory tree 3 Copy the entire contents of the backup data carrier to this folder If the copying process finished without displaying an error me...

Page 49: ... if filters are dirty or doors are not tight Procedure 1 Danger Electric shock Power off the machine and wait approx 30 minutes Check with a meter if there is still voltage applied to the intermediate circuit Check settings of the fuses For this purpose review the information in the wiring diagram 2 Check Sinamics S120 connections control modules connectors bus device bus and intermediate circuit ...

Page 50: ...be abrasive to cables or hoses and damage them Under unfavorable circumstances defective clamps may lead to entangling of the cables hoses which may result in tearing off entire bundles Procedure 1 Check cables for chafing and kinks 2 Check cable and hose clamps for tight seating In case of moving drags or bundles check for any movement within the function 3 Example Power cabling G400 Check strain...

Page 51: ...Service Interval 4 000 Operating hours Service Interval 4 000 Operating hours 47 Maintenance Instructions B500 DIE219EN 05 06 2019 ...

Page 52: ...cation system D063 Check the pneumatic system D085 Check main and counter spindles D170 Check the system for reconditioning the cooling lubricant D180 Check fire extinguishing system visual inspection D347 Replace belts and check belt tension D457 Replacing hydraulic fluid D500 Perform data backup D520 Check control cabinet and cable assemblies visual inspection D540 Check motor protection switch ...

Page 53: ...as is particularly important Requirement Only the agents described in the documentation may be used for the cleaning and after treatment of the machine Always use the proper tool to remove chips The following tools are required for cleaning chip hooks chip brushes spray bottles of cleaners or cooling lubricant a sufficient quantity of rags oil to apply to the telescopic plates and all other bare p...

Page 54: ...nts Follow the manufacturer s documentation Cleaning of the spindle carriers of the main and counter spindles Remove machine covers in the area of the spindles Then remove and clean the spindle covers 9 Clean the machine drag Remove accumulations of chips especially in the area of the counter spindle For this purpose move the counter spindle towards the main spindle and flush the area with cooling...

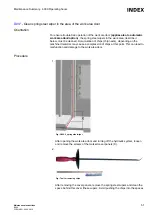
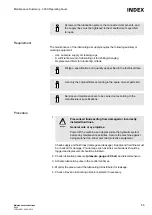
Page 55: ...ssion of chips at this point This can lead to malfunction and damage to the work area door Procedure 1 Fig G200 2_spring steel wiper After opening the work area door and turning off the hydraulic system loosen and remove the screws of the marked cover panels X 2 Fig Tool for removing chips After removing the cover panels remove the spring steel wipers and clean the space behind this cover these wi...

Page 56: ...shes to remove the chips 3 Reattach the spring steel wipers and cover panels making sure that they rest evenly against the work area door so they can cleanly wipe off any chips Maintenance Summary 4 000 Operating hours 52 Maintenance Instructions B500 DIE219EN 05 06 2019 ...

Page 57: ...higher loads Screws on the hydraulic system the connected components and the supply lines must be tightened to the manufacturer s specified torques Procedure 1 Check the pressure accumulator With the machine powered on not during the program or continuous run slowly open the accumulator drain valve on the hydraulic fluid tank and watch the needle on the system pressure gauge The pressure gauge nee...

Page 58: ... all components involved in lubrication for leaks and their visual condition The following components must be examined during maintenance of the lubricating oil system Lubricating oil tank Z Oil level in lubricating oil tank Lubricating oil pump Supply and fluid lines Pressure gauge b Metering valves Pressure sensors For all work in connection with operating materials the information in the data s...

Page 59: ...ure 1 Danger Pressurized fluids exiting from damaged or incorrectly installed fluid lines General cuts or eye injuries Power off the machine and depressurize the hydraulic system before any maintenance activities Secure the machine against being switched on Wear personal protective equipment Check supply and fluid lines damage and leakage Supply and fluid lines must be checked for damage Pre damag...

Page 60: ...re to review the respective manufacturer s documentation The following components are used on the system maintenance unit X and the extension for sealing air on the glass scales Y X System maintenance unit 1 Switch on valve manual 2 Pressure regulating valve system pressure 6 bar 3 Pressure gauge for system pressure 4 Filter insert with retained particle size 40 µm with automatic condensate drain ...

Page 61: ...nts on the pneumatic system must be replaced Filters are hazardous waste and must be disposed of in a controlled manner Requirement Service and maintenance are to be carried out according to the manufacturer s specifications Procedure 1 Check pressure setting on pressure gauge and adjust if necessary An operating pressure of 6 bar has been set at the factory 2 Check supply and fluid lines damage a...

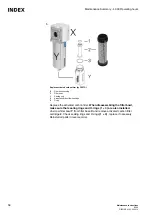
Page 62: ... When disassembling the filter bowl make sure that sealing rings and O rings 1 3 are also installed Unscrew filter bowl Y from filter base X and remove activated carbon filter cartridge 2 Check sealing rings and O rings 1 3 replace if necessary Reinstall all parts in reverse order Maintenance Summary 4 000 Operating hours 58 Maintenance Instructions B500 DIE219EN 05 06 2019 ...

Page 63: ...ne filter or microfilter When removing the filter bowl make sure to include the O ring 5 separating disk 2 and filter holder 4 Unscrew filter bowl 1 from filter base body and remove filter cartridge 3 and replace Check O ring 5 replace if necessary Reinstall all parts in reverse order Maintenance Summary 4 000 Operating hours 59 Maintenance Instructions B500 DIE219EN 05 06 2019 ...

Page 64: ...ity various components in the area of the spindles are checked for leaks on the one hand and for the general condition of the power and encoder connections on the other Requirement The following tools and spare parts are required to carry out this maintenance 1 Sealing rings or O rings 2 Supply or fluid lines as necessary Procedure 1 Example Version for depth stop flushing unit 1 O ring 2 Rotary f...

Page 65: ...ss of the depth stop flushing unit and the correct seating of the rotary feed device 2 Tightness of the solid or hollow clamping cylinder 3 Example Holding brake X B400 B500 Check the tightness of the holding brake 2 Maintenance Summary 4 000 Operating hours 61 Maintenance Instructions B500 DIE219EN 05 06 2019 ...

Page 66: ...nufacturer s documentation Check and potentially replace O rings or other seals on the clamping devices O rings and other seals on the clamping devices prevent that chips or cooling lubricant penetrate into the hydraulic circuit or even into the mechanical components of the respective assemblies where they can cause significant damage In any case make sure that the seals recommended by the manufac...

Page 67: ...with operating materials the information in the data sheets of the respective manufacturers and the information in the document Notes on Operating Materials must be observed Due to different requirements and or specifications of the respective manufacturers be sure to review the respective manufacturer s documentation Requirement To determine the concentration of cooling lubricant in the cooling l...

Page 68: ...horization by the manufacturer Be sure to read the operating instructions of the manufacturer Procedure 1 Visual inspection for obvious defects 2 Example Inspection stickers Kraft Bauer Check sticker for manufacturing date 3 Check sticker for inspection date 4 Check sticker for battery replacement Maintenance Summary 4 000 Operating hours 64 Maintenance Instructions B500 DIE219EN 05 06 2019 ...

Page 69: ... meter is required for testing Also the reference point may need to be checked or adjusted Setting values in Hertz Hz for belt tension A8 Main spindle drive A11 Main spindle drive Procedure 1 Caution Uncontrolled movements of axes or machine components Severe cut and crush injuries Secure all axes or components against uncontrolled movements during maintenance or repair work Move the tool slides t...

Page 70: ...7 Measure belt tension frequency meter and adjust belt Maintenance Summary 4 000 Operating hours 66 Maintenance Instructions B500 DIE219EN 05 06 2019 ...

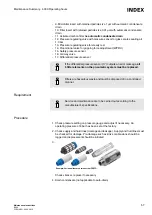
Page 71: ...n in the document Notes on Operating Materials must be observed Requirement Specification and quantity of hydraulic fluid as specified in the technical data Before replacing the hydraulic fluid make sure that the required spare parts such as seals and filters are available Use only the original filters according to the spare or wear parts list Procedure 1 Suction off old fluid through the filler n...

Page 72: ...nscrew the filter bell Y 4 Dispose of the fluid in the filter bell Y do not refill into the hydraulic tank Replace the filters Z of the hydraulic fluid filters X A different number of hydraulic filters X may be installed depending on the version Unscrew filter bell Y remove contaminated hydraulic fluid oil sump and used filter Z from the filter bell Y and dispose of them according to environmental...

Page 73: ...ilter that is exclusively used for hydraulic fluid 7 Fill in the prescribed amount of new hydraulic fluid 8 Switch on the machine and hydraulic system 9 Check and if necessary replenish hydraulic fluid level 10 Vent hydraulic system To bleed the hydraulic system open the accumulator drain valve c for about 10 seconds and then close it again Maintenance Summary 4 000 Operating hours 69 Maintenance ...

Page 74: ...chine If machine data have been modified as part of maintenance or repair work a data backup must be performed In this case a backup of the PLC and NC archives is sufficient The data can be saved to a floppy disk or USB stick depending on the machine control equipment In a system recovery the backup CD DVD created when the machine was delivered is restored on the machine Afterwards the PLC and NC ...

Page 75: ...e hazardous waste and must be disposed of in accordance with environmental guidelines and regulations of the country of operation When working in or on the control cabinet switch off the machine and secure it against power on Requirement Even with the machine powered off some devices or components in the control cabinet are still energized Observe the specific electrical diagrams for this machine ...

Page 76: ...cated e g between the control cabinet and cabinet doors and between the drag and the machine bed 9 Check cable assemblies for damage replace if necessary Maintenance Summary 4 000 Operating hours 72 Maintenance Instructions B500 DIE219EN 05 06 2019 ...

Page 77: ...te training by the machine manufacturer Orientation This check must be carried out on all motors that have a motor protection Obtain the motor rated current from the nameplate or from the circuit diagrams Requirement Observe the specific electrical diagrams for this machine Procedure 1 Check the motor protection switch setting 2 Check consumer tap Maintenance Summary 4 000 Operating hours 73 Maint...

Page 78: ...propriate manufacturer s documentation Procedure 1 Check air conditioners in the control cabinet 2 Check condensate drain 3 Check air inlets and outlets 4 Use only the original filters according to the spare or wear parts list Replace filter Maintenance Summary 4 000 Operating hours 74 Maintenance Instructions B500 DIE219EN 05 06 2019 ...

Page 79: ...Service Interval 5 Years Service Interval 5 Years 75 Maintenance Instructions B500 DIE219EN 05 06 2019 ...

Page 80: ...he maintenance activities carried out by using the appropriate maintenance log The maintenance log has the document number DIE220EN 05 06 2019 I020 Replace the pressure accumulator Maintenance Summary 5 Years 76 Maintenance Instructions B500 DIE219EN 05 06 2019 ...

Page 81: ...ator after 5 years to avoid an internal inspection that is laborious and expensive for this size of pressure accumulator Due to different requirements and or specifications of the respective manufacturers be sure to review the respective manufacturer s documentation The machine operator is obliged to check the pressure accumulator according to applicable rules and directives Defective pressure acc...

Page 82: ...2 Example Pressure accumulator Connect and secure the pressure accumulator Observe the tightening torque Maintenance Summary 5 Years 78 Maintenance Instructions B500 DIE219EN 05 06 2019 ...

Page 83: ...Service Interval 8 Years Service Interval 8 Years 79 Maintenance Instructions B500 DIE219EN 05 06 2019 ...

Page 84: ... the maintenance activities carried out by using the appropriate maintenance log The maintenance log has the document number DIE220EN 05 06 2019 J150 Replacing the viewing glass Maintenance Summary 8 Years 80 Maintenance Instructions B500 DIE219EN 05 06 2019 ...

Page 85: ...ly the center pane m is essential for the impact resistance of the viewing glass The polycarbonate pane is subject to natural aging and must therefore be replaced at regular intervals After replacing the inner viewing glass and after the installation activities are complete the glass it must be sealed on the inside of the work area door S It is necessary to provide a suitable sealant The sealant T...

Page 86: ...screws M6 along the contour on both sides and remove Fig 03_1 Remove front cover pane carefully place aside and secure against tipping over 2 Example G200 2_Arbeitsraumtuere_06 Cut the silicone sealing S on the inside of the viewing glass see Fig _06 with suitable knife Maintenance Summary 8 Years 82 Maintenance Instructions B500 DIE219EN 05 06 2019 ...

Page 87: ...ealing and fastening the clamp frame with screws Example G200 2_Arbeitsraumtuere_07 Remove the clamping frame x of the glass package Loosen and remove all screws from the clamping frame see Fig_07 4 Example G200 2_Arbeitsraumtuere_04 Remove the clamping frame x and glass package y See Fig _04 Maintenance Summary 8 Years 83 Maintenance Instructions B500 DIE219EN 05 06 2019 ...

Page 88: ...e installation when mounting the clamping frame into the work area door Example G200 2_Arbeitsraumtuere_07 Reinstall the glass package and clamping frame After installation tighten all screws Fig _07 to the prescribed torque 7 Example G200 2_Arbeitsraumtuere_06 Maintenance Summary 8 Years 84 Maintenance Instructions B500 DIE219EN 05 06 2019 ...

Page 89: ...sealant S again After the assembly of the panes and frame parts the inner pane must be sealed using a sealant Terostat 930 gray is used at the factory See Fig _06 Maintenance Summary 8 Years 85 Maintenance Instructions B500 DIE219EN 05 06 2019 ...

Page 90: ...INDEX Werke GmbH Co KG Hahn Tessky Plochinger Str 92 D 73730 Esslingen Germany Fon 49 711 3191 0 Fax 49 711 3191 587 info index werke de www index werke de ...

Reviews: