background image

iD-S9920-OPT: INSTALLATION & OPERATION MANUAL

PAGE 11

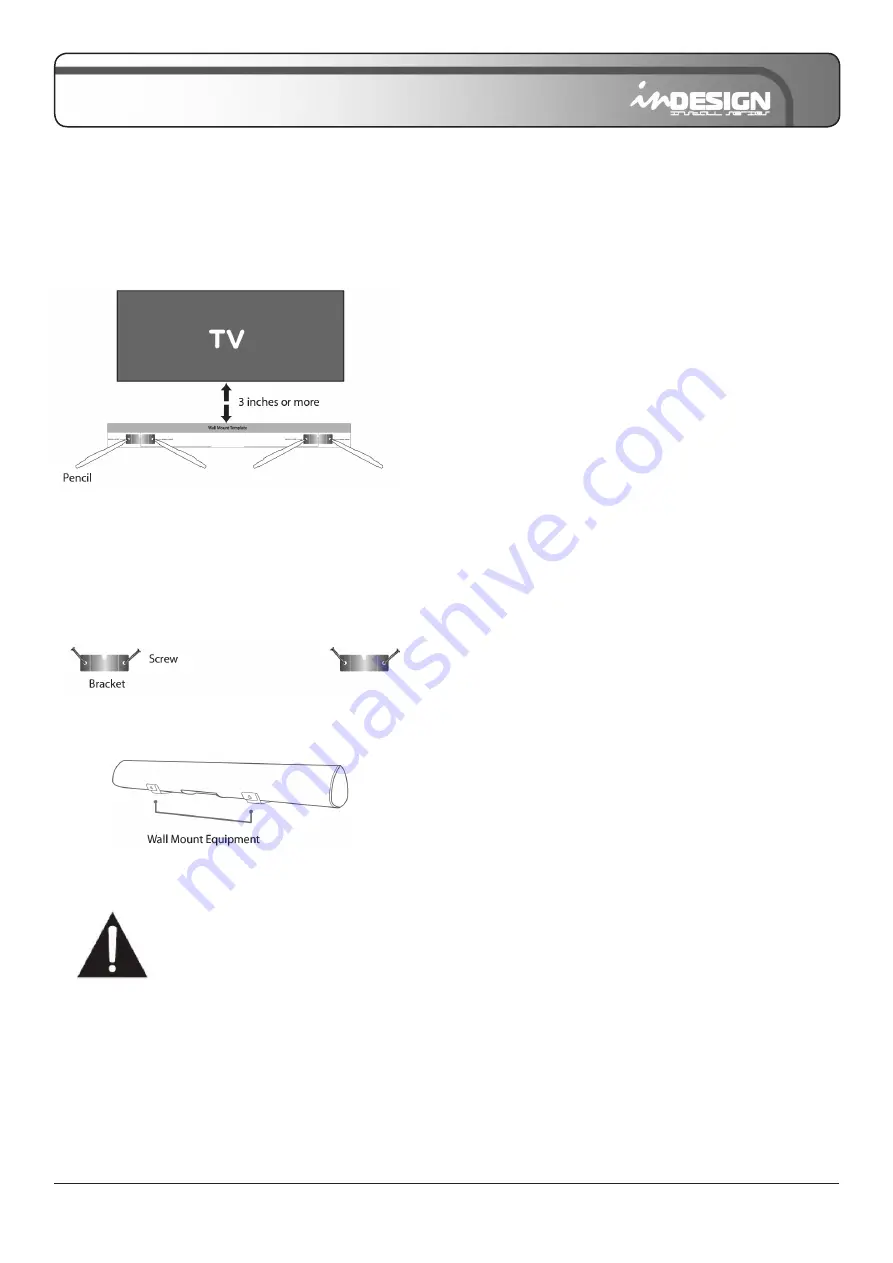
INSTALLING THE WALL MOUNT

1.  Place the wall mounting template against the wall under your TV and using a pencil, mark the bracket holes.

2.  Remove the template and use an appropriately sized drill bit to drill a hole in the wall at each marking.

• The template must be level.

• Leave at least 3 inches (76 mm) between the template and TV.

• Be sure the wall is vertical wall (drywall).

3.  Push the green Holder-Screw into each hole in the wall, and screw each screw (supplied) through each bracket 

firmly into a support Holder-Screws hole.

4.  Install the Sound Bar by hanging the bracket on the wall.

Consult a professional installer if you are unfamiliar with 
power tools or the layout of electrical wiring in the walls 
of your home.

Summary of Contents for iD-S9920-OPT

Page 1: ......

Page 2: ...D SERVICE PERSONNEL ONLY TO REDUCE THE RISK OF ELECTRIC SHOCK DO NOT PERFORM ANY SERVICING OTHER THAN THAT CONTAINED IN THE OPERATING INSTRUCTIONS UNLESS YOU ARE QUALIFIED TO DO SO CAUTION The lightening flash with arrowhead symbol with an equilateral triangle is intended to alert the user to the presence of un insulated dangerous voltage within the products enclosure that may be of sufficient mag...

Page 3: ...t registers stoves or other apparatus including amplifiers that produce heat 9 Do not defeat the safety purpose of the polarised or grounding type plug A polarised plug has two blades and a third grounding prong The wide or the third prong are provided for your safety If the provided plug does not fit into your outlet consult an electrician for replacement of the obsolete outlet 10 Protect the pow...

Page 4: ...STALLATION OPERATION MANUAL PAGE 4 iD S9920 Sound Bar Remote Control User Manual Digital Optical Cable Stereo RCA 50 3 5mm Audio Cable Power Adapter Wall Mount Brackets Mount Screws Wall Mount Template WHAT S INCLUDED ...

Page 5: ... your TV s speakers in the Audio Setup menu of your TV Refer to the owner s manual supplied with your TV Bottom Panel of the Sound Bar 1 DIGITAL AUDIO IN Optical Connects to the digital optical output of an external device 2 COAXIAL AUDIO IN Connects to the digital coaxial output of an external device 3 AUX1 L R Connects to the analog output of an external device 4 AUX2 3 5mm jack Connects to the ...

Page 6: ... other foreign substances could enter the adapter and cause the adapter to malfunction CONNECTING WITH A TV 1 Connect the DIGITAL AUDIO IN OPTICAL jack on the Sound Bar to the OPTICAL OUT jack of the TV with the digital optical cable supplied 2 Press the OPT button on the remote and the LED indicator will be WHITE You must use the Sound Bar s remote to turn power on or control the volume under thi...

Page 7: ... control If you do not have a remote control press MENU on the television 2 Press the arrow keys on the remote to scroll to Audio Settings If you do not have a remote control press the VOL and VOL buttons to scroll 3 Press OK on the remote control Press ENTER on the television if you do not have a remote If the television does not have an ENTER button the MENU button is often used 4 Scroll to Adva...

Page 8: ...UT L R jack of the TV using the RCA to 3 5mm cable Press AUX2 on the remote LED indicator will be YELLOW If there is no sound or an echo set your TV s audio output to external speaker Refer to TV s manual Choose only one connection from above it depends on your TV s audio output jack CONNECTING AN EXTERNAL DEVICE An external device can be connected via 1 Optical cable or 2 3 RCA to 3 5mm cable To ...

Page 9: ...TING A BLUETOOTH DEVICE 1 Press the BT button on the remote the LED indicator blinks BLUE 2 Turn on Bluetooth on the Bluetooth device see the device s manual for more information 3 Select S9920 from the list connect it When your Bluetooth device is connected the LED indicator blinks BLUE slowly 4 Play music files from the device connected via Bluetooth throught the Sound Bar The initial connection...

Page 10: ...vice or Sound Bar high volume can damage your hearing KNOW YOUR REMOTE 1 Turns the Sound Bar on and off 2 Press to mute and unmute 3 Press to pause or play music 4 7 Press to adjust volume 5 6 Press to select previous or next music file 8 Three kinds of Audio Modes to select 3D mode fills your room with sound SR 1 mode gives clear sound for TV shows and News SR 2 mode provides deeper bass in movie...

Page 11: ...each marking The template must be level Leave at least 3 inches 76 mm between the template and TV Be sure the wall is vertical wall drywall 3 Push the green Holder Screw into each hole in the wall and screw each screw supplied through each bracket firmly into a support Holder Screws hole 4 Install the Sound Bar by hanging the bracket on the wall Consult a professional installer if you are unfamili...

Page 12: ...le is connected to an audio output on your device not input Remote isn t working Check that the battery is installed properly and has power Make sure that the signal of the receiver is not obstructed The working distance of the remote is 6 8 metres clear space I hear buzzing or humming Ensure all cables and wires are securely connected Connect a different source device TV Blu ray player etc to see...

Page 13: ...Inputs 1 x RCA Stereo Audio 1 x 3 5mm Jack 1 x USB 1 x Bluetooth Wireless 1 x Optical 1 x Coaxial Remote Control Full function Scope of Application LED LCD TV Notebook Smart Phone Gaming Console Packing Measurements 108 x 15 x 19 cm Qty 1 Pcs Ctn G W 6 7 kg Accessories User Manual Line in Cable Digital Optical Cable Wall Mounting accessories Remote Control Power Adaptor Compliance UL FCC ROHS CE R...

Page 14: ...no other express warranties in respect of your NAS product To make a claim under this Warranty valid proof of purchase must be presented when the warranty claim is made along with any other required information The Warranty offered by NAS is not transferable The Warranty will only apply if your NAS product has been installed and used in accordance with NAS s recommendations as noted in the operati...

Reviews: