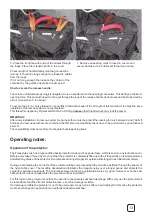
7. Remove all packing cords! Close pin covers and
secure handle with a 2 daN seal threat (see arrow).
12
13
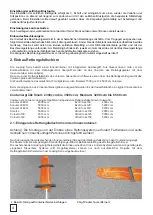
3. Fold the canopy in big, horizontal S-folds (stack pack) in
the deployment bag. Bundle the lines in 3x3 “8-folds”. Do
not bundle the last 50 cm of lines.
Attention: new rubber bands must be used for line
bundles with every re-pack!
4. Close the deployment bag.
First the lower flap (1) with the upper flap (2). Then
close the left (3), then right flap (4) and secure it with
the lines.
Depending of the rescue system volume the inner or
outer grommets can be used to adjust the deployment
bag size.
2.2. Mouting the deployment bag into the harness:
4
2
1
4
3
2
1
3
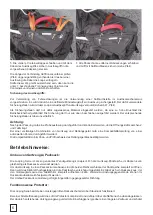
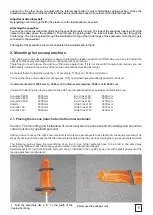
4. Close the container flaps by the help of the packing
cords. Close No. 1 with 2; No. 4 with 5 and 6) Place
handle-deployment bag connection in between.
2.
Stow the bridle in the harness container and place the
deployment bag in the harness container. Lines of
deployment bag are facing to the bottom side.
Place a packing cord in loops of flap 1 and 4.
Guide the Y-bridle in the channel to the rescue system
container and put the zipper slider down (yellow arrow).
1. Connect the rescue bridle with the harness bridle by
looping the bridles or with a quick link (strength > 2400
daN) and fix the connection to prevent slipping (for
example by a neopren sleeve).
Depending on the volume of the rescue system the
harness container size can be increased or decreased by
flipping a partition inside the container (fixed by velcro).
3. Close zipper of Y-bridle channel completely by sliding
the slider from the bottom to the top of the shoulder
straps. Make sure that the zipper is fully closed from the
beginning of the zipper (yellow circle) to avoid
unintended opening.
4
1
5. Close the front flap with and put the cables through
the loops. Place the release handle in the cover.
Check length of handle/deployment bag connection
(arrow). It should be long enough to release the cables
from the loops.
If it is not long enough then reduce the volume of the
container by the partition described under point 1.
How to secure the release handle:
To avoid an unintentional opening it is obligatory to use a seal thread in the opening mechanism. This defines a minimum
opening force. This special thread must be put through the loop at the release handle and harness and has to be fixed by
a knot. (See picture 7, red arrow)
To secure the pin it is only allowed to use certified material because if the strength of this material is too high the save
operation of the rescue system is not guaranteed.
This thread is supplied by Flymarket GmbH & Co. KG! Do
not use
other threads which may look the same!
Attention:
After every installation of a rescue-system in a harness there must be a test if the opening force is between 2 and 7 daN. If
harness and rescue parachute are combined the first time a compatibility check have to be performed by an authorized
person!
The compatibility must be confirmed in the parachute repack log book.
Operating notes:
Operation of the protector:
The Freesstyle serie has a type certified back protector made out of a special foam, which is sewn in a nylon fabric cover.
Before every take off you have to check that the protector is completely filled up with air. Especially on low temperatures
and after long disuse of the protector (if compressed during storage) it may take a little longer to be inflated completely.
During a hard landing the air inside of the protector will be compressed and the air will be deflated through the seams of
the nylon fabric cover. The resulting deceleration distributes the impact energy over a longer period and protects the
spine from extreme peak loads. The G-forces achieved in the type certification were very good. However, even the best
back protection does not guarantee the prevention of back injuries!!!
For this reason, the protector should not be used for unnecessary seat board landings. With every use the protector will
be less efficient and the effect of protection less - even if no damage is visible.
If a damage is visible the protector is not to be used anymore as well as after a hard landing!! In this case the protector
must be exchanged or repaired from an authorised dealer/workshop.


