Impact Acoustics 40972 Operation Manual Download Page 5


To connect to a PC: 

 
1.  Place your Multi-Function Video Converter near the monitor. 
 
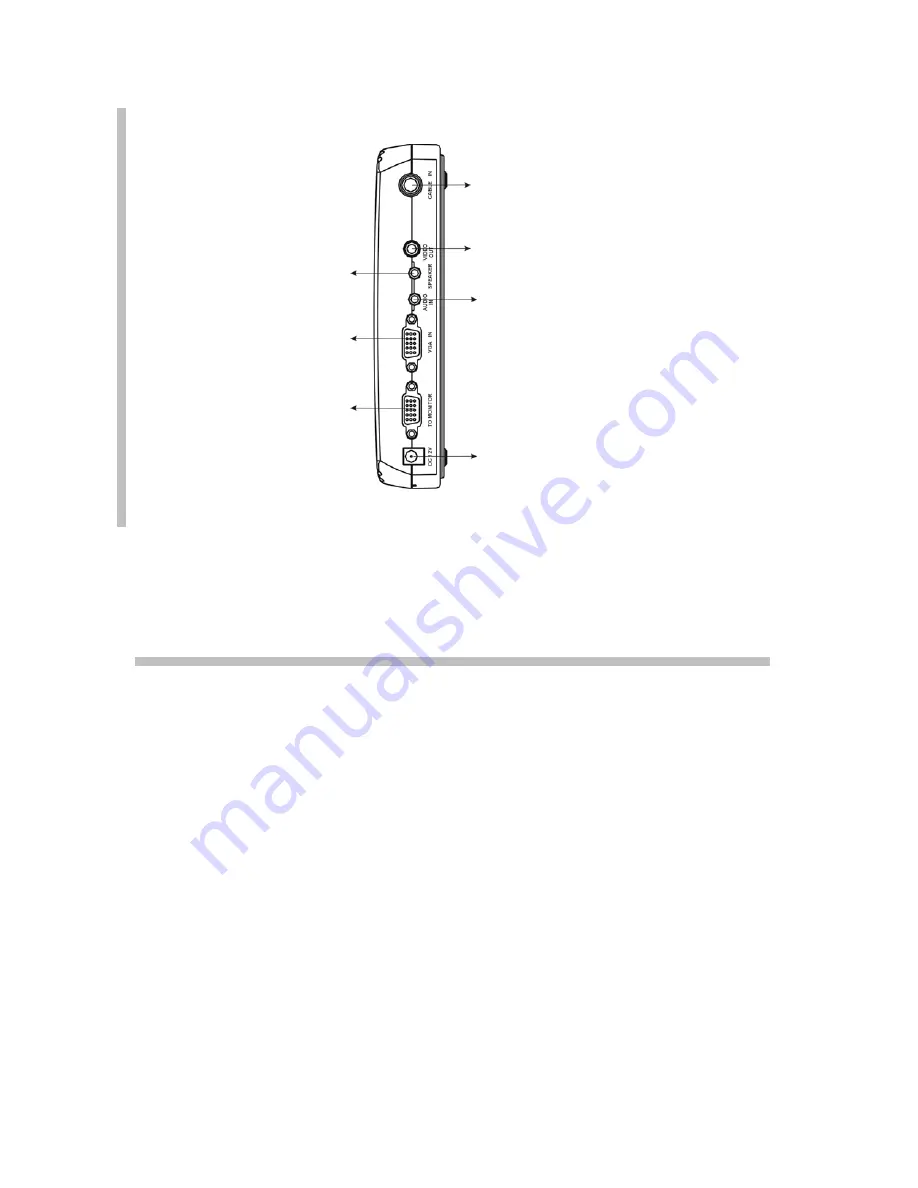
2.  Connect the CATV cable to the “CABLE IN” jack on the back panel. 
 

3.  Connect the monitor’s VGA cable to the “TO MONITOR” jack on the back panel. Tighten the 

screws as a loose connection will cause picture distortion.  

 
4.  Connect your multimedia (computer) speaker (

please note the connector should be 

3.5mm male stereo type

) to “SPEAKER” on the back panel. 

 
5.  Connect the supplied 3.5mm audio cable to the speaker output of your PC sound card and 

the opposite end to the “AUDIO IN” on the back panel. 

 
6.  Connect the supplied AC/DC adapter to “DC 12V” on the back panel and then plug into a 

standard 110~120Volt receptacle. 

NOTE: Using a differently rated adapter may result in 

damage to the unit, risk of electrical shock and possible fire.


7.  Turn on your monitor and then push the “POWER” button on the Multi-Function Converter. 

You should have a TV image on your LCD or CRT screen. Turn off the Multi-Function 
converter and your computer should be displayed. 


SPEAKER CONNECTION 

3.5mm Stereo connection for 
speakers or amplifier  

VGA IN


HD-15 VGA Female 
connector for connection to 
CRT or LCD 
 

DC 12V

Power input connection for the 
supplied AC/DC Adapter 

Note: using different rated 
power supply may cause 
damage, serious injury or fire. 

CABLE IN

F (or IEC) connector for CATV 
signal input 
 

Video Output

Only 

operates in TV mode 

AUDIO IN  

3.5mm Stereo connection from a 
PC sound card 


Rear Panel


TO MONITOR


HD-15 VGA Female 
connector for connection to 
VGA Output Port of VGA 
Card of PC 


Summary of Contents for 40972

Page 1: ...Multi Function Converter w CATV Tuner PIP Model 40972 Operation Manual ...

Page 2: ...lace scanning to form an image on the screen while the TV uses interlaced scanning It becomes apparent that an LCD or CRT monitor is better for long time viewing and the CRT or LCD has higher resolution than a TV Traditional television sets have limited resolution Horizontal Lines and CRT or LCDs generally have more than two to three times the resolution The Multi Function Converter turns your CRT...

Page 3: ...ntents Functions ii Package Contents ii Features 1 Connecting the Converter 1 Operating the Multi Function Converter 4 Troubleshooting 10 Specifications 10 Replaceable Parts 10 Warranty Important Safety Information 11 ...

Page 4: ...GA in out and 3 5mm audio in out Adjustable TV function brightness hue color etc Auto Scan channel programming MTS Stereo for a true theater like experience Connecting the Converter Front Panel POWER Switches the unit to by pass when in the OFF state IR Receiver Receives IR signals from the remote control Audio Input Video Input S Video Input INPUT Input selection this is repeated TVÆ CVBS Æ S Vid...

Page 5: ...120Volt receptacle NOTE Using a differently rated adapter may result in damage to the unit risk of electrical shock and possible fire 7 Turn on your monitor and then push the POWER button on the Multi Function Converter You should have a TV image on your LCD or CRT screen Turn off the Multi Function converter and your computer should be displayed SPEAKER CONNECTION 3 5mm Stereo connection for spea...

Page 6: ...io Input on the front panel of Multi Function Converter paying attention to color coding If your video source has a S Video output follow these steps 1 Connect the S Video and 2 RCA patch cable to the output of your game DVD VCR etc pay special attention to connector orientation and color coding WHITE for left audio and RED for right audio 2 Connect the S Video patch cable to the S Video input and...

Page 7: ...V CATV Channel only valid in TV CATV mode FC MEMO selection of the Output Resolution OSD OSD Display VOL Volume Control CH Channel up down Power TV PC mode selection INPUT Source selection between different sources Volume Control Volume Control for TV Video S Video EXIT exit key for use with the Menu key Numeric Key 0 9 RCL Last Channel Recall only valid in TV CATV mode PIP PIP Function Key Sleep ...

Page 8: ...Please note that if your PC is off when you press this button to PC mode there will be no video on your screen 3 MUTE To MUTE the audio press this button To resume audio press this button or VOLUME UP Please Note this function only works in CATV Mode 4 Input Source Selection There are four possible sources for the Multi Function Converter You can press this button to select between Composite Video...

Page 9: ...4 Resolution Select 4 items show up 4 PC 5 OSD Function 6 Language 7 Reset 2 Picture Setting the Picture Parameters There are 5 adjustments available within this function Navigate over the intended adjustment and press SELECT Use the left and right arrows to make the adjustment Brightness is for adjusting the brightness on your screen Contrast is for adjusting the contrast of the Picture Color is ...

Page 10: ... available within this function To make an adjustment highlight the item you want to adjust press the Select key on the remote and make the adjustment Å Key to adjust lower Æ to adjust higher 640X480 60Hz 800X600 60Hz 852X480 60Hz 1024 X768 60Hz 640X480 75Hz 800X600 75Hz 852X480 75Hz 1024 X768 75Hz MENU 1 Input 1 640 X480 60Hz 2 Picture 2 800X600 60Hz 3 TV Function Choose Resolution then press 3 8...

Page 11: ...e 11 SCAN When you set up Multifunction Video Converter for the first time it is recommended to press this key to search for television channels available in your area and store them into memory There are 3 selections available 1 Full Scan 2 Channel Scan 3 Exit Full Scan scans the available channels by frequency recommended Channel Scan scans the available channels according to the internal pre se...

Page 12: ...timer This will turn the unit off after the pre set time 1 5 min 2 10 min 3 15 min 4 30 min 5 60 min 6 90 min 7 OFF 17 PIP Function There are 4 PIP modes 1 4 1 9 1 16 and off the selection mode is cyclic Use the navigation keys arrow keys to position the PIP display on the screen When you activate the PIP display the last source selected will be displayed TV mode Press this key 9 Channel Preview p...

Page 13: ... ICES 003 CE Replaceable Parts Part Number 98000 AC DC adapter 98023 Remote control Problem Solution No picture 1 Compare all connections to the appropriate illustrations to verify correct connectivity 2 Make sure the power adapter is connected to the electrical supply and the converter 3 Make sure that the selected mode is the same as the input signal and then perform Auto Scan No sound 1 Compare...

Page 14: ...to function Refer to the specifications in this manual for power level of the unit Liquid If this unit or its corresponding power adapter has had liquid spilled on or in it do not attempt to use the unit Do not attempt to use this product in an outdoor environment as elements such as rain snow hail etc can damage the product In case of a storm it is recommended that you unplug this device from the...

Reviews: