


GB
8
4) Slide back the battery holder so that it locks into
place.
5) Place the microphone cartridge onto the handle in
such a way that the 4-pole contacts (5) of cartridge
and handle engage, then screw the cartridge onto
the handle.
5
Setting into Operation
1) To switch on, set the switch “POWER” (4) at the
lower end of the microphone to “ON”. The display
(2) indicates the transmission channel adjusted and
a battery symbol indicating the current charging
status of the batteries in several steps:
fully charged exhausted
2) To remove the plastic cap (3), slightly press down
the grooved latch on the rear side of the cap and
remove the cap.
Then the control part with the three adjusting
keys (8, 9, 10) is accessible (fig. 5). To actuate the
keys, a narrow object, e. g. a small screwdriver,
may be used.
3) Adjust the transmission channel for the microphone
→
see chapter 5.1. Switch on the receiver and
adjust it to the same channel
→
see operating
instructions of the receiver.
Switch on the audio unit (mixer or amplifier)
connected to the receiver.
4) Speak/sing into the microphone. The volume level
of the microphone may be readjusted by modifying
the sensitivity
→
see chapter 5.2.
5) The microphone may be locked to prevent acciden-
tal change of adjustments and accidental switching
off
→
chapter 5.3.
6) After all adjustments have been made, replace the
cap (3). For colour-coding the microphone, the cap
may also be replaced by one of the supplied col -
oured caps.
7) To switch off the microphone after operation, set the
switch “POWER” (4) to “OFF”. The display shortly
indicates
and then extinguishes completely.
5.1 Adjusting the transmission channel
1) Keep the key “SET” (8) pressed for 2 s. The display
shortly indicates
.
Note: To exit the adjusting mode without making
an adjustment, press the key “SET” so many
times until
is indicated in the display. Then
the unit returns to normal operation.
2) Adjust the channel with the cursor keys: With the
key
(9), the channels are scanned in descending
order, with the key
(10) in ascending order.
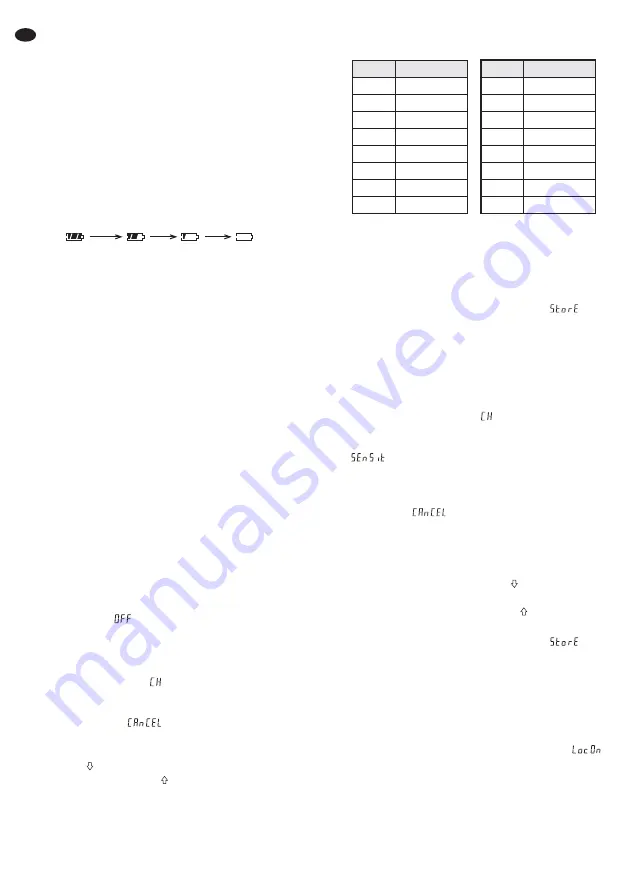
The 16 transmission channels are assigned to the
following transmission frequencies:
Note: When using other wireless transmission
systems with this wireless system at the same time,
the radio frequencies of the individual systems
should be carefully matched to each other to pre-
vent interference.
3) Memorize the adjustment by pressing the key
“SET”. The display shortly indicates
, the
adjusting mode is exited, the unit returns to normal
operation.
5.2 Adjusting the sensitivity
1) First recall the channel adjusting mode: Keep the
key “SET” (8) pressed for 2 s.
2) As soon as the indication
flashes in the display,
shortly press the key “SET” to change into the sen-
sitivity adjusting mode: The display shortly indicates
, then the sensitivity adjusted (0 dB, -10 dB,
-20 dB, or -30 dB).
Note: To exit the adjusting mode without making
an adjustment, press the key “SET” so many
times until
is indicated in the display. Then
the unit returns to normal operation.
3) Adjust the sensitivity in such a way that an optimum
volume level of the microphone is reached. If the
volume is too high, the microphone will distort, then
adjust a lower value with the key
(9). If the volume
is too low, a poor signal-noise ratio will result, then
adjust a higher value with the key
(10).
4) Memorize the adjustment by pressing the key
“SET”. The display shortly indicates
, the
adjusting mode is exited, the unit returns to normal
operation.
5.3 Locking/the unit
With the unit locked it is not possible
a
to switch off the unit; if the power switch (4) is set to
“OFF” with the unit locked, the display shows
.
b
to recall the adjusting modes for channel and sen-
sitivity.
4
6
Channel
747.125 MHz
1
749.125 MHz
3
5
748.250 MHz
7
750.500 MHz
Frequency
744.250 MHz
746.500 MHz
8
2
753.500 MHz
745.500 MHz
12
14
13
15
Channel
9
11
16
10
758.500 MHz
760.750 MHz
759.000 MHz
761.750 MHz
Frequency
754.250 MHz
757.000 MHz
763.250 MHz
755.875 MHz


