background image

1. The wire which is coloured green and yellow

must be connected to the terminal in the plug
which is marked with the letter E or with the
earth symbol  , or coloured green or green
and yellow.

2. The wire which is coloured blue must be con-

nected to the terminal which is marked with
the letter N or coloured black.

3. The wire which is coloured brown must be

connected to the terminal which is marked
with the letter L or coloured red.

Warning – This appliance must be earthed.

3

Applications

The LED spotlight PARL-20DMX is used for effect
lighting, e. g. on small stages, in clubs or function
rooms. It uses 7 extra bright 8 W RGBW LEDs as a
light source for coloured light or white light. Various
operating modes are available (e. g. automatic or
music-controlled show programs, stroboscope
effects).

The spotlight is designed for operation via a

DMX light controller. The number of DMX control
channels is selectable: 1, 2, 5, 6 or 8. The spotlight
can also be operated without a controller, either on
its own or together with multiple PARL-20DMX
(master / slave  mode).

4

Installation / Setting Up

G

To prevent heat accumulation inside the unit,
always position the spotlight in such a way to
ensure sufficient air circulation during operation.
Never cover the air vents of the housing.

G

The distance to the illuminated object should be
50 cm as a minimum.

Use one the mounting brackets (1) to install the
spotlight, e. g. with a stable mounting screw or a

support for lighting units (C hook) on a cross bar.
Alternatively, set up the spotlight on its own: Fold
out the mounting brackets underneath the spotlight
and use them as a stand. 

To align the spotlight or to adjust the brackets,

release the two locking screws (2) of the brackets,
make the adjustment, then fasten the locking
screws again.

4.2 Barn doors

To reduce the beam angle, optional bar doors
PARL-20B are available. Slide the barn doors into
the outer rails at the front of the spotlight and use
the locking bracket (4) to secure them (

fig. 3). A

spring (arrow in fig. 3) will keep the bracket in place.

5

Setting the Spotlight into Operation

For operating the spotlight with a DMX controller or
for the master / slave mode, make the corresponding
control connections (

chapter 1, step 5). For con-

nection, special cables for DMX signal transmission
are recommended (e. g. cables of the CDMXN
series from IMG STAGELINE). For cable lengths
exceeding 150 m, it is recommended to insert a
DMX level matching amplifier (e. g. SR-103DMX
from IMG STAGELINE).

To switch on the spotlight, connect the plug of the
mains cable (6) to a socket (230 V~ 

50 Hz). To

switch off, disconnect the mains plug from the
socket.

Caution:

Never

use a dimmer to connect the spot-

light to the mains voltage!

6

Operation

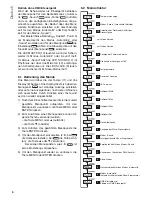
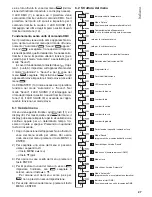
A menu is used to make the settings for the spot-
light. To operate the menu, refer to chapters 6.1
and 6.2.

Operation with a DMX controller

Select the channel mode (menu item 

) and set

the DMX address (menu item 

). If required, use

the menu to set additional functions (e. g. behaviour
of the spotlight after loss of control signal). The
spotlight will be set to operation via the DMX con-
troller when the menu item 

is called up (indi-

WARNING

To prevent damage to your eyes,
never look directly into the light
source for any length of time.
Please note that fast changes in light-
ing may trigger epileptic seizures with
photosensitive persons or persons
with epilepsy!

WARNING

Install the spotlight safely and
expertly. When installing it at a place
where people may walk or sit under
it, additionally secure it [e. g. via a
safety rope attached to one of the
two rings (3) on the housing; fasten
the safety rope in such a way that the
maximum falling distance of the unit
will not exceed 20 cm].

If the spotlight is to be put out of operation
definitively, take it to a local recycling plant
for a disposal which is not harmful to the
environment.

12

English

Summary of Contents for PARL-20DMX

Page 1: ...ICS FOR SPECIALISTS BEDIENUNGSANLEITUNG INSTRUCTION MANUAL MODE D EMPLOI ISTRUZIONI PER L USO GEBRUIKSAANWIJZING MANUAL DE INSTRUCCIONES INSTRUKCJA OBSŁUGI SIKKERHEDSOPLYSNINGER SÄKERHETSFÖRESKRIFTER TURVALLISUUDESTA DMX LED Scheinwerfer DMX LED Spotlight PARL 20DMX Bestell Nr Order No 38 6900 ...

Page 2: ...2 7 8 9 1 10 11 12 13 6 4 5 2 2 3 3 ...

Page 3: ...FOR SPECIALISTS ELECTRONICS FOR SPECIALISTS ELECTRONICS FOR SPECIALISTS Deutsch Seite 4 English Page 11 Français Page 18 Italiano Pagina 25 Nederlands Pagina 32 Español Página 39 Polski Strona 46 Dansk Sida 53 Svenska Sidan 54 Suomi Sivulta 55 ...

Page 4: ... Netzkabel zum Anschluss an eine Steckdose 230 V 50 Hz 7 LED DMX leuchtet wenn der Scheinwerfer über ein DMX Steuergerät betrieben wird 8 Display zur Anzeige der Menüeinstellungen 9 LED SLAVE leuchtet wenn der Scheinwerfer als Slave Gerät läuft 10 LED MASTER leuchtet wenn der Scheinwerfer als Master Gerät oder als Einzelgerät im Be triebsmodus Automatik oder Sound läuft 11 Tasten zur Bedienung des...

Page 5: ...rieb mit einem DMX Steuergerät oder bei Master Slave Betrieb die Steuerverbindungen her stellen Kapitel 1 Punkt 5 Zum Anschluss sollten spezielle Kabel für die DMX Signalübertra gung verwendet werden z B Kabel der CDMXN Serie von IMG STAGELINE Bei Leitungslängen ab 150 m wird grundsätzlich das Zwischenschalten eines DMX Aufholverstärkers empfohlen z B SR 103DMX von IMG STAGELINE Zum Einschalten de...

Page 6: ...dann wieder eingeschaltet 1 Nach dem Einschalten des Geräts ist der zuletzt gewählte Menüpunkt aufgerufen Um den Menüpunkt zu verlassen die Taste MENU oder ENTER drücken 2 Zum Anwählen eines Menüpunkts können fol gende Tasten verwendet werden die Taste MENU oder aufwärts die Taste abwärts 3 Zum Aufrufen des gewählten Menüpunkts die Taste ENTER drücken 4 Um den Menüpunkt einzustellen z B bei die Ad...

Page 7: ...erät gesteuert wer den soll Kapitel 1 Punkt 5 Die Anzahl der DMX Kanäle hängt von den benö tigten Funktionen ab und eventuell auch von der Anzahl der verfügbaren Steuerkanäle am Licht steuergerät In Kapitel 8 sind die Funktionen die in den fünf Kanalmodi verfügbar sind aufgeführt Nach dem Aufrufen des Menüpunkts läuft das Gerät im Modus Sound mit dem aktuell einge stellten Programm Je höher der We...

Page 8: ...Menüpunkts lässt sich umschalten zwischen alle LEDs aus Blackout alle LEDs eingeschaltet Das Display lässt sich auf eine Anzeigedauer von 30 s 60 s 90 s oder 120 s einstellen Ist nach dem letzten Tastendruck die Dauer verstrichen schaltet sich das Display aus Beim nächsten Tastendruck schaltet es sich wieder ein Ist eingestellt ist das Display ständig eingeschaltet kein Test Test Rot Test Grün Tes...

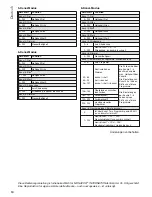
Page 9: ...t Helligkeit Grün Helligkeit Blau Helligkeit Weiß für diesen Scheinwerfer 1 Kanal Modus 2 Kanal Modus DMX Wert Funktion Kanal 1 Farben 0 6 LEDs aus 7 255 35 Farben Tabelle 1 Kanal Modus Kanal 2 Dimmer 0 255 Helligkeit DMX Wert Funktion 0 6 LEDs aus 7 13 Farbe 1 35 Farben 14 20 Farbe 2 21 27 Farbe 3 28 34 Farbe 4 35 41 Farbe 5 42 48 Farbe 6 49 55 Farbe 7 56 62 Farbe 8 63 69 Farbe 9 70 76 Farbe 10 7...

Page 10: ...ngsam bis schnell Kanal 6 Dimmer 0 255 Gesamthelligkeit Kanal 7 automatische Programme Musiksteuerung 0 31 kein Programm 32 63 64 95 96 127 Kontinuierliches Dimmen dunkel hell hell dunkel dunkel hell dunkel Die Farbe wird über die Kanäle 1 4 bestimmt und die max Helligkeit über Kanal 6 Die Einstellung von Kanal 5 hat keinen Einfluss auf diese Programme 128 159 Überblenden zwischen den Farben Die E...

Page 11: ...e spotlight is operated as a master unit or when it is operated on its own in the operating mode Automatic or Sound 11 Buttons to control the spotlight via a menu chapters 6 1 and 6 2 12 LED SOUND flashes during music control when a sound pulse is picked up by the micro phone 13 13 Microphone for music control 2 Safety Notes The spotlight corresponds to all relevant directives of the EU and is the...

Page 12: ...bar doors PARL 20B are available Slide the barn doors into the outer rails at the front of the spotlight and use the locking bracket 4 to secure them fig 3 A spring arrow in fig 3 will keep the bracket in place 5 Setting the Spotlight into Operation For operating the spotlight with a DMX controller or for the master slave mode make the corresponding control connections chapter 1 step 5 For con nec...

Page 13: ...ttons 11 and the display 8 The menu item is used to define the display time display always on or dis play switched off after a given time To switch it on again press any button 1 After switching on the spotlight the menu item most recently selected will be called up To exit the menu item press the button MENU or ENTER 2 To select a menu item use the following but tons the button MENU or up the but...

Page 14: ...r unit chapter 1 step 5 The number of DMX channels depends on the functions required it may also depend on the num ber of control channels available on the light con troller The functions available in the five channel modes can be found in chapter 8 When this menu item is called up the program cur rently selected in the mode Sound will start The higher the value the higher the sensitivity of the s...

Page 15: ...d up two settings are available all LEDs off blackout all LEDs switched on The display time can be set to 30 s 60 s 90 s or 120 s After this time when no button is pressed any more the display will be switched off To switch it on again press any button With the setting the display is always on no test test red test green test blue test white test red green blue white standard display indication di...

Page 16: ...l brightness brightness of red brightness of green brightness of blue brightness of white for this spotlight 1 channel mode DMX value Function 0 6 LEDs off 7 13 colour 1 35 colours 14 20 colour 2 21 27 colour 3 28 34 colour 4 35 41 colour 5 42 48 colour 6 49 55 colour 7 56 62 colour 8 63 69 colour 9 70 76 colour 10 77 83 colour 11 84 90 colour 12 91 97 colour 13 98 104 colour 14 105 111 colour 15 ...

Page 17: ...lours The settings of channels 1 6 will not affect any of these programs 160 191 colour change 1 192 223 colour change 2 224 255 music controlled program Channel 8 speed sensitivity 0 When a program is selected via channel 7 this program will stop or fail to start 1 255 when channel 7 32 223 speed slow to fast when channel 7 224 255 music sensitivity low to high DMX value Function Channel 1 red 0 ...

Page 18: ... le projecteur fonctionne via un contrôleur DMX 8 Affichage pour indiquer les réglages de menu 9 LED SLAVE brille si le projecteur fonctionne comme appareil Slave 10 LED MASTER brille si le projecteur fonctionne comme appareil Master ou comme appareil seul en mode Automatic ou Sound 11 Touches pour utiliser lʼappareil via le menu chapitres 6 1 et 62 12 LED SOUND clignote en mode gestion par la mus...

Page 19: ...rier de verrouillage 4 contre toute chute schéma 3 Lʼétrier est verrouillé sur sa position par un ressort flèche sur le schéma 3 5 Fonctionnement Pour un fonctionnement via un contrôleur DMX ou en mode Master Slave effectuez les branche ments de commande chapitre 1 point 5 Pour le branchement il est recommandé d utiliser des câbles spécifiques pour la transmission de signaux DMX par exemple câbles...

Page 20: ...nu ou sur une durée dʼaffichage une fois cette durée écoulée lʼaffichage sʼéteint En appuyant sur une touche il se rallume 1 Une fois lʼappareil allumé le dernier point de menu sélectionné est appelé Pour quitter le point de menu appuyez sur la touche MENU ou ENTER 2 Pour sélectionner un point de menu vous pou vez utiliser les touches suivantes touche MENU ou vers le haut touche vers le bas 3 Pour...

Page 21: ...it être géré comme appareil Slave via un appareil Master chapitre 1 point 5 Le nombre de canaux DMX dépend des fonctions nécessaires et éventuellement du nombre de canaux de gestion disponibles sur le contrôleur Le chapitre 8 présente les fonctions disponibles pour les cinq modes de canal Une fois le point de menu appelé lʼappareil est en mode Sound avec le programme actuellement réglé Plus la val...

Page 22: ...vez commuter entre toutes les LEDs éteintes Blackout toutes les LEDs allumées Il est possible de régler lʼaffichage pour une durée de 30 s 60 s 90 s ou 120 s Si après la dernière pression sur une touche la durée est écoulée lʼaf fichage sʼéteint Il se rallume à la prochaine activa tion dʼune touche Si est réglé lʼaffichage est tout le temps allumé pas de test test rouge test vert test bleu test bl...

Page 23: ...é bleu luminosité blanc pour ce projecteur Mode 1 canal Mode 2 canal Valeur DMX Fonction Canal 1 couleurs 0 6 LEDs éteintes 7 255 35 couleurs tableau mode 1 canal Canal 2 dimmer 0 255 luminosité Valeur DMX Fonction 0 6 LEDs éteintes 7 13 couleur 1 35 couleurs 14 20 couleur 2 21 27 couleur 3 28 34 couleur 4 35 41 couleur 5 42 48 couleur 6 49 55 couleur 7 56 62 couleur 8 63 69 couleur 9 70 76 couleu...

Page 24: ...nfluence sur ces programmes 160 191 changement couleur 1 192 223 changement couleur 2 224 255 programme géré par la musique Canal 8 vitesse sensibilité 0 Si via le canal 7 un programme est sélec tionné il s arrête ou ne démarre pas 1 255 si canal 7 32 223 vitesse de lent à rapide si canal 7 224 255 sensibilité musique de faible à élevée Valeur DMX Fonction Canal 1 rouge 0 255 luminosité rouge Cana...

Page 25: ...lʼingresso DMX del primo apparecchio della catena rimane libero 6 Cavo rete per il collegamento con una presa di rete 230 V 50 Hz 7 LED DMX è acceso se il proiettore viene comandato tramite unʼunità di comando DMX 8 Display per visualizzare le impostazioni del menu 9 LED SLAVE è acceso se il proiettore funziona come apparecchio slave 10 LED MASTER è acceso se il proiettore fun ziona come apparecch...

Page 26: ...il paraluce nelle guide esterne sul lato anteriore del proiettore e bloccarlo con la staffa di bloccaggio 4 in modo che non possa cadere Fig 3 La staffa viene fissata nella sua posizione per mezzo di una molla freccia in fig 3 5 Messa in funzione In caso di uso con unʼunità di comando DMX o con funzionamento Master Slave effettuare i collega menti di comando Capitolo 1 punto 5 Per il collegamento ...

Page 27: ...splay può essere impostato per la visualizzazione continua oppure per un determinato tempo tra scorso il quale si spegne Premendo un qualsiasi tasto si riaccende 1 Dopo lʼaccensione dellʼapparecchio è attivata la voce del menu scelta per ultima Per uscire dalla voce del menu premere il tasto MENU o ENTER 2 Per scegliere una voce del menu si possono usare i seguenti tasti il tasto MENU o su il tast...

Page 28: ...er come apparecchio slave Capitolo 1 punto 5 Il numero dei canali DMX dipende dalle funzioni richieste e eventualmente anche dal numero dei canali di comando disponibili sullʻunità di comando luce Nel capitolo 8 sono elencate le funzioni dispo nibili nei cinque modi canali Dopo aver aperto la voce del menu lʼapparecchio funziona nel modo Sound con il programma attualmente impostato Più è alto il v...

Page 29: ...con unʼunità di comando DMX Tuttavia valgono solo per questo apparecchio non per gli apparecchi slave collegati Dopo aver aperto la voce del menu si può cam biare fra tutti i LED spenti blackout tutti i LED accesi Per il display si può impostare la durata dellʼindica zione fra 30 s 60 s 90 s o 120 s Se dopo lʼultima pressione del tasto è trascorso il tempo impostato il display si spegne Alla succe...

Page 30: ...X I valori impostati qui determinano sempre la massima luminosità possibile luminosità globale luminosità rosso luminosità verde luminosità blu luminosità bianco per questo proiettore Modo a 1 canale Comportamento dellʼappa recchio in caso di caduta del segnale di commando 19 Valore DMX Funzione 0 6 LED spenti 7 13 Colore 1 35 Colori 14 20 Colore 2 21 27 Colore 3 28 34 Colore 4 35 41 Colore 5 42 4...

Page 31: ...ioni dei canali 1 6 non influenzano questi programmi 160 191 Cambio colore 1 192 223 Cambio colore 2 224 255 Programma comandato dalla musica Canale 8 Velocità sensibilità 0 Se tramite il canale 7 è stato scelto un pro gramma questo si ferma oppure non si avvia 1 255 Se canale 7 32 223 Velocità da lenta a veloce Se canale 7 224 255 Sensibilità alla musica da bassa a alta Valore DMX Funzione Canale...

Page 32: ...j DMX bedrijf in een ketting met elkaar zie hierboven maar de DMX in gang van het eerste apparaat van ketting blijft toch vrij 6 Netsnoer voor aansluiting op een stopcontact 230 V 50 Hz 7 Led DMX licht op als de schijnwerper via een DMX besturingsapparaat gebruikt wordt 8 Display voor de weergave van de menu instel lingen 9 Led SLAVE licht op als de schijnwerper als slaveapparaat werkt 10 Led MAST...

Page 33: ... rails vooraan op de schijnwerper en zet vast met de ver grendelingsbeugel 4 zodat ze er niet kan uitval len figuur 3 De beugel wordt door een veer pijl in figuur 3 in zijn positie vergrendeld 5 Ingebruikneming Breng bij bedrijf met een DMX besturingsapparaat of bij master slavebedrijf de besturingsverbindin gen tot stand hoofdstuk 1 punt 5 Voor het aansluiten moeten speciale kabels voor de DMX si...

Page 34: ...em op permanente weergave ingesteld worden of ook op een bepaalde weergaveduur waarna het display automatisch uitschakelt Door op een toets te drukken wordt het dan opnieuw ingeschakeld 1 Na inschakelen van het apparaat is het laatst geselecteerde menu item geactiveerd Om het menu item te verlaten drukt u op de toets MENU of ENTER 2 Om een menu item te selecteren kunnen vol gende toetsen gebruikt ...

Page 35: ...pparaat moet worden gestuurd hoofdstuk 1 punt 5 Het aantal DMX kanalen hangt af van de beno digde functies en eventueel ook van het aantal beschikbare besturingskanalen op de lichtregelaar In hoofdstuk 8 vindt u de functies terug die in de vijf kanaalmodi beschikbaar zijn Na het openen van het menu item werkt het appa raat in de modus Sound met het momenteel inge stelde programma Hoe hoger de waar...

Page 36: ...ringsapparaat Ze gelden echter alleen voor dit apparaat en niet voor aangesloten slaveapparaten Na het openen van het menu item kunt u wisselen tussen alle leds uit Blackout alle leds ingeschakeld U kunt het display instellen op een weergaveduur van 30 sec 60 sec 90 sec of 120 sec Als na de laatste keer drukken op de toets de duur verstreken is dan schakelt het display uit Als er dan een toets wor...

Page 37: ...d zijn bepalen deels de maximaal mogelijke helderheid totale helder heid helderheid rood helderheid groen helderheid blauw helderheid wit voor deze schijnwerper 1 kanaalmodus 2 kanaalmodus DMX waarde Functie Kanaal 1 Kleuren 0 6 Leds uit 7 255 35 kleuren Tabel 1 kanaalmodus Kanaal 2 Dimmer 0 255 helderheid Gedrag van het apparaat bij uitvallen van het besturingssignaal 19 DMX waarde Functie 0 6 Le...

Page 38: ... kleurwisseling 1 192 223 kleurwisseling 2 224 255 muziekgestuurd programma Kanaal 8 Snelheid gevoeligheid 0 Als via kanaal 7 een programma geselec teerd is stopt het of start het niet 1 255 als kanaal 7 32 223 Snelheid van langzaam tot snel als kanaal 7 224 255 muziekgevoeligheid laag tot hoog DMX waarde Functie Kanaal 1 Rood 0 255 helderheid rood Kanaal 2 Groen 0 255 helderheid groen Kanaal 3 Bl...

Page 39: ...Se ilumina cuando el proyector fun ciona con un controlador DMX 8 Visualizador para indicar los ajustes de menú 9 LED SLAVE Se ilumina cuando el proyector funciona como aparato Slave 10 LED MASTER Se ilumina cuando el proyector funciona como aparato Master o cuando fun ciona por sí mismo con el modo de funciona miento Automatic o Sound 11 Botones para controlar el proyector mediante un menú aparta...

Page 40: ...s de control correspondientes apartado 1 paso 5 Para la conexión se recomienda el uso de cables especiales para la transmisión de la señal DMX p ej cables de la gama CDMXN de IMG STAGE LINE Para cableados de más de 150 m se reco mienda insertar un amplificador de nivel DMX ade cuado p ej SR 103DMX de IMG STAGELINE Para conectar el proyector conecte el enchufe del cable de corriente 6 a la toma de ...

Page 41: ...o pulse cualquier botón 1 Después de conectar el proyector se activará el objeto de menú seleccionado más reciente mente Para salir del objeto de menú pulse el botón MENU o ENTER 2 Para seleccionar un objeto de menú utilice los siguientes botones El botón MENU o arriba El botón abajo 3 Para activar el objeto de menú seleccionado pulse el botón ENTER 4 Para ajustar el objeto de menú p ej para la di...

Page 42: ...to Master apartado 1 paso 5 El número de canales DMX depende de las funcio nes necesarias también puede depender del número de canales de control disponibles en el controlador de luces Las funciones disponibles en los cinco modos de canales se pueden encontrar en el apartado 8 Cuando se active este objeto de menú se iniciará el programa seleccionado en ese momento con el modo Sound A mayor valor m...

Page 43: ...MX Los ajustes sin embargo sólo se aplicarán en este proyector no se aplicarán a cualquier aparato Slave conectado Cuando se activa este objeto de menú aparecen dos ajustes disponibles todos los LEDs apagados Blackout todos los LEDs conectados El tiempo de visualización se puede ajustar en 30 60 90 ó 120 segundos Después si no se pulsa algún botón se apagará el visualizador Para conectarlo de nuev...

Page 44: ...ectarán al funcionamiento con un controlador DMX Los valores ajustados para estos objetos de menú definirán el brillo máximo brillo total brillo del rojo brillo del verde brillo del azul brillo del blanco para este proyector Modo 1 canal Valor DMX Función 0 6 LEDs apagados 7 13 Color 1 35 colores 14 20 Color 2 21 27 Color 3 28 34 Color 4 35 41 Color 5 42 48 Color 6 49 55 Color 7 56 62 Color 8 63 6...

Page 45: ...es Los ajustes de los canales 1 6 no afectarán a ninguno de estos programas 160 191 Cambio de color 1 192 223 Cambio de color 2 224 255 Programa controlado por música Canal 8 velocidad sensibilidad 0 Cuando se seleccione un programa mediante el canal 7 este programa parará o no se ini ciará 1 255 Cuando canal 7 32 223 velocidad lenta a rápida Cuando canal 7 224 255 sensibilidad musical baja a alta...

Page 46: ... świeci gdy reflektor jest usta wiony w tryb nadrzędny master lub gdy pracuje niezależnie w trybie Automatic lub Sound 11 Przyciski operacyjne do wprowadzania usta wień w menu sterującym rozdz 6 1 oraz 6 2 12 Dioda SOUND miga podczas sterowania muzyką przez wbudowany mikrofon 13 13 Mikrofon do sterowania muzyką 2 Środki bezpieczeństwa Urządzenie spełnia wszystkie wymagania norm UE dzięki czemu jes...

Page 47: ...korzystać spe cjalny kabel o dużej przepływności danych np kabel z serii CDMXN marki IMG STAGELINE Jeżeli długość przewodu przekracza 150 m zale cane jest podłączenie wzmacniacza sygnału DMX np SR 103DMX marki IMG STAGELINE Podłączyć kabel zasilający do gniazdka siecio wego 230 V 50 Hz Urządzenie jest już włą czone Aby wyłączyć urządzenie odłączyć wtyczkę od gniazdka sieciowego Uwaga Nie wolno pod...

Page 48: ... polecenia wcisnąć przycisk MENU lub ENTER 2 Do wyboru poleceń służą przyciski przycisk MENU lub w górę przycisk w dół 3 Aby wywołać wybrane polecenie wcisnąć przy cisk ENTER 4 Do wprowadzania ustawień np dla adresu dla koloru służą przyciski lub W przypadku niektórych poleceń np wprowadzanie ustawień nie jest możliwe 5 Aby wyjść z polecenia wcisnąć przycisk MENU lub ENTER 6 2 Struktura menu 48 Po...

Page 49: ...5 Liczba kanałów DMX zależy od żądanej funkcjo nalności oraz ilości dostępnych kanałów kontro lera W rozdz 8 opisano możliwe do uzyskania funkcje przy sterowaniu za pomocą różnej liczby kanałów Po wywołaniu tego polecenia uruchomiony zosta nie program wybrany w poleceniu Sound Im wyższa ustawiona wartość tym wyższa czułość na rytm muzyki Po ustawieniu program zostaje zatrzymany lub nie zostaje uru...

Page 50: ...wpływ wyłącznie na dane urządzenie i nie jest przesyłane do urządzeń slave W poleceniu tym dostępne są dwa ustawienia wszystkie diody wygaszone blackout wszystkie diody włączone Czas wyświetlania może być ustawiony na 30 s 60 s 90 s lub 120 s Po upływie ustawionego czasu od momentu wciśnięcia ostatniego przycisku wyświetlacz wygasi się Aby ponownie włączyć wyświetlacz wcisnąć dowolny przycisk Przy...

Page 51: ...ą jasność całkowitą kolory czerwonego zielonego niebieskiego ora białego Tryb 1 kanałowy Tryb 2 kanałowy Wartość DMX Funkcja Kanał 1 kolory 0 6 Diody wygaszone 7 255 35 kolorów tabela dla trybu 1 kanałowego Kanał 2 ściemniacz 0 255 jasność Wartość DMX Funkcja 0 6 Diody wygaszone 7 13 kolor 1 35 kolorów 14 20 kolor 2 21 27 kolor 3 28 34 kolor 4 35 41 kolor 5 42 48 kolor 6 49 55 kolor 7 56 62 kolor ...

Page 52: ...192 223 zmiana kolorów 2 224 255 program sterowany muzyką Kanał 8 prędkość czułość 0 Jeżeli program wybrano poprzez kanał 7 program zostaje zatrzymany lub nie zostaje uruchomiony 1 255 gdy kanał 7 32 223 prędkość wolno do szybko gdy kanał 7 224 255 czułość mała do duża Wartość DMX Funkcja Kanał 1 czerwony 0 255 jasność czerwonego Kanał 2 zielony 0 255 jasność zielonego Kanał 3 niebieski 0 255 jasn...

Page 53: ...er betjenes forkert eller hvis den ikke repare res af uautoriseret personel omfattes eventuelle skader ikke af garantien Opsaetning montering G Placér altid enheden så der er rigeligt med venti lation omkring denne Kabinettets ventilations huller må ikke tildækkes G Hold en afstand på mindst 50 cm til belyste objek ter ADVARSEL Se ikke direkte mod lyskilden under brug dette kan medføre skader på ø...

Page 54: ...I dessa fall tas inget ansvar för uppkommen skada på person eller materiel Placering montering G Placera enheten så att luften kan cirkulera fritt runt den och täpp inte till kylhålen i chassiet G Placera enheten minst 50 cm från materialet som skall belysas VARNING Enheten måste monteras på ett pro fessionellt och säkert sätt Om den installeras på en plats där folk kan sitta eller gå under så mås...

Page 55: ...uuhun kuin alkuperäiseen käyttö tarkoitukseen laitetta on taitamattomasti käy tetty tai asennettu tai jos laitetta on huollettu muussa kuin valtuutetussa huollossa Asennus G Asenna laite aina siten että riittävä ilmankierto on varmistettu käytön aikana Älä koskaan peitä tuuletusaukkoja G Minimi välimatkan valaistavaan kohteeseen pitäisi olla 50 cm HUOMIO Laite on asennettava asiantuntevasti ja tur...

Page 56: ...MONACOR INTERNATIONAL GmbH Co KG Zum Falsch 36 28307 Bremen Germany Copyright by MONACOR INTERNATIONAL All rights reserved A 1590 99 02 04 2016 ...

Reviews: