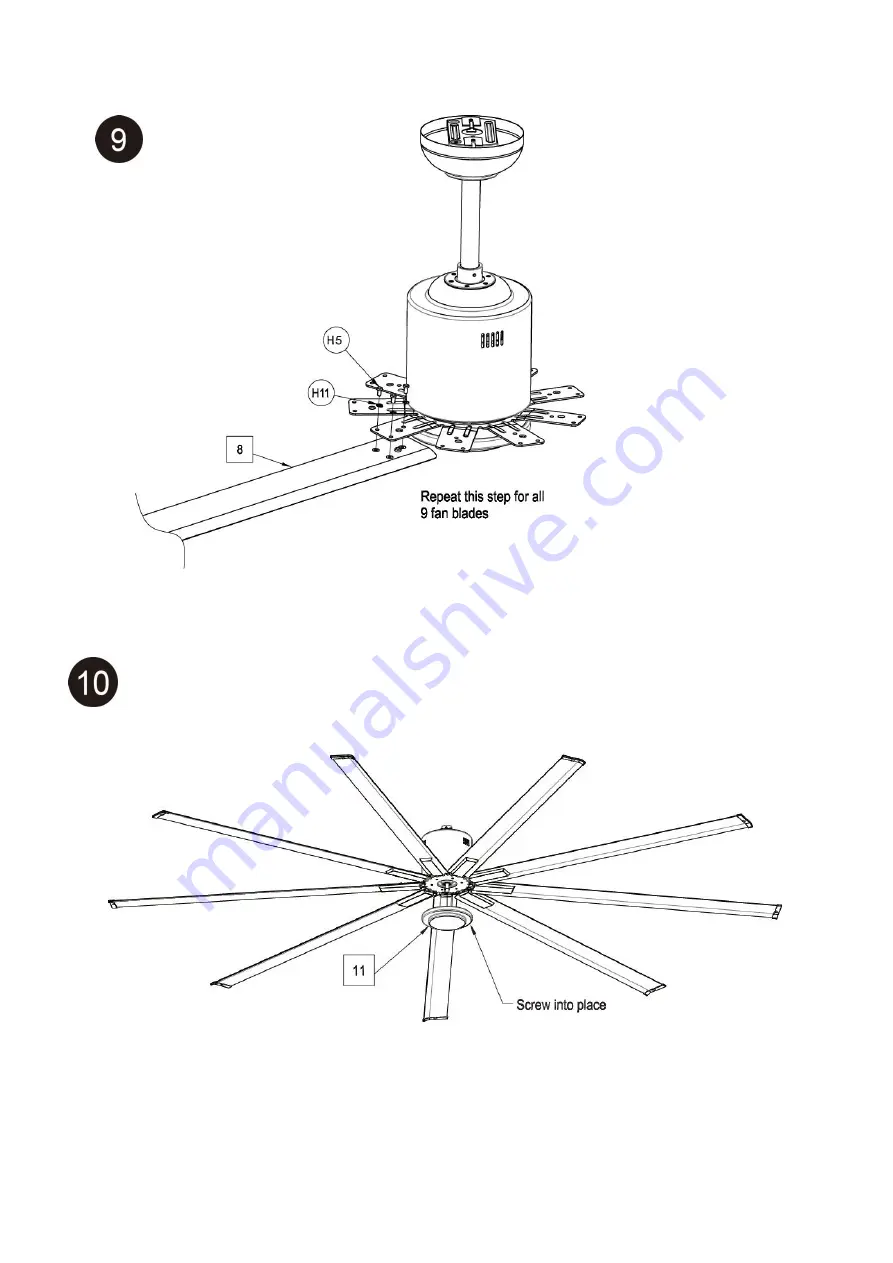
14
Rotate the bottom cover to the fan assembly until tighten.
Assemble the fan blade to the fanblade holder with (H5)
M5x10mm
long screw and (H11) Ф5 lockwasher. Repeat this step for all 9fan blades.
Page 1: ...1 Industrial BLDC Ceiling Fan Owner s Manual Model No ILG8HVLS72 ILG8HVLS88 ILG8HVLS96 ILG8HVLS108 IMPORTANT INSTRUCTIONS READ SAVE THESE INSTRUCTIONS...
Page 2: ...neral Safety Instructions 3 4 Specifications 4 Parts of the ceiling fan 5 7 Installation Instructions 8 14 Remote Control Operating Instructions 15 17 Maintenance and Cleaning 18 Troubleshooting 18 Wa...
Page 3: ...ting fan blades 10 Ceiling fans without guards are to be installed at least 10 feet above the floor with adequate clearance between blades and adjacent walls furnishings etc 11 When mounted in cathedr...
Page 4: ...low CFM ILG8HVLS72 ILG8HVLS88 ILG8HVLS96 ILG8HVLS108 Speed 6 9 900 13 600 17 000 19 000 Speed 5 8 100 10 700 12 600 14 500 Speed 4 7 100 9 300 9 900 12 800 Speed 3 4 700 7 500 8 100 10 100 Speed 2 3 8...
Page 5: ...over SP HVLSxxx 6 1 Motor Assembly SP HVLS 7 1 Fan Blade Holder SP HVLSxxx 8 9 Fan Blade SP HVLS 9 9 Fan Blade Cap SP HVLS 10 9 Fan Blade Screw Cover SP HVLS 11 1 Bottom Cover PARTS OF THE CEILING FAN...
Page 6: ...HER For cUL only H4 1 MOUNTING PIN H5 28 M5x10mm LONG SCREW H6 1 COTTER PIN H7 7 1 4 20x5 16 LONG SCREW H8 7 6 LOCK WASHER H9 10 M4x6mm LONG SCREW H10 10 4 PLAIN WASHER H11 38 5 LOCK WASHER H12 10 M5x...
Page 7: ...7 Dimensions inch Model D H ILG8HVLS72 72 16 3 4 ILG8HVLS88 88 16 3 4 ILG8HVLS96 96 16 3 4 ILG8HVLS108 108 14...
Page 8: ...Hanger bracket must seat firmly against outlet box If the outlet box is recessed remove wallboard until bracket contacts box If bracket and or outlet box are not securely attached the fan could wobble...
Page 9: ...rt Attention Install the ceiling fan in a location such that the spacing from the tip of the blades to the nearest objects or walls is AT LEAST 12 300mm If the ceiling is angled the fan mounting equip...
Page 10: ...Install and tighten the two set screws with nuts in the downrod support WARNING It is critical that the mounting pin in the downrod support is properly installed and the set screws and nuts are secur...
Page 11: ...11 Install the fan assembly to the mount bracket as shown below Rotate till notch on the ball joint catches the stopper on the mounting bracket...
Page 12: ...part with the grounded conductor neutral Wire and the equipment grounding conductor Ground Wire on one side of the outlet box and the ungrounded conductor Live Wire on the other side of the outlet box...
Page 13: ...of mounting bracket is engaged with canopy then tighten the screws till the keyhole is locked Install the fan blade cap to the fan blade with H9 M4x6mm long screw and H10 4 plain washer Repeat this s...
Page 14: ...14 Rotate the bottom cover to the fan assembly until tighten Assemble the fan blade to the fan blade holder with H5 M5x10mm long screw and H11 5 lock washer Repeat this step for all 9 fan blades...
Page 15: ...be used for a month or more Batteries left in the unit may leak and cause damage Button Description Power ON Off 1 Speed 1 Minimum 2 Speed 2 3 Speed 3 4 Speed 4 5 Speed 5 6 Speed 6 Maximum Direction...
Page 16: ...itive and negative full or empty of the power 3 When the remote cannot control the fan please check is there any existence of similar remote controlled products nearby then check whether they works be...
Page 17: ...o set your air conditioner on a higher temperature setting without affecting your comfort When the fan blade rotates counterclockwise Winter Mode and the air will blow up An upward airflow moves warm...
Page 18: ...art 1 Check main and branch circuit fuses or circuit breakers 2 Check wire connections as performed in Step 2 of installation Caution Make sure main power is turned off 3 If the fan still will not sta...
Page 19: ...ngusa com for troubleshooting tips and service instructions if needed Register your product at our website Or visit iLivingUSA com register product Feedback Love it Help us make the product more for y...