8
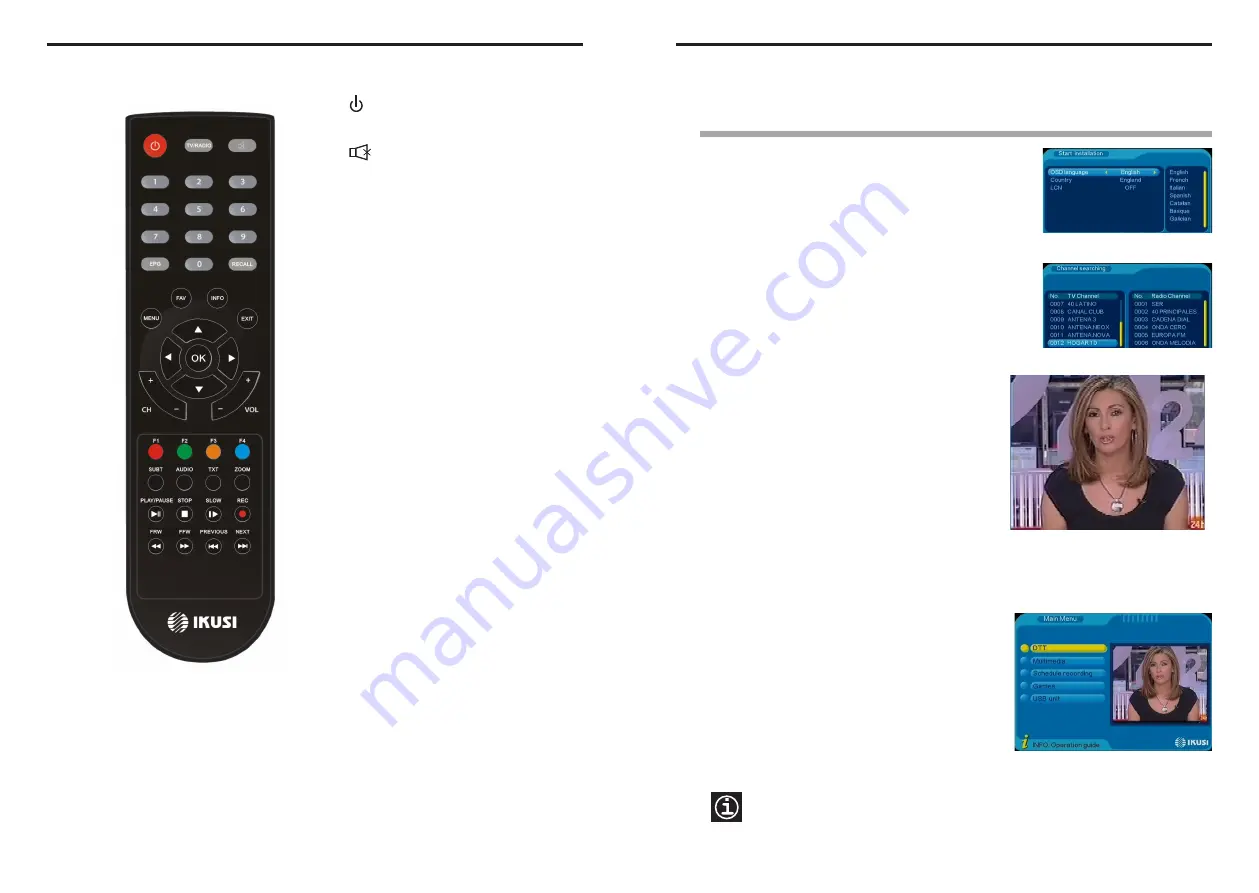
3. REMOTE CONTROL BUTTONS
TV/RADIO
(change between TV channels and Radio channels)
NUMBER BUTTONS 0 - 9
(select channels)
(enter numeric values)
EPG
(open electronic programme guide)
RECALL
(return to the last viewed channel)
MENU
(exit TV viewing and enter main menu)
FAV
(open favourite channels list)
INFO
(display channel information in TV Viewing mode)
(display buttons operation in Menu mode)
EXIT
(close OSD window)
(return to previous menu)
(exit main menu and enter TV viewing)
OK
(open channel list)
(confirm selection in list or menu)
▲
▲
▲
▲
▲
/
▼
▼
▼
▼
▼
(move up/down in list or menu)
(flip photo in multimedia playback)
(move left/right in menu)
(choose option in circular menu)
(rename channel in Channel Managing)
(open Calendar in date selection)
(see weekly programme information in the EPG guide)
(rotate photo in multimedia playback)
CH+ / CH–
(next/previous channel in channel list)
VOL+ / VOL–
(raise/lower volume)
F1 – red button
(mark a channel as favourite in Channel Managing)
(go to next month in Calendar)
(go to Today from Week in the EPG guide)
F2 – green button
(remove channel in Channel Managing)
(go to next year in Calendar)
(go to Week from Today in the EPG guide)
(select action when managing recorded files)
F3 – yellow button
(move channel in Channel Managing)
(go to previous month in Calendar)
(show additional programme information in EPG guide)
(repeat the playback of video and audio files)
(state duration of instant recording)
F4 – blue button
(lock channel in Channel Managing)
(go to previous year in Calendar)
SUBT
(select language or deactivate subtitles, if available)
AUDIO
(select audio language, if available)
(change between stereo, left channel and right channel)
TXT
(open teletext, if available)
ZOOM
(activate image zoom in TV viewing)
/
▲
▲
SMARTmini Receiver
PLAY/PAUSE
(pause/continue multimedia playback)
STOP
(stop multimedia playback)
(stop instant recording)
SLOW
(change video playback to
slow motion
)
REC
(start instant recording)
(schedule recording from EPG guide)
FRW & FFW
(change day of week in EPG guide)
(fast-forward & rewind video or audio playback)
PREV & NEXT
(play previous & next multimedia file)
(mute sound)
(on/standby)
9
Settings
Accessing the menus
Your
SMARTmini
receiver has stored information about all of the channels that it receives through the
antenna and has created the Channel List. You can already view any of the channels in this list (take a look
at section 4.3.4 on page 19) but please carry on reading this manual in order to first discover all of the
features of the receiver and to familiarise yourself with its use.
On the screen you are seeing images from the first channel in
the list. Press the MENU button on the remote control. The
Main Menu
page appears, with these options :
1)
DTT
, to watch the television or listen to the radio.
2)
Multimedia
, to play back video or audio files or to view photos.
3)
Schedule recording
, to external hard disk.
4)
Games
, just for fun.
5)
USB unit
, for managing the external USB device.
The
DTT
option is the main function of the
SMARTmini
receiver
and is the subject of this chapter 4.
When the receiver is turned on during its daily use, the screen displays the
channel that was tuned in the last time the device was turned off.
If you are watching the television («TV viewing») and you wish to access the
Main Menu
, press the MENU button on the remote control.
If you are on the menu screen and wish to return to the TV viewing, press the
EXIT button several times.
4. RECEIVING DTT (Digital Terrestrial Television)
4.1 Initial startup
When you turn on the
SMARTmini
receiver for the first time, the TV
set displays the
Start installation
screen. From here you can
automatically install all of the digital channels received via the
antenna. But first you must make the correct choices regarding the
following parameters:
1.
OSD language
: this is the language used for the menus and the
messages that the receiver displays on screen. By default, this is
set to English. To change this option, press the button on the
remote control to open the list of languages on the right-hand
side; now use the
▲
/
▼
buttons to highlight the desired
language and press OK. From this moment onwards, all of the
text displayed on the screen will be in that language.
2.
Country
: this is where the receiver is installed. By default, this
is set to England. If you are in another country, change this
option in the same way as indicated above.
3.
LCN
(Logical Channel Numbering)
: this refers to the automatic
classification of the channels. Select ON or OFF in the
same way as indicated above.
Press the OK button. A confirmation message appears.
Press to select "Yes" and then press OK again. The
channel search begins. The receiver will detect all the
channels received via the
RF In
input and will automatically
create a list of channels. Once the process has finished,
the television screen will begin to display images from the
first channel on the list.
You are now watching DTT on your TV !
▲
▲


