background image


25 

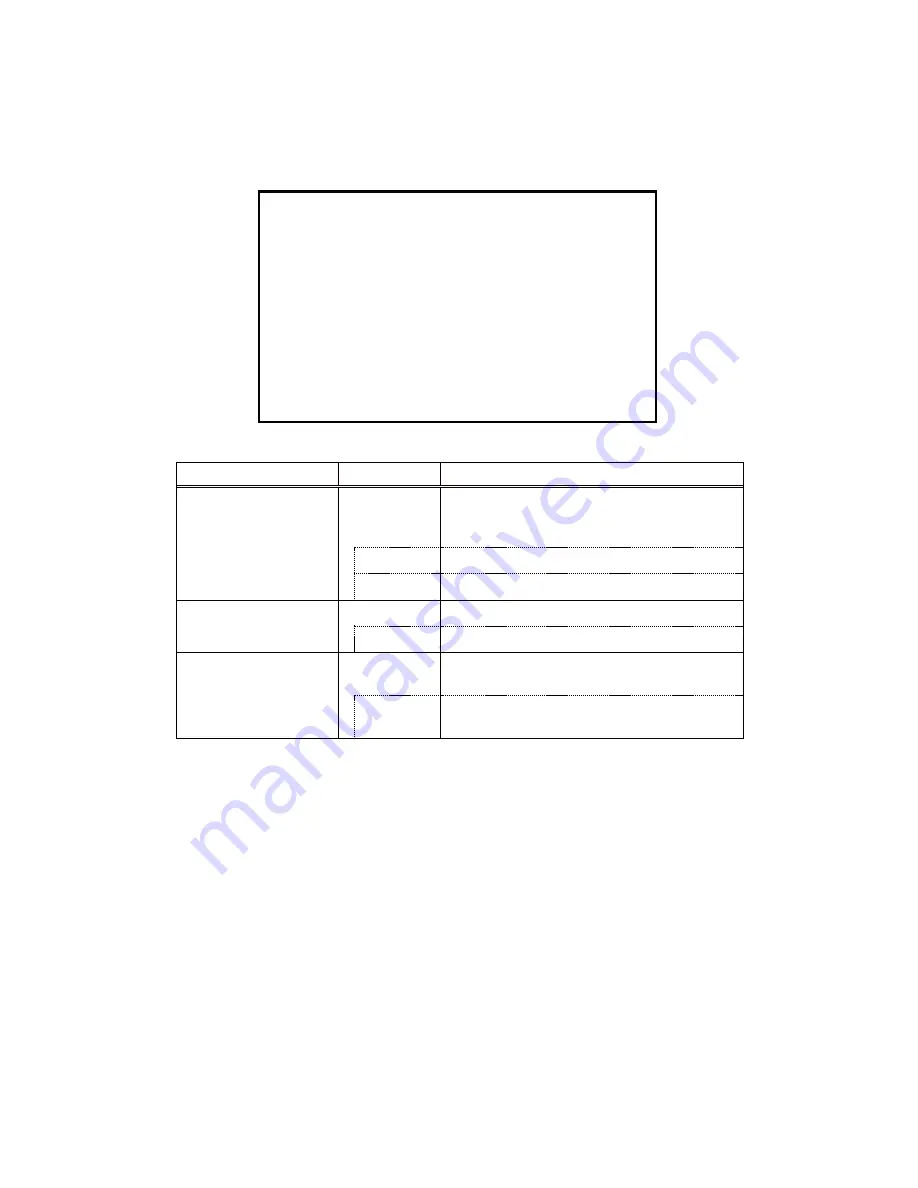
4.4. Detail

Used to adjust detail enhancement.

Item

Setting

Description

DTL

Sets the contour enhancement. If contour 
enhancement is carried out, the image is clearer 
and easier to view. Set it to ON usually.

ON

Carried out contour enhancement.

OFF

Does not carried out contour enhancement.

DTL Gain

To adjust the detail enhancement level.

-128 to 127

Increasing the value results in a sharper image.

Boost Frequency

Set the boost frequency for contour 
enhancement.

2 MHz to 

28 MHz

The lower the value, the easier it is to carry out 
contour enhancement on the entire screen.

DTL

Quit
DTL

           ON

DTL Gain

       0

Boost Frequency

16 MHz

Summary of Contents for MKC-230HD

Page 1: ...MKC 230HD Rev A Digital Process Compact 3CMOS Color Camera O Operation Manual ...

Page 2: ... supply voltage than s specified A fire or electric shock may be caused Do not put a metal body or flammable material into t the opening of the unit Do not drop in such material Afireorelectricshock may be caused Do not make alterations to the unit A fire or electric shock may be caused When installing the unit Do not set the unit in an unstable place It may drop or turn down causing an injury Do ...

Page 3: ... harmful interference to radio communication Operation of this equipment in a residential area is likely to cause harmful interference in which case the user will be required to correct the interference at his own expense Changes or modifications not expressly approved by the party responsible for compliance could void the user s authority to operate the equipment 䢢 䣃䣤䣱䣷䣶䢢䣅䣣䣯䣧䣴䣣䢢䣅䣣䣤䣮䣧䢢 Note the fo...

Page 4: ...umidity should be at least 30 Electrical fast transient burst IEC61000 4 4 2kV for power supply lines 1kV for input output lines 2kV for power supply lines 1kV for input output lines Main power quality should be that of a typical commercial or hospital environment Surge IEC61000 4 5 1kV differential mode 2kV common mode 1kV differential mode 2kV common mode Main power quality should be that of a t...

Page 5: ...ned by an electromagnetic site survey ashould be less than the compliance level In each frequency range b Interference may occur in the vicinity of equipment marked with the following symbol䠖 NOTE 1 At 80 MHz and 800 MHz the higher frequency range apply NOTE 2 These guidelines may not apply in all situations Electromagnetic propagation Is affected by absorption and reflection from structures objec...

Page 6: ... File Selection 19 4 Menu Operation 20 4 1 Operation Method 20 4 2 Video Adjust 21 4 3 AE Mode 22 4 4 Detail 25 4 5 Video Setting 26 4 6 Picture Setting 28 Scene File 29 4 8 Foot Switch 30 4 9 White Balance 31 4 10 Iris Setting 32 4 11 IP ENC Setting Enabled Only with Optional Board Installed 33 4 12 Miscellaneous 36 4 13 Version Information 5 Advanced Usage Methods 38 5 1 External Synchronization...

Page 7: ... File 41 5 4 Snapshot requires optional module 41 5 4 1 SD Card Recording 41 5 4 2 RU FDUGV RQ ZKLFK UHFRUGLQJ LV ÀQLVKHG 42 6 Default Settings 43 Specification 45 1 Ratings 45 2 Performance 45 3 Functions 45 8 External Appearances 46 8 1 Camera Head 46 8 2 CCU 46 ...

Page 8: ... the lens Allows mounting of various C mount lens and microscope adapters ղ Lens connector The dedicated microscope adapter or the IRIS cable of a C mount lens is connected here 㻌 㻌 㻌 㻌 㻌 㻌 㻌 㻌 㻌 㻌 㻌 㻌 㻌 㻌 㻌 㻌 㻌 㻌 㻌 㻌 㻌 㻌 㻌 㻌 㻌 㻌 㻌 㻌 㻌 㻌 㻌 㻌 㻌 㻌 㻌 㻌 㻌 㻌 㻌 㻌 㻌 HR10A 7R 4S PIN assignment 㻌 㻌 㻌 㻌 㻌 㻌 㻌 㻌 㻌 㻌 㻌 㻌 㻌 㻌 㻌 㻌 㻌 㻌 㻌 㻌 㻌 㻌 㻌 㻌 㻌 㻌 㻌 㻌 㻌 㻌 㻌 㻌 㻌 㻌 㻌 㻌 㻌 㻌 㻌 Iris Cable side HR10A 7P 4P 4 pin f...

Page 9: ... a color monitor Page 18 䐡 White balance button This executes the automatic white balance function Page 15 䐢 Freeze button Possible to freeze the screen image See page 17 䐣 Color correction volume red To finely control the red color density on the output picture պMenu button չFunction Set button նColor correction volume blue ձPower button ղColor bar button յColor correction volume red ճWhite balan...

Page 10: ...HV RU RSHUDWH WKH PHQX 䐧 Function Set button Press to determine the item you wish to set with the menu displayed Refer to Menu Operation 䐨 Menu button To display the menu that the user can set as desired on the monitor Select an item you want to set with ո UURZ NH DQG GHÀQH LW ZLWK չ FUNCTION SET button for menu items you can set Refer to Menu Operation Page 20 for further detailed operations ...

Page 11: ...ble extension from the foot switch When using the FOOT SW you must install the ferrite core to the cable Contact us if you use FOOT SW 4 Camera connector Connects with camera connector of the special camera cable Be aware that the size of the camera connector differs on the camera head side and CCU side նMain power switch մCamera connector ղS VIDEO OUT connector ոHD SDI Output Connector չGEN LOCK ...

Page 12: ...chronizing signals from the other system Equivalent to Tri Level SYNC HD 10 SYNC connector When using while synchronized with the phase of another system s image outputs synchronizing signals to the other system Equivalent to Tri Level SYNC HD This connector can be used only in synchronization for other MKC 230HD We cannot guarantee the synchronization with our competitor s product 11 Equipotentia...

Page 13: ...or warranty when videos are not saved due to any failure of this machine and SD card Although in the following cases saved data may be damaged lost please note we assume no responsibility for damage and so on caused by data corruption and so on Ɣ KHQ DQ 6 FDUG is used improperly Ɣ KHQ DQ 6 FDUG LV QRW SURSHUO LQVHUWHG LQWR WKH HTXLSPHQW Ɣ KHQ DQ 6 FDUG LV VXEMHFW WR HOHFWURQLF DQG PHFKDQLFDO VKRFN...

Page 14: ... Power of all the equipment before making connections Ⴠ RU H FOXVLYH FDPHUD KHDG FRQQHFWLRQ JRRGV 8VLQJ KHDGV RWKHU WKDQ WKDW VSHFL HG may result in failure Ⴠ The operator must not touch a connector simultaneously with a patient 㻌 Foot switch S VIDEO cable HD SDI compatible coaxial cable HDD DVD recorder Camera cable Supplied power cable DVI D cable MKC 230HD CCU HD SDI compatible DVI compatible M...

Page 15: ...held even if power is turned on again and MKC 230HD is set to the normal shooting state When moving the CCU be sure to turn off the POWER disconnect the power plug and remove the connecting cable between equipment beforehand If the cable comes loose during use repeat the steps described above CAUTION Caution for Camera cable connection and disconnection Turn off the power of MKC 230HD when you con...

Page 16: ...omatic adjustment the white balance button is lit in green Ɣ If AWB is displayed on the monitor screen and it ends normally AWB COMPLETED is displayed Ɣ If AWB ERROR is displayed AWB adjustment was not carried out for the following reasons Recheck the image pickup conditions a white subject brightness etc and readjust the white balance Ɣ If the image level is too low Ɣ If the image level is too hi...

Page 17: ...d 3 Adjust the Blue color level density of picture with B PAINT adjuster ŏClockwise for adjuster Darker blue color on picture is appeared Counterclockwise for adjuster Lighter blue color on picture is appeared 4 The picture color condition is relatively changed above Red and Blue color level by adjustment 3 5 Adjustment AE Level It is possible with the MKC 230HD to automatically adjust the shutter...

Page 18: ...utput and switch to freeze frame output Operation 1 Press Freeze button Ɣ Immediately switches to freeze frame output Ɣ During freeze frame output the freeze button is lit green 2 To return to moving image output press the freeze button again Ɣ The freeze button extinguishes Freeze button ...

Page 19: ...he color monitor brightness contrast etc Operation 䐟 䐟 Press the color bar button ƔImmediately changes to color bar output Ɣ During color bars output the color bar button is lit green 䐠 To return to camera images press the color bar button again Ɣ The light of the color bar button extinguishes Color bar button ...

Page 20: ...dout operation 1 The arrow key is lit that corresponds to the presently selected scene file 2 Use the arrow keys to select the scene files ƔThe numerical value displayed next to the arrow keys is the number of the scene file ƔThe arrow key is lit that corresponds to the selected scene file ƔThe scene file setting is immediately reflected Scene file 2 Scene file 1 Scene file 3 Scene file 4 ...

Page 21: ...the Ќ Ў keys on the front of the CCU to select the item and then press the SET button to enter the submenu screen The setting values of the setting items can be changed with the Ћ Ѝ keys If the Menu button on the front of the CCU is pressed during display of the menu screen the settings are stored and the menu screen stops Display non display of the menu screen Changing setting values Determining ...

Page 22: ... is the same function as paint adjustment volume on the front of the CCU 128 to 127 Increasing the value causes blue to be displayed more vividly White shading White shading function setting ON Carries out white shading correction OFF Does not carry out white shading correction Auto white shading White shading is adjusted automatically When it is not a uniform screen it is not adjusted normally D ...

Page 23: ...ed is carried out in the item entitled Manual Shutter Manual Shutter The shutter speed when Shutter Control is FIX is set here If set to AUTO it is ignored It is usually used in the OFF setting OFF The shutter speed set at about 1 60 seconds 1 100 to 1 10000 The shutter speed is constantly set to a fixed value ranging between 1 100 sec and 1 10000 sec Auto shutter Limit 1 100 to 1 10000 If the Shu...

Page 24: ...etering Area Select Possible to adjust the extent of a metering area Carries out automatic adjustment of the shutter and gain etc based on the image in the frame displayed in the screen MID About 40 of the screen center is a metering area WIDE About 60 of the screen center is a metering area FULL The entire screen is a metering area NARROW About 10 of the screen center is a metering area USER Allo...

Page 25: ...he sensitivity Although the sensitivity will increase by a factor of two horizontal resolution will be slightly lower ON Carries out increase the sensitivity OFF Does not carry out increase the sensitivity Line Mix It is used when you want to increase the sensitivity Although the sensitivity will increase by a factor of two vertical resolution will be slightly lower ON Carries out increase the sen...

Page 26: ...ON Carried out contour enhancement OFF Does not carried out contour enhancement DTL Gain To adjust the detail enhancement level 128 to 127 Increasing the value results in a sharper image Boost Frequency Set the boost frequency for contour enhancement 2 MHz to 28 MHz The lower the value the easier it is to carry out contour enhancement on the entire screen DTL Quit DTL ON DTL Gain 0 Boost Frequency...

Page 27: ...ogressive signal 1080i Output the interlace signal DVI Setting Select the DVI output signal output format 1080p Output the progressive signal 1080i Output the interlace signal Gamma If gamma correction is carried out it is possible to cause the caused the dark sections of the image to be displayed brightly Normally this is used in an ON setting ON Carries out gamma correction OFF Does not carry ou...

Page 28: ... the color intensity normal color image Color Saturation Gain Adjusts the color intensity 64 to 63 The higher the value the more intense the color The lower the value the more faded the color With 64 it is monochrome Genlock Mode Select the Genlock mode Auto When GENLOCK signal was input It is automatically replaced OFF Does not carry out Genlock function Genlock H Phase 128 to 127 Adjusts the hor...

Page 29: ...come the normal rotation output V Flip Sets the vertical inversion of the image ON Inverts to a vertical direction for output OFF The vertical direction becomes the normal rotation output Digital Zoom Magnification setting for electronic zoom x1 0 to x4 0 The center of the screen is zoomed up in units of 0 1 power Picture Shift H 32 to 32 The horizontal display position of the screen is adjusted i...

Page 30: ...ting Description Scene Number Select and read the set scene file Store Scene Store the set condition in the scene file Select the scene file you wish to set and press the SET button Initialize Scene Select the scene file you wish to initialize and press the SET button If you select ALL all scene files will be initialized Scene File Quit Scene Number No 1 Store Scene READY Initialize Scene READY ...

Page 31: ...tch again to return to moving images SCENE FILE Switches the scene file selection H FLIP Outputs a horizontally inverted image V FLIP Outputs a vertically inverted image ROTATE Outputs an image inverted 180 degrees ZOOM IN Carries out electronic zoom in ZOOM OUT Carries out electronic zoom out SNAPSHOT Inserts still images on SD card with IP encoder optical SHUT CONT Switch the shutter control AUT...

Page 32: ...NUAL Manual adjustment of white balance Adjustment is carried out with Manual Gain Red Blue ATW Automatically adjusts to the white balance in relation to pickup conditions Manual Gain Red Adjusts the red gain 128 to 127 Increasing the value causes red to be displayed more vividly Manual Gain Blue Adjusts the blue gain 128 to 127 Increasing the value causes blue to be displayed more vividly White B...

Page 33: ...er or gain control may become slow AUTO Automatically adjusts to the ideal lens iris value in relation to image brightness FIX The lens iris value that a user has set will always take effect An iris value is adjusted at the item Iris Level Iris Level Adjust the iris level 128 to 127 The higher the value the brighter it The lower the value the darker it Iris Setting Quit Iris Control AUTO Iris Leve...

Page 34: ...sion method SNAPSHOT Compress with JPEG method and record on the SD card STREAMING Compress with the H 264 method and distribute the image JPEG Quality Sets the image quality if the compression method is set to JPEG A to E Five steps from A highest image quality to E lowest image quality IP ENC Setting Quit IP Address ENTER Encoder Mode SNAPSHOT JPEG Quality A ...

Page 35: ...select OK To stop press Cancel and then press the Set button Only displayed if the IP address is changed Note Ɣ The Setting values such as IP address and sub net mask will vary according to the network environment of the customer Please consult with the network manager Do you change the IP Address Cancel OK IP Address Quit IP Address 192 168 001 100 Subnet Mask 255 255 255 000 ...

Page 36: ...tain by this device disruption due to unauthorized access system halt and so on The messages include the following but please implement sufficient other measures under your own responsibility Do not install in any place where cables can be easily moved replaced Maintain network safety Firewall and so on Conduct regular anti virus checks on all PCs to be connected to the network Restrict the number...

Page 37: ...Menu Lock Menu lock ON Sets a state in which no settings other than Menu Lock can be changed During MENU LOCK a red lock mark is displayed in the upper right of the menu screen OFF Sets to a state in which all menu item setting can be changed Cancel 3UHVV 5 ĺ 67 57 ĺ 6 7 The last saved menu items will be restored Initialize ex Scene 3UHVV 5 ĺ 67 57 ĺ 6 7 All the settings other than those for scene...

Page 38: ...4 13 Version Information To display the software version of this camera Only displayed if IP ENC module is mounted Version Information Quit CCU Firmware V5 00 CCU FPGA V5 00 Head FPGA V5 00 IP ENC V1 00 ...

Page 39: ...automatically switches from internal synchronization to external synchronization SYNC input conditions Tri Level SYNC 0 6 Vp p 75 ohms 5 1 1 Wiring connection example Prepare two sets of CCU and camera for MKC 230HD Connect the SYNC connector of CCU Master and the GENLOCK connector of CCU Slave with the coaxial cable CCU master CCU slave Camera master Camera slave Coaxial cable Sold separately SYN...

Page 40: ...e You can change the range of a metering frame as desired By adjusting a metering frame a video can automatically be adjusted in keeping with the use environment 5 2 1 Setting Select 0RGH ĺ UHD 6HOHFW ĺ 86 5 IURP WKH PHQX and press the SET button The system goes to the manual setting screen for a metering frame Possible to set the position and size of the metering frame KHQ VHWWLQJ LV QLVKHG selec...

Page 41: ... 7 EXWWRQ to complete adjustment Size Setting Select Size and press the SET button to adjust the size of a metering frame The upper left FRUQHU RI WKH IUDPH LV HG 7KH ORZHU ULJKW FRUQHU FDQ EH PRYHG IRU adjustment Use the Ѣ ѣ Ѥ ѡNH V WR DGMXVW WKH VL H RI WKH IUDPH KHQ DGMXVWPHQW LV QLVKHG SUHVV WKH SET button to complete adjustment Quit Position Size Movement of frame Quit Position Size Changimg ...

Page 42: ...he alternatives Initialize Scene 1 to Initialize Scene 3 and then press the SET button The selected scene is immediately initialized 5 3 3 Setting of Scene File 7R XVH WKH VWRUHG VFHQH OH RSHUDWH WKH IURQW SDQHO 6HH SDJH 8 or the foot switch See page 30 or the menu Scene File See page 29 5 4 Snapshot requires optional module Possible to record still images JPEG to SD card The picture quality setti...

Page 43: ...42 5 4 2 RU FDUGV RQ ZKLFK UHFRUGLQJ LV QLVKHG It is possible to view the recorded images on a PC This device does not include a function for displaying images A PC is required to view images ...

Page 44: ... AUTO Manual Shutter OFF Auto Shutter Limit 1 10000 AE Level 15 AE Speed MID Peak Ratio 20 Area Select MID Gain Control AUTO AGC Gain Range 9 dB Normal Gain 9 dB High Sensitivity OFF Line Mix ON DTL Set Detail ON Detail Gain 0 Boost Frequency 16 MHz Video Setting Format 59 94Hz SDI Setting 1080i DVI Setting 1080i Gamma ON Master Gamma 0 Color Saturation ON Color Saturation Gain 10 Genlock Mode AUT...

Page 45: ...h Foot Switch 1 FREEZE Foot Switch 2 ROTATE Foot Switch 3 FREEZE Foot Switch 4 FREEZE Iris Setting Iris Control AUTO Iris Level 0 White Balance WB Mode AWB Manual Gain Red 64 Manual Gain Blue 64 Iris Setting Iris Control AUTO Iris Level 0 IP ENC Setting IP Address 192 168 001 100 Subnet Mask 255 255 255 0 Encoder Mode SNAPSHOT JPEG Quality A Miscellaneous Center Marker OFF Menu Lock OFF Cancel REA...

Page 46: ... 10 11 Rating current 0 5A 0 3A 12 Operating Temperature 0qC 40qC 13 Storage temperature 20qC 70qC 14 Dimensions Weight Camera head W34 x H40 x D40 mm 100 g or less CCU W170 x H58 x D270 mm 2 kg or less 15 Accessories Operation Manual 7 2Performance 1 Resolution Horizontal 1000 TV lines 1080I 59 94 50 2 S N ratio G WDUJHWHG Ȗ DQG GHWDLO 2 3 Sensitivity Standard 2000 lux f14 3200 K or more 7 3Funct...

Page 47: ...46 8 External Appearances 8 1Camera Head 8 2CCU Unit mm ...

Page 48: ...The software that we have manufactured is copyrighted by IKEGAMI TSUSHINKI CO LTD You may not reproduce or alter it in whole or in part without permission ...

Page 49: ... Tsushinki Co Ltd 䢰 September 2015 Ikegami Tsushinki Co Ltd All rights reserved Reproduction or duplication without permission of Ikegami Tsushinki Co Ltd of editorial or pictorial content in whole or in part in any manner is prohibited Specifications and design are subject to change without prior notice ...

Page 50: ... ...

Reviews: