HQLM-1720WR
- -
23
SCENE1
SCENE2
SCENE10
ն
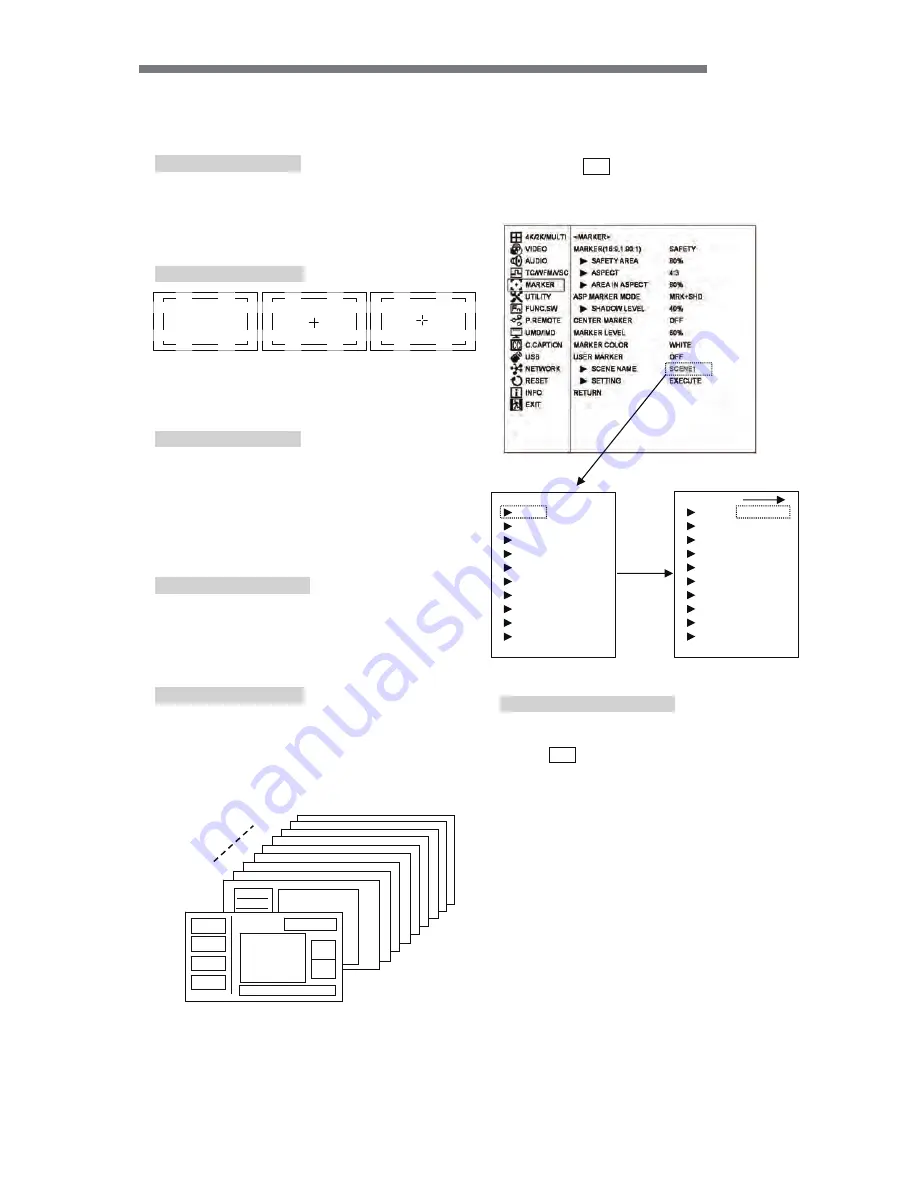
Setting the aspect marker shadow level
࣭
Used to set the contrast level of the aspect marker
shadow, when displayed.
࣭
Settings: 0%, 20%, 40% and 60%
࣭
Default setting is 40%.
շ
Setting the center marker ON(TYPE-A/B)/OFF
࣭
Used to turn on and off the center cross marker.
࣭
There are two kinds of center markers TYPE-A or
TYPE-B.
࣭
Default setting is OFF.
ո
Setting the marker display level
࣭
Used to set the marker display level.
࣭
Settings: 20%, 40%, 60%, 80% and 100%
࣭
Default setting is 80%.
չ
Setting the marker display color
࣭
Used to set the marker display color.
* The marker is displayed in the color preset on
the marker menu.
࣭
Settings
㸸
White, yellow, cyan, green, magenta,
red and blue
࣭
Default setting is white.
պ
Setting the user marker display ON/OFF
࣭
Used to turn on and off the user marker display.
࣭
This function can be assigned to a function
switch on the front panel.
࣭
Default setting is OFF.
ջ
Selecting each scene of user markers and set-
ting the scene names
࣭
The user markers can be set for up to 10 scenes;
you can select from SCENE 1 to SCENE 10.
࣭
The name of each scene can be up to 8 characters in
length with the following characters: "0-9, A-Z, (),
-
,
□
(blank)".
࣭
If you press
ENT
on the SCENE, the following
SETTING MENU is displayed, and there you can
change the name of each SCENE.
࣭
The switching of the scenes can be assigned to a
function switch on the previous screen.
࣭
Default setting is SCENE1.
ռ
Setting User Markers
࣭
Press
ENT
with EXECUTE, and the user mark-
ersetting menu shows up. Now various settings
can be made in this menu.
࣭
For details, refer to Item “4-7. Description of
MENU-USER MARKER Functions and Setup”.
OFF
TYPE-A
TYPE-B
<SCENE NAME>
NO.1
RETURN
NO.2
NO.3
NO.4
NO.5
NO.6
NO.7
NO.8
NO.9
NO.10
SCENE1
䕕䕕
SCENE2
䕕䕕
SCENE3
䕕䕕
SCENE4
䕕䕕
SCENE5
䕕䕕
SCENE6
䕕䕕
SCENE7
䕕䕕
SCENE8
䕕䕕
SCENE9
䕕䕕
SCENE1 0
䕕
<SCENE NAME>
NO.1
RETURN
NO.2
NO.3
NO.4
NO.5
NO.6
NO.7
NO.8
NO.9
NO.10
ABCDEFGH
SCENE2
䕕䕕
SCENE3
䕕䕕
SCENE4
䕕䕕
SCENE5
䕕䕕
SCENE6
䕕䕕
SCENE7
䕕䕕
SCENE8
䕕䕕
SCENE9
䕕䕕
SCENE1 0
䕕
Summary of Contents for HQLM-1720WR
Page 1: ...MODEL HQLM 1720WR 㻝㻣㻙㼕㼚㼏㼔㻌㻠㻷㻛㻴㻰㻌㻹㼁㻸㼀㻵㻌㻲㻻㻾㻹㻭㼀㻌㻸㻯㻰㻌㻹㻻㻺㻵㼀㻻㻾 OPERATION MANUAL ...
Page 2: ...㩷 ...
Page 22: ...HQLM 1720WR 12 4㸬MENU Functions 4 1㸬MENU Outline 㻌 㻌 㻌 㻌 ...
Page 63: ...HQLM 1720WR 53 6 Mouse menu function 6 1㸬Basic procedure of the mouse menu ...
Page 70: ...HQLM 1720WR 60 10㸬External View UNIT㸸mm 10 1 Without option ...
Page 80: ...HQLM 1720WR 70 Notes ...


