5.2 Settings from the Menu
HDK-55 1206 VER1 (U)
89
C
A
ME
R
A
SE
T
T
INGS an
d AD
JUS
T
ME
NT
5
■
FILE SET
FILE SET creates a lens
fi
le.
To change the settings, select "LENS SELECT" on MENU (3/3), then "FILE SET."
The following explains the set values, descriptions, and setting procedures.
Set Value
De
s
cription
OFF (default)
Does not create lens files.
MANUAL
Stores the current lens status as a file. ("LENS No. x" will be displayed at the bottom of the screen.)
AUTO
Starts auto setup for lens file creation. ("PUSH SET -> START" will be displayed and flash at the
bottom of the screen.)
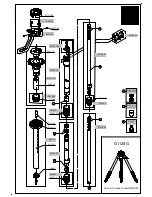
Chart on which Kent paper, etc. has been pasted
and the entire surface is a uniform white.
Illumination
meter
Light
Camera
Tripod
Picture monitor
(connect if required)
Coax cable
Light
WFM
MON SDI OUT connector
Note:
- The creation of lens
fi
le requires precise adjustment; therefore, lens
fi
les are protected against unintentional update by the S11-4 DIP
switch of the MPU module.
- When creating a lens
fi
le, set the optical
fi
lter to ND:100% and the ECC
fi
lter to 3200K. Also con
fi
rm that no special effect
fi
lter is
attached to the front of the lens or internal
fi
lter disk. If a special effect
fi
lter is attached, it may not be possible to correctly create the
lens
fi
le.
- When operating the DIP switch (S11) in the MPU module, turn the POWER switch of the camera OFF once.
1
Set the camera for level setup.
- Mount the standard lens, which is used as a reference lens, to the camera.
- Chart on which Kent paper, etc. has been pasted and the entire surface is uniform white is used for the photographic
subject.
- Use an illumination meter to adjust the light so that light is evenly distributed over the whole chart.
2
Dip switch S11-4 On allows creation of a lens file, Off prohibits creation of new lens files.
Summary of Contents for HDK-55
Page 1: ...HIGH DEFINITION CAMERA SYSTEM HDK 55 FA 55 OPERATION MANUAL...
Page 2: ......
Page 17: ...1 OUTLINE...
Page 18: ...2 HDK 55 1206 VER1 U...
Page 24: ...8 HDK 55 1206 VER1 U 1 2 Operating Systems...
Page 26: ......
Page 27: ...2 NAME and FUNCTION...
Page 28: ...12 HDK 55 1206 VER1 U...
Page 47: ...3 INSTALLATION and CONNECTION...
Page 48: ...32 HDK 55 1206 VER1 U...
Page 50: ...3 1 Preparation 34 HDK 55 1206 VER1 U...
Page 52: ......
Page 54: ......
Page 70: ...54 HDK 55 1206 VER1 U...
Page 71: ...4 OPERATION...
Page 72: ...56 HDK 55 1206 VER1 U...
Page 86: ...70 HDK 55 1206 VER1 U...
Page 87: ...5 CAMERA SETTINGS and ADJUSTMENT...
Page 88: ...72 HDK 55 1206 VER1 U...
Page 115: ...6 TROUBLE SHOOTING and MAINTENANCE...
Page 116: ...100 HDK 55 1206 VER1 U...
Page 126: ...110 HDK 55 1206 VER1 U...
Page 127: ...7 SPECIFICATIONS...
Page 128: ...112 HDK 55 1206 VER1 U...
Page 132: ...116 HDK 55 1206 VER1 U 7 2 External Dimensions Diagram Left View 94 3 7 1 337 5 270 5...
Page 134: ...118 HDK 55 1206 VER1 U 7 2 External Dimensions Diagram Rear View 138 5 3...
Page 150: ...134 HDK 55 1206 VER1 U...
Page 152: ......
Page 153: ......