background image

UNO Drum

7 – The Sequencer

         36

7 – MIDI Implementation

7.1 – General

MIDI stands for Musical Instrument Digital Interface, and is the worldwide standard for exchanging musical data 

between electronic musical instruments and computers.
When MIDI cables are used to connect two or more MIDI devices, performance data can be exchanged 

between the devices, even if they were made by different manufacturers.
The UNO Drum transmits the front panel knobs or buttons movement via continuous controller (CC) messages 

to let you control other external MIDI devices.
As each parameter and control on the synth has its own unique Control Change number, it is possible to 

completely control the unit via external controllers or computers.
MIDI data can also be exchanged between the UNO Drum and your computer using the provided USB cable in 

addition to the MIDI DIN ports.
It is possible to synchronize the UNO Drum’s tempo to the MIDI clock of an external MIDI sequencer or other 

device.

7.2 – Control External Devices with UNO Drum

If you want to use the UNO Pads, controls, and sequencer to play sounds on or to control an external 

instrument, connect the UNO Drum MIDI OUT connector to the external instrument MIDI IN connector using a 

MIDI cable.

7.3 – Control UNO Drum from External Devices

If you want to play or control the UNO Drum from another MIDI keyboard, pad controller, sequencer or other 

external device, connect the MIDI OUT connector of the external MIDI device to the UNO Drum’s MIDI IN jack 

with a MIDI cable.

7.4 – Connecting UNO Drum to a computer via MIDI

You may want to play the UNO Drum and record your performance on a computer (connected using a MIDI 

interface) and/or play the UNO Drum while monitoring what you recorded. You also may want to use the UNO 

Drum as both an input device for playing notes and as a tone generator. In all of these cases, connect the MIDI 

OUT connector to the MIDI IN connector on both the UNO Drum and the computer.

7.5 – Connecting UNO Drum to a computer via USB 

The UNO Drum is recognized as a standard USB device, so the installation of proprietary drivers is not needed. 

The USB MIDI has both IN and OUT capabilities and can be used as a MIDI Interface.

Summary of Contents for UNO Drum

Page 1: ...ANALOG PCM DRUM MACHINE USER MANUAL...

Page 2: ...1 Insert a trig 33 5 2 Automate a trig 33 5 3 Automate a pattern 33 5 4 Using the Element pads 34 6 Presets 35 6 1 Loading a KIT or a PATTERN 35 6 2 Store a KIT or a PATTERN 35 6 3 Factory Presets 35...

Page 3: ...UNO Drum Contents 3 8 Specifications 43 9 Troubleshooting 45 10 Support 46 10 1 User Area 46...

Page 4: ...UNO Drum Introduction 4 Introduction Thank you for purchasing UNO Drum In the box Your package contains UNO Drum USB cable 4 AA Batteries MIDI cables Quick Start Guide Registration Card...

Page 5: ...orrect USB port in the device or USB power adapter UNO Drum works with both Ni MH and Alkaline Ni MH batteries are tested to last for about 2 5 hours of continuous use while Alkaline batteries last ab...

Page 6: ...tact your nearest IK Multimedia dealer or the store where the equipment was purchased Specification subject to change The information contained in this manual is believed to be correct at the time of...

Page 7: ...n the display when the batteries reach a low level but the unit will still be under battery power and will eventually shut off Set the switch to the USB position to avoid this 1 Power switch This swit...

Page 8: ...UNO Drum 1 Installation and setup 8 5 Audio OUT Connect the UNO Drum output to an external amp mixer or audio interface or to your headphones with stereo mini plug here...

Page 9: ...buttons or put objects on the unit during the calibration as this will incorrectly calibrate the capacitance sensing system In case of incorrect calibration of the capacitance sensing system please po...

Page 10: ...um grooves to your music UNO Drum features 12 Killer sounding elements 6 fat punchy analog voices Up to 12 PCM voices Analog drive and compressor 100 drum kits Wider sonic palette Analog character wit...

Page 11: ...6 of the available 60 are analog Kit a Kit is a combination of element and sounds that are edited and stored as a preset Element Pattern is the pattern relative to an element Pattern is the global pat...

Page 12: ...panel interface 12 4 Front panel interface For an easier explanation we can divide the front panel in 3 parts which are meant to cooperate together the Editing Matrix the Master Section and the Play...

Page 13: ...jump in values The first row named DRUM has a second function which it activates after holding the button for 1 5 seconds after those 1 5 seconds the encoders will adjust the parameters according to...

Page 14: ...the tuning of the modulator FM Amount adjust the amount of the FM modulation Sweep Time adjust the sweep time of the carrier and the modulator Snap adjust the volume of the added initial transient Le...

Page 15: ...school vibe to the entire machine For the PCM sounds the engine operate at 32kHz and 12 bit The controls are Tune adjust the speed reading of the PCM samples On the display values are showed from 0 t...

Page 16: ...tortion given by the analog drive circuit Values go from 0 to 127 adjusting the amount of distortion The drive value cannot be recorded in an element pattern or a pattern The drive values is stored in...

Page 17: ...1 This type repeats 8 steps in a loop from the first available after the press of the stutter button In this case the AMOUNT controls the number of element affected by the stutter from the Kick1 to al...

Page 18: ...repeats 4 steps in a loop from the first available after the press of the stutter button In this case the AMOUNT controls the number of element affected by the stutter from the Kick1 to all the 12 ele...

Page 19: ...s type repeats 3 steps in a loop from the first available after the press of the stutter button In this case the AMOUNT controls the number of element affected by the stutter from the Kick1 to all the...

Page 20: ...4 This type repeats 6 steps in a loop from the first available after the press of the stutter button In this case the AMOUNT controls the number of elements affected by the stutter from the Kick1 to...

Page 21: ...pattern of elements starting from the first step available as showed in the picture In this case the AMOUNT controls the number of elements affected by the stutter from Kick1 to all of the 12 element...

Page 22: ...rrent element pattern starting from the first step available as showed in the picture In this case the AMOUNT controls the number of elements affected by the stutter from Kick1 to all the 12 elements...

Page 23: ...lement going from value 0 to 127 in 8 steps at the double of the speed of the sequence In this case the AMOUNT controls the number of element affected by the stutter from the Closed and Open HiHats to...

Page 24: ...lement going from values 127 to 0 in 8 steps at the double of the speed of the sequence In this case the AMOUNT controls the number of elements affected by the stutter from the Closed and Open HiHats...

Page 25: ...he steps independently from the loop that will have a random Velocity Decay and Tune TYPE 10 Madness 2 the selection on the display shows 10 This type repeats 3 steps in a loop from the first availabl...

Page 26: ...ing refers to straight timing where every second step is played exactly half way between the two beats either side of it The Values goes from 50 to 70 DIVISION MIDI Effect The UNO sequence can have di...

Page 27: ...note Four steps will be one beat the default and the usual 4 4 meaning that 16 steps will be 1 bar Since we have 64 steps available on a pattern the possibility to create up to 4 complete bars is ava...

Page 28: ...per step recording by holding the step to modify the parameter 4 2 Master Section The Master section can be identified as the section where all the global parameters are controlled and the management...

Page 29: ...rt and to modify use the DATA ENCODER When the step is released the display will show SNG again To delete a selection press the steps again To cancel an entire chain hold CLEAR and press SONG When cle...

Page 30: ...comes active SELECT When active it disables the playback of the Pads and maintains the selection of the relative element MUTE When active it disables the playback of the Pads and the selection will MU...

Page 31: ...function will randomize not only the step position but also the velocity of the steps To randomize all the element patterns hold RANDOM and press SELECT ALL Now all the elements will be randomized CO...

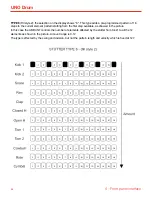
Page 32: ...selection of an element is made every time a pad is pressed in any of the 2 velocity pats The bottom row of 16 buttons is where the sequencer is located composed by the 16 step buttons When an elemen...

Page 33: ...it and again to insert the trig When a trig is deleted the automated parameters on the step are also deleted 5 2 Automate a trig A step where a trig is inserted can store up to 8 parameters depending...

Page 34: ...terns When the REC function is inactive the pads will only play the Elements without recording them When the REC function is active and the sequencer is in Playback the pads will record the trigger qu...

Page 35: ...loaded To select other KITs or PATTERNs simply press the KIT or PATTERN button and use the data encoder to load the desired KIT or PATTERN 6 2 Store a KIT or a PATTERN After the KIT or the Pattern has...

Page 36: ...Devices with UNO Drum If you want to use the UNO Pads controls and sequencer to play sounds on or to control an external instrument connect the UNO Drum MIDI OUT connector to the external instrument M...

Page 37: ...MIDI clock received from the USB connector sets the tempo of the UNO Drum 7 8 MIDI Soft Thru The MIDI Soft Thru functionality allows messages from the MIDI IN DIN of the unit to be passed through to t...

Page 38: ...C 3 49 RIDE note D 3 51 COWBELL note G 3 56 7 11 Pad note out The PADs send out MIDI notes with a fixed gate meaning a fixed time between a note ON and note OFF message 7 12 Program Change On the drum...

Page 39: ...em Off Yes No DLS 1 Yes No File Reference Yes No Controller Destination Yes No Key based Instrument Ctrl Yes No Master Fine Coarse Tune Yes No Other Universal System Exclusive Manufacturer or Non Comm...

Page 40: ...1 0 1 Page 2 of 4 Manufacturer IK Multimedia Model UNO Drum Version 1 0 Date 9 May 2019 No No Output Level No No No No No No No No No No No No Yes Yes No No Yes Yes Swing Amount No No No No Yes Yes Se...

Page 41: ...meter Number MSB 102 103 104 105 106 107 108 109 110 111 112 113 114 115 116 117 118 119 120 All Sound Off 121 Reset All Controllers 122 Local Control On Off 123 All Notes Off 124 Omni Mode Off 125 Om...

Page 42: ...llowing operation F0 00 21 1A 02 02 21 00 06 00 F7 Program Change Receive OFF F0 00 21 1A 02 02 21 00 06 01 F7 Program Change Receive ON default F0 00 21 1A 02 02 21 00 08 00 F7 Program Change Send OF...

Page 43: ...y responsive Preset 100 Kits 100 Patterns Keyboard and controls 5 Encoders 4 matrix 1 global 2 Knobs fixed 12 Multi Touch Element Pads with 2 velocity 17 Sequencer buttons 17 Utility and effects butto...

Page 44: ...noise and interference than when the synth is connected to a USB wall charger or running via batteries With the direct computer connection you can reduce the USB ground noise and other interference b...

Page 45: ...bably because of a typo here are some common errors Typing a 0 zero number instead of an O o letter Typing 1 one number instead of an I i letter Typing 2 two number instead of a Z z letter Typing 5 fi...

Page 46: ...sily edit your personal data manage your product authorizations and licenses and download the latest IK products updates Access your User Area to be able to Edit your Personal data View and download t...

Page 47: ...ultimedia s sound model development and for describing certain types of tones produced with IK Multimedia s digital modeling technology Use of these names does not imply any cooperation or endorsement...

Reviews: