background image

ENGLISH

  BEFORE YOU OPERATE THE MONITOR  13  

 Procedure for turning ON the Power Switch

  Turn ON the monitor fi rst, and then the computer.



Touch screen driver software

  Touch  screen  driver  software  and  system  may  not  start  when  you  start  your  computer  while 

touching the screen. 

  Touch  screen  driver  software  may  not  run  due  to  the  power  saving  function  depending  on  the 

BIOS of your computer. In this case, set the power saving function to off .

 Signal Timing

  Change to the desired signal timing listed on page 33: COMPLIANT TIMING.

 Windows XP/Vista/7/8/8.1/10 Plug & Play

  The iiyama LCD monitor complies with DDC2B of VESA standard. The Plug & Play function runs 

on  Windows  XP/Vista/7/8/8.1/10  by  connecting  the  monitor  to  DDC2B  compliant  computer  with 
the Signal Cable supplied. 

  For  installation  on  Windows  XP:  The  monitor  Information  File  for  iiyama  monitors  may  be 

necessary for your computer and obtained via the Internet, using the address: 


                          http://www.iiyama.com



For additional information on how to download the driver for your touch screen monitor,  
please access the internet site noted above.



Monitor  Drivers  are  not  required  in  most  cases  for  Macintosh  or  Unix  operating 
systems. For further information, please contact your computer dealer fi rst for advice.

COMPUTER SETTING

NOTE



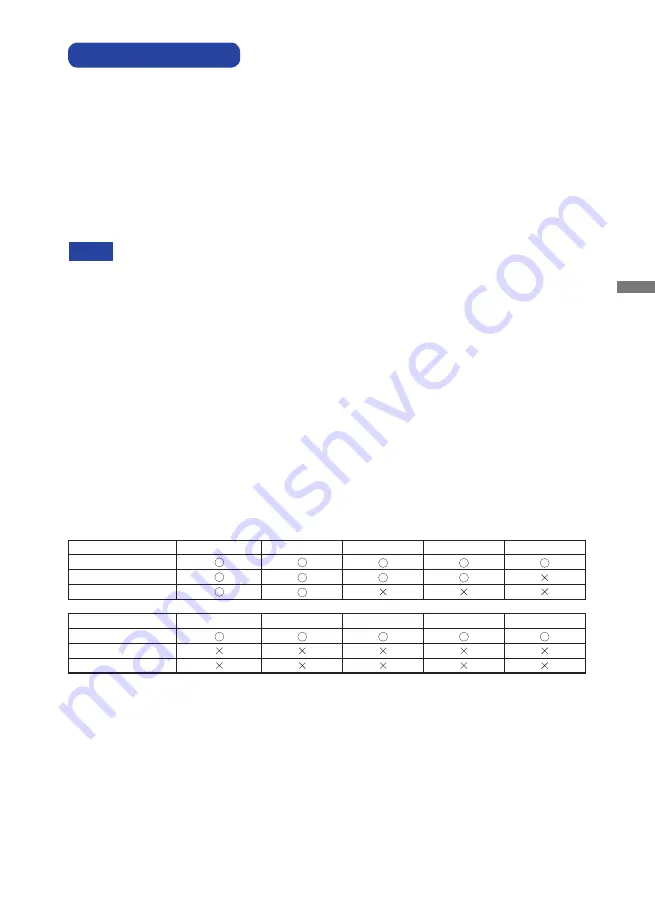
TOUCH support operation system 

  Microsoft Windows XP (64 bit and 32 bit) 

Microsoft Windows Vista (64 bit and 32 bit)

  Microsoft Windows 7 (64 bit and 32 bit) 

Microsoft Windows 8 / 8.1 / 10 (64 bit and 32 bit)

  Microsoft Windows CE 6.0 / net (4.x / 5.0) 

Mac OS X (Intel CPU) / 10.11 El Capitan / 10.12 Sierra

  Kernel 2.6.24 upward & 3.x.x / 4.x.x 

Not support earlier versions. 

Windows8/8.1/10

Windows7*

5

Windows7*

4

Vista

XP

Default mouse*

1

Touch digitizer*

2

Windows7 gestures*

3

2K

Windows CE

XP Embedded

Mac OSX

Linux

Default mouse*

1

Touch digitizer*

2

Windows7 gestures*

3

*

Default mouse (click, drag, double-click and right-click)

*

Touch digitizer (click, drag /selection, double-click, right-click, fl ick and visual feedback)

*

Digitizer with Windows 7 touch gestures

*

Windows 7 - Starter and Home Basic version

*

5

 Windows 7 - Home Premium, Professional, Enterprise and Ultimate versions

Summary of Contents for ProLite TF1015MC

Page 1: ...ing the iiyama LCD monitor We recommend that you take a few minutes to read this comprehensive manual carefully before installing and switching on the monitor Please keep this manual in a safe place f...

Page 2: ...ENGLISH...

Page 3: ...This LCD monitor complies with the requirements of the EC EU Directive 2014 30 EU EMC Directive 2014 35 EU Low Voltage Directive 2009 125 EC ErP Directive and 2011 65 EU RoHS Directive The electro mag...

Page 4: ...THE MONITOR 14 ADJUSTMENT MENU CONTENTS 16 SCREEN ADJUSTMENTS 20 POWER MANAGEMENT FEATURE 23 TROUBLE SHOOTING 24 RECYCLING INFORMATION 25 APPENDIX 26 SPECIFICATIONS ProLite TF1015MC B2 26 SPECIFICATI...

Page 5: ...Do not use where water may be splashed or spilt onto the monitor as it may cause re or electric shock OPERATE UNDER THE SPECIFIED POWER SUPPLY Be sure to operate the monitor only with the speci ed pow...

Page 6: ...e monitor and be sure the signal cable is disconnected If you do not disconnect them it may cause re or electric shock UNPLUG THE MONITOR If the monitor is not in use for a long period of time it is r...

Page 7: ...iyama service center for advice or replacement packaging WARNING If you drop any materials or liquids such as water into the monitor when cleaning unplug the power cable immediately and contact your d...

Page 8: ...t Touch panel ProLite TF1515MC High Contrast 1000 1 Typical Brightness 350cd m2 Typical without Touch panel ProLite TF2215MC High Contrast 3000 1 Typical Brightness 350cd m2 Typical without Touch pane...

Page 9: ...ual to H05VVF 3G 0 75mm2 must be used 2 This CD ROM contains the touch screen driver software Install the Touch Panel Driver Disk after connecting the computer to the monitor with USB Cable For the de...

Page 10: ...o be compatible in landscape portrait and face up modes A Not Available This product is not designed for the purpose of being used in high temperature environment If the product is placed in an extern...

Page 11: ...tness Button Scroll Down Contrast Button Select Button SELECT Power Switch External control pad Connector RJ45 USB Connector USB VGA Connector VGA HDMI Connector HDMI DisplayPort Connector DP Connecto...

Page 12: ...rs of 2 pcs ProLite TF2415MC 6pairs of 2 pcs Attach the L bracket to the back of the recess where the monitor is to be attached and x it with screws Customer s screws ProLite TF1015MC 4 p c s P r o L...

Page 13: ...ProLite TF1015MC 4 pcs ProLite TF1515MC ProLite TF2215MC 8 pcs ProLite TF2415MC 12 pcs L Bracket L Bracket Screw x 2 x 4 L Bracket L Bracket Screw x 2 x 6 L Bracket L Bracket ProLite TF1015MC ProLite...

Page 14: ...ount the L Bracket L Brackets and screws are necessary to install an open frame monitor For details regarding the operating temperature and humidity conditions see speci cation of this User Manual The...

Page 15: ...ntact your local iiyama dealer or regional iiyama o ce For connection to Macintosh computers contact your local iiyama dealer or regional iiyama o ce for a suitable adaptor Make sure you tighten the n...

Page 16: ...the table beforehand to prevent the monitor from being scratched Lay the monitor at on a table with front face down Removal Remove the screw of the cable cover and remove the cable cover from the mon...

Page 17: ...itional information on how to download the driver for your touch screen monitor please access the internet site noted above Monitor Drivers are not required in most cases for Macintosh or Unix operati...

Page 18: ...on operations are aborted during adjustment On Screen Display disappears when the time set for the OSD Timeout has passed MENU button can be used to return previous menu item Any changes are automatic...

Page 19: ...seconds when the Menu is not displayed till TOUCH DISABLE disappears LOCK MODE Simultaneously press the MENU button and the button when an image is displayed through VGA HDMI or DisplayPort The OSD m...

Page 20: ...e 20 for SCREEN ADJUSTMENTS 4 Only Analog Input You can skip the Menu items and directly display an adjustment scale by using the following button operations Contrast Press the Button when the Menu is...

Page 21: ...300 Color Temp 5500 6500 7500 Blue Sharpness You can change the picture quality from 0 to 100 soft to sharp Press the Button to change the picture quality in numerical order Press the Button to change...

Page 22: ...Press OSD V Position OSD Position OSD You can set the OSD position User Upper left Lower left Upper right Lower right Center Touch Switch Normal Glove Through Glass Normal touch with bare hands or st...

Page 23: ...or an available input source and select automatically Auto Direct You can skip the Menu items and directly display an option setting screen by using the following button operations Source Select Press...

Page 24: ...requency with the monitor controls rather than the computer software or utilities Perform adjustments after a warm up period of at least thirty minutes Additional adjustments may be required after the...

Page 25: ...ture may icker during the Clock H V Position adjustment In case the picture frame is bigger or smaller than the data display area after the Clock adjustment repeat steps from 2 Stretch the right side...

Page 26: ...e refresh rate of computer to low 60Hz and repeat steps from again Adjust the H Position after the Phase adjustment if the horizontal position moves during the adjustment Adjust the Brightness and Col...

Page 27: ...enters into Power Management Mode which reduces the power consumption to less than 1 2W The screen becomes dark From Power Management Mode the image reappears in several seconds when either the keyboa...

Page 28: ...puter is within the speci cation of the monitor The screen is too bright or too dark T h e s c r e e n i s shaking The video output level of the computer is within the speci cation of the monitor The...

Page 29: ...ENGLISH RECYCLING INFORMATION 25 For better environment protection please don t dispose your monitor Please visit our web site www iiyama com for monitor recycling RECYCLING INFORMATION...

Page 30: ...rs Approx 16 2M Sync Frequency Horizontal 31 4 49 7kHz Vertical 60Hz Maximum Resolution 1280 800 1 0 MegaPixels Input Connector VGA HDMI DisplayPort Plug Play VESA DDC2BTM Input Sync Signal Separate s...

Page 31: ...cal 56 75Hz Maximum Resolution 1024 768 0 8 MegaPixels Input Connector VGA HDMI DisplayPort Plug Play VESA DDC2BTM Input Sync Signal Separate sync TTL Positive or Negative Input Video Signal Analog 0...

Page 32: ...ertical 56 75Hz Maximum Resolution 1920 1080 2 1 MegaPixels Input Connector VGA HDMI DisplayPort Plug Play VESA DDC2BTM Input Sync Signal Separate sync TTL Positive or Negative Input Video Signal Anal...

Page 33: ...rtical 56 75Hz Maximum Resolution 1920 1080 2 1 MegaPixels Input Connector VGA HDMI DisplayPort Plug Play VESA DDC2BTM Input Sync Signal Separate sync TTL Positive or Negative Input Video Signal Analo...

Page 34: ...1 6 100 0mm 3 9 57 5mm 2 2 100 0mm 3 9 4xM4 SCREW HOLE VESA MOUNT 69 5mm 2 7 169 5mm 6 7 89 5mm 3 5 132 0mm 5 2 DIMENSIONS ProLite TF1015MC 255 5mm 10 1 260 5mm 10 3 91 5 3 6 39 5mm 1 5 178 0mm 7 0 18...

Page 35: ...113 5mm 4 5 120 0mm 4 7 113 5mm 4 5 85 0mm 3 3 4xM4 SCREW HOLE VESA MOUNT 69 5mm 2 7 169 5mm 6 7 118 5mm 4 7 237 5mm 9 3 DIMENSIONS ProLite TF2215MC 515 5mm 20 3 520 0mm 20 5 157 5mm 6 2 310 5mm 12 2...

Page 36: ...t A Bracket B Bracket A Bracket B 1 0 mm Screw holes for mounting the chassis Screw holes for mounting the monitor M4 M4 135 0 mm 1 6 mm 34 0mm 25 2mm 90 0 mm 120 0 mm 5 5mm 4 2 mm 60 0 mm 20 0mm Scre...

Page 37: ...MC NOTE Video Mode Horizontal Frequency Vertical Frequency Dot Clock 640 480 31 469kHz 59 940Hz 25 175MHz 37 500kHz 75 000Hz 31 500MHz 37 861kHz 72 809Hz 31 500MHz 800 600 35 156kHz 56 250Hz 36 000MHz...

Reviews: