Iiyama AU4831D User Manual Download Page 15

ENGLISH

OPERATING THE MONITOR      11
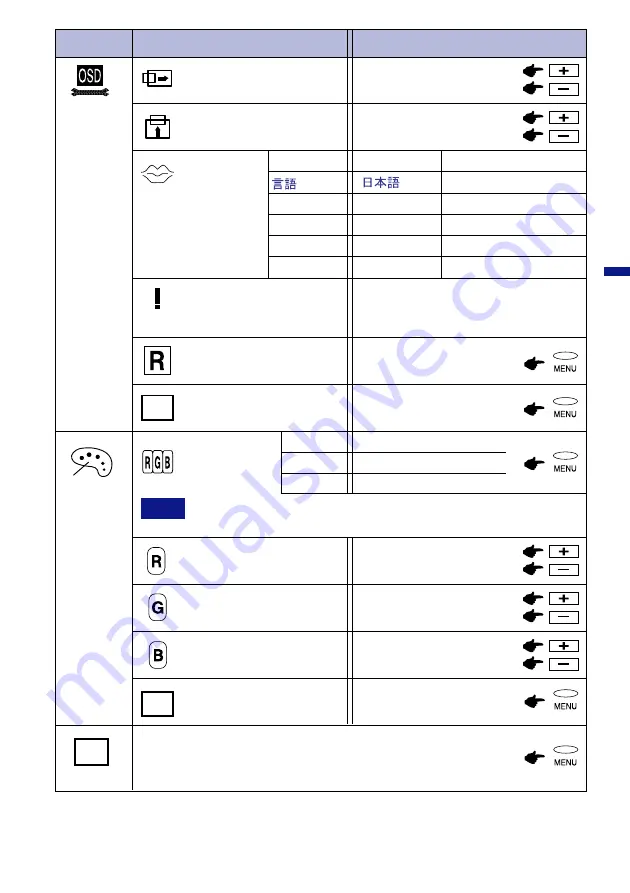
INFORMATION

Sub-Menu

OSD V-POSITION

LANGUAGE

EXIT

OSD H-POSITION

Too low

Too high

OSD

ADJUST

Too far to the left

Too far to the right

Main Menu

Problem / Option              Button to Press

USER

USER

USER

USER

COLOR

EXIT

EXIT

EXIT

EXIT

Return to Main Menu.

Return to Main Menu.

Reddish white

Bluish white

EXIT

Close OSD window.

The current resolution, vertical
refresh rate and Analog/Digital
signal is displayed.

9300

6500

Too weak

Too strong

Too weak

Too strong

Too weak

Too strong

RESET

Factory-preset data is

restored.

(in K: kelvin)

NOTE

The setting by User color function is changed to 6500K or 9300K when

you perform this operation.

DEUTSCH

FRANSAIS

NEDERLANDS

SVENSKA

ENGLISH

English

German

French

Dutch

S w e d i s h

Japanese

LANGUAGE

SPRACHE

LANGUAGES

TA A L

SPRÅCK

USER

User color adjustment

Summary of Contents for AU4831D

Page 1: ... for your future reference FOR YOUR SAFETY 1 SAFETYPRECAUTIONS 1 SPECIALNOTESONLCDMONITORS 3 CUSTOMERSERVICE 3 CLEANING 3 BEFOREYOUOPERATETHEMONITOR 4 FEATURES 4 CHECKINGTHECONTENTSOFTHEPACKAGE 4 CONTROLSANDCONNECTORS 5 CONNECTINGYOURMONITOR 6 COMPUTERSETTING 7 ADJUSTING THE VIEWINGANGLE 8 PANELROTATION 8 OPERATINGTHEMONITOR 9 ADJUSTMENTMENUCONTENTS 10 SCREENADJUSTMENTS 13 POWERMANAGEMENTFEATURE 1...

Page 2: ...ng of personal computers The labelling scheme was developed as a joint effort by the TCO The Swedish Confederation of Professional Employees Svenska Naturskyddsforeningen The Swedish Society for Nature Conservation and Statens Energimyndighet The Swedish National Energy Administration Approval requirements cover a wide range of issues environment ergonomics usability emission of electric and magne...

Page 3: ... nervous system and is toxic in high doses The relevant TCO 99 requirement states that batteries the colour generating layers of display screens and the electrical or electronics components must not contain any cadmium Mercury Mercury is sometimes found in batteries relays and switches It damages the nervous system and is toxic in high doses The relevant TCO 99 requirement states that batteries ma...

Page 4: ...nna n Increase the separation between the device and receiver n Connect the device into an outlet on a circuit different from that to which the receiver is connected n Consult the dealer or an experienced radio or TV technician for help To meet the FCC requirements you should use a signal cable with ferrite core at both ends CAUTION Changes or modifications not expressly approved by Iiyama Electri...

Page 5: ...hock or damage INSTALL THE MONITOR ON A FLAT STABLE SURFACE The monitor may cause an injury if it falls or is dropped DO NOT USE THE MONITOR NEAR WATER Do not use where water may be splashed or spilt onto the monitor as it may cause fire or electric shock OPERATE UNDER THE SPECIFIED POWER SUPPLY Be sure to operate the monitor only with the specified power supply Use of an incorrect voltage will ca...

Page 6: ...material may also cause damage DISCONNECT THE CABLES WHEN YOU MOVE THE MONITOR When you move the monitor turn off the power switch unplug the monitor and be sure the signal cable is disconnected If you do not disconnect them it may cause fire or electric shock UNPLUG THE MONITOR If the monitor is not in use for a long period of time it is recommended that it is left unplugged to avoid accidents HO...

Page 7: ...itor may have to be periodically replaced For the warranty coverage on this component please check with local iiyama service center If you have to return your unit for service and the original packaging has been discarded please contact your dealer or iiyama service center for advice or replacement packaging n n WARNING If you drop any materials or liquids such as water into the monitor when clean...

Page 8: ...his rating then a power cable with a rating of 10A 250V must be used u u u u u 48cm 19 TFT Color LCD Monitor u u u u u Supports Resolutions up to 1600 1200 u u u u u Super Wide Viewing Angle and High Contrast u u u u u Digital Character Smoothing u u u u u Automatic Set up u u u u u Windows 95 98 Me 2000 Plug Play Compliant u u u u u Power Management ENERGY STAR and VESA DPMS Compliant u u u u u E...

Page 9: ...N Connect any cables from USB compliant peripherals such as mouse keyboard etc H Speakers I Input Select Button VIDEO 1 2 VIDEO IN 1 Analog signal D Sub VIDEO IN 2 Digital signal DVI D Select either VIDEO IN 1 or 2 for the signal input when both of the signal inputs are connected to a signal source Switch VIDEO IN 1 and 2 whenever pressing Input Select Button Input Select Button factory setting is...

Page 10: ...omputer with the USB Cable when using the USB hub features F Connect the Power Cable to the monitor first and then to the power supply NOTE n The signal cables used for connecting the computer and monitor vary by the type of computer used An incorrect connection may cause serious damage to both the monitor and the computer The cable supplied with the monitor is for a standard 15 pin D Sub connecto...

Page 11: ... the computer for the first time set the signal timing of the computer to VGA before connection Change to the desired signal timings listed on page 19 in COMPLIANT TIMING after you confirm that the picture appears normally at VGA n Windows 95 98 Me 2000 Plug Play The iiyama LCD monitor complies with DDC1 2B of VESA standard The Plug Play function runs on Windows 95 98 Me 2000 by connecting the mon...

Page 12: ...hange the angle It may cause damage or break the LCD screen n Careful attention is required not to catch your fingers or hands when you change the angle 8 BEFORE YOU OPERATE THE MONITOR A Tilt the panel from bottom of the front cabinet fully upwards 30 degrees NOTE Panel will not rotate if not fully extended upward Attempting to rotate without fully extending upward may cause damage to stand B Rot...

Page 13: ...xt page for further information The On Screen Display disappears several seconds after you stop pressing the buttons while performing an adjustment Any changes are automatically saved in the memory when the On Screen Display disappears Turning off the power should be avoided while using the Menu n To help you to operate the monitor more efficiently press the Menu and Buttons at the same time so th...

Page 14: ... Menu is not displayed l BRIGHTNESS Press the Buttons when the Menu is not displayed l AUTO ADJUST Press the Menu Button for more than 2 seconds when the Menu is not displayed SWITCHING CONTRAST BRIGHTNESS ADJUSTMENT To switch between Brightness and Contrast adjustments press the Menu Button within 2 seconds after pressing the Buttons during the direct adjustments above NOTE 1 Adjust the Brightnes...

Page 15: ...h white Bluish white EXIT Close OSD window The current resolution vertical refresh rate and Analog Digital signal is displayed 9300 6500 Too weak Too strong Too weak Too strong Too weak Too strong RESET Factory preset data is restored in K kelvin NOTE The setting by User color function is changed to 6500K or 9300K when you perform this operation DEUTSCH FRANSAIS NEDERLANDS SVENSKA ENGLISH English ...

Page 16: ...ent resolution vertical refresh rate and Analog Digital signal is displayed RESET Factory preset data is restored EXIT EXIT Close OSD window You can skip the Menu pages and display an adjustment scale directly by using the following button operations l CONTRAST Press the Buttons and then the Menu Button continuously when the Menu is not displayed l BRIGHTNESS Press the Buttons when the Menu is not...

Page 17: ... screen adjustment pattern In this case manual adjustments are required There are two ways to adjust the screen One way is automatic adjustment for Clock Phase and Position Another way is performing each adjustment manually Perform the Auto Set up first when the monitor is connected to a new computer or resolution is changed If the screen has a flicker or blur or the picture does not fit in the di...

Page 18: ...he picture may flicker during the Clock H Position and V Position adjustment 2 Stretch the right side of the picture frame to the right edge of the display area by adjusting the Clock C Perform the Auto Adjust Or press the Menu Button for more than 2 seconds Direct adjustment D Adjust the image manually by following procedure below when the screen has a flicker or blur or the picture does not fit ...

Page 19: ...t the refresh rate of computer to low 60Hz and repeat steps from C again n Adjust the H Position after the Phase adjustment if the horizontal position moves during the adjustment H Adjust the Brightness and Color Temp to get the desired picture after you complete the Clock and Phase adjustments Put back your favorite wallpaper G Adjust the Phase to correct horizontal wavy noise flicker or blur in ...

Page 20: ...onitor enters into Power Management Mode which reduces the power consumption to less than 5W The screen becomes dark and the power indicator turns to orange From Power Management Mode the image reappears in 10 seconds when either the keyboard or the mouse are touched again The power management feature of this product complies with every power saving requirement of ENERGY STAR and VESA DPMS When ac...

Page 21: ...witch is turned ON A Power indicator is green o The signal timing of the computer is within the specification of the monitor Power indicator is orange If the input video signal selection is different switch VIDEO IN 1 and 2 pressing Input Select Button o o If the monitor is in power management mode touch the keyboard or the mouse The screen is not synchronized o The Signal Cable is properly connec...

Page 22: ...degrees Downward 5 degrees Input Video Signal Analog 0 7Vp p Standard 75Ω Positive Digital DVI Digital Visual Interface standard Rev 1 0 compliance Viewable angle Right Left Up Down 85 degrees each Typical Maximum Screen Size 386 4mm W 289 8mm H 15 2 W 11 4 H Power Source 100 240VAC 50 60Hz 1 4 0 6A Headphone Connector ø 3 5mm mini jack Stereo Rev 1 1 compliance Self powered hub Upstream Series B ...

Page 23: ...0Hz 60 020Hz 75 025Hz 60 000Hz 70 087Hz 70 087Hz 66 667Hz 74 500Hz 74 720Hz 56 424Hz VGA TEXT VESA Macintosh PC9801 SVGA VGA XGA 1024 768 640 480 800 600 1280 1024 1152 864 720 400 640 480 832 624 640 400 Horizontal Frequency 31 469kHz 37 861kHz 37 500kHz 43 269kHz 35 156kHz 37 879kHz 48 077kHz 46 875kHz 53 674kHz 48 363kHz 56 476kHz 60 023kHz 68 677kHz 67 500kHz 63 981kHz 79 976kHz 75 000kHz 31 4...

Page 24: ... T M D S Data 0 Ground T M D S Clock Ground T M D S Clock T M D S Clock Compliant to VESA DDC DVI D 24pin Connector n 16 17 24 1 9 8 DVI D 10 Input Signal 1 Input Signal 9 8 CONNECTOR PIN ASSIGNMENT n 3 Red video Green video Sync on green Pin 2 4 5 6 7 Pin Blue video Green video ground Blue video ground Ground H Sync HV Sync Red video ground Data line SDA Clock line SCL Compliant to VESA DDC V Syn...

Reviews: