


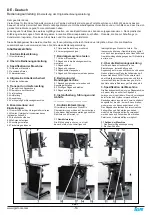

-
5
-
www.igmtools.com
Guards
When running, the blade can be very
dangerous, and the amount of blade that is
exposed must be kept to a minimum. The
machine is supplied with a number of guards,
all of which
MUST
be installed and used while
the machine is running. There is a guard that
is attached to the lower door and is adjustable
vertically once the door is closed. There is a
guard on the guide vertical adjustment shaft.
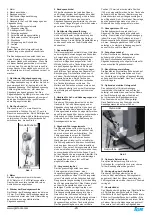
Blade tilt and tension mechanism
The upper wheel is attached to the tilt and
tension mechanism. This mechanism adjusts
the wheel so that the bandsaw blade can be
adjusted for blade tracking. This is achieved by
a screwed handle at the back of the machine
that pushes on the mechanism and adjusts the
axis of the wheel so that it runs true with the
lower wheel. The second function is to tension
the blade, which is achieved by adjusting the
upper flywheel vertically. A handle is located
below upper flywheel and, when rotated, will
move the wheel up or down. The machine has
a quick-acting blade release mechanism that is
located at the back of the machine and will
remove the tension from the blade to speed the
removal and fitting of blades. The mechanism
has a spring, which helps to keep the tension
constant as the blade expands and contracts
with the heat generated by the cutting action.
Electrical connection
The bandsaw is provided with a cable and plug.
Identification
There is a plate at the back of the machine
listing all the manufacturing data, including the
serial number, model and blade length.
Pic. 5
3.2
Technical data
Motor
230V, 2,237 kW, 50Hz, 1 Phase
Breaker
16 A,
tripping characteristic C (16/1/C)
Throat
346 mm
Table cast iron
406 mm x 546 mm
Table tilt
-7° to +45°
Mitre slot
9,5 mm x 19 mm
Table height
965 mm
Flywheel
Cast iron
Resaw Capacity
330 mm
Minimum blade length
2914 mm
Maximum blade length
2946 mm
Maximum blade width
19 mm
Minimum blade width
3 mm
Guides
Ceramic
L x W x H
713 x 755 x 1790 mm
Footprint
800 x 683 mm
Weight gross
133 kg
Weight net
123 kg
Package size
1857 x 673 x 618 mm
Mobility kit
Optional
Industrial light
Optional
3.3 Noise emission
Equivalent A-weighted Sound pressure level
according to EN ISO 3746: 73.56 dB(A)
Uncertainty, K in decibels: 4.0 dB (A) according
to EN ISO 4871 The figure quoted is emission
levels and are not necessarily safe working
levels. Whilst there is a correlation between the
emission and exposure levels, this cannot be
used reliably to determine whether or not further
precautions are required. Factors that influence
the actual level of exposure of the workforce
include characteristics of the work room, the
other sources of noise, etc. Like the number of
machines and other adjacent processes.
Pic. 6
4. General safety
Warning: Read all safety considerations. Failure
to follow this set of guidelines can result in
unwarranted damage to the machine and serious
injury to the operator and bystanders. Save all
warnings and instructions for future reference.
4.1 Safety instructions
• Keep guards in place and in working order.
• Remove adjusting keys and wrenches. Form habit
of checking to see that keys and adjusting wrenches
are removed from tool before turning it on.
• Keep work area clean. Cluttered areas and
benches invite accidents.
• Don’t use in dangerous environment. Don’t
use power tools in damp or wet locations,
or expose them to rain. Keep work area well
lighted.
• Keep children away. Ali visitors should be kept
safe distance from work area.
• Make workshop kid proof with padlocks,
master switches or by removing starter keys.
• Don’t force tool. It will do the job better and
safer at the rate for which it was designed.
• Use right tool. Don ‘t farce tool or attachment
to do a job for which it was not designed.
• Use proper extension cord. Make sure your
extension cord is in good condition. When using
an extension cord, be sure to use one heavy
enough to carry the current your product will
draw. An undersized cord will cause a drop
in line voltage, resulting in loss of power and
overheating. Table a shows the correct size to
use depending on cord length and nameplate
ampere rating. If in doubt, use the next heavier
gage. The smaller the gage number, the heavier
the cord.
• Wear proper apparel. Do not wear loose
clothing, gloves, neckties, rings, bracelets or
other jewelry that may get caught in moving
parts. Nonslip footwear is recommended. Wear
protective hair covering to contain long hair.
• Always use safety glasses. Also use face
or dust mask if cutting operation is dusty.
Everyday eyeglasses only have impact-
resistant lenses; they are not safety glasses.
• Secure work. Use clamps or a vise to hold
work when practical. Lt’s safer than using your
hand, and it frees both hands to operate tool.
• Don’t overreach. Keep proper footing and
balance at all times.
• Maintain tools with care. Keep tools sharp
and clean for best and safest performance.
Follow instructions for lubricating and changing
accessories.
• Disconnect tools before servicing, when
changing accessories such as blades, bits and
cutters.
• Reduce the risk of unintentional starting.
Make sure switch is in off position before
plugging in.
• Use recommended accessories. Consult the
owner’s manual for recommended accessories.
The use of improper accessories may cause
risk of injury to persons.
• Never stand on tool serious injury could
occur if the tool is tipped or if the cutting tool is
unintentionally contacted.
• Check damaged parts. Before further use of
the tool, a guard or other part that is damaged
should be carefully checked to determine that
it will operate properly and perform its intended
function - check for alignment of moving parts,
binding of moving parts, breakage of parts,
mounting and any other conditions that may
affect its operation. A guard or other part that
is damaged should be properly repaired or
replaced.
• Direction of feed. Feed work into a blade or
cutter against the direction of rotation of the
blade or cutter only.
• Never leave tool running unattended turn
power off. Don’t leave tool until it comes to a
complete stop.
Location of warning signs Pic.4
Because the direction of the blade is always
downward toward the table, there is little
danger (except for special cuts) that the wood
will be thrown back at the operator, which is
called a kickback. There is always danger of
kickback when a circular saw is being used. For
safety reasons many woodworkers prefer the
bandsaw especially when cutting small pieces.
The unique feature of the bandsaw is that the
work piece can be rotated around the blade
creating a curve. It is the tool most often used
when curves have to be cut in wood. Because
the bandsaw blade is fairly thin, it can cut
thick stock with a minimum of horsepower. For
this reason the bandsaw is often used when
valuable pieces of wood are made into a thin
piece of veneer.
5. Unpacking your machine
5.1 Transport and unpacking
It is probable that your machine will be
delivered by a third party. Before you unpack
your new machine, you will need to first inspect
the packing, invoice and shipping documents
supplied by the driver.
Ensure that there is no visible damage to the
packing or the machine. You need to do this
prior to the driver leaving. All damage must be
noted on the delivery documents and signed
by you and the delivery driver. You must then
contact the seller within 24 hours.
5.2 Unpacking
To unpack your machine, you will need tin
snips, knife and a wrench.
Note
: The machine is heavy, and if you have
any doubt about the described procedure, seek
professional assistance. Do not attempt any
procedure that you feel is unsafe or that you do
not have the physical capability of achieving.
Using the tin snips, cut the banding that is
securing the machine to the pallet (if fitted).
WARNING: EXTREME CAUTION MUST
BE USED BECAUSE THE BANDING WILL
SPRING AND COULD CAUSE INJURY.


