-13-
www.igmtools.com
7.3 Arbor and Tilt Adjustments
Adjusting the Blade Tilt Limits
You can check the arbor (blade) tilt limits with
an angle finder or 45-degree triangle. If these
limits are not within 0 degrees and 45 degrees,
use the following steps to adjust.
1. Unplug the table saw!
2. Remove the motor cover.
3. Remove the tool storage cover.
4. Locate tilt adjustment screws.
5. Adjust as needed.
6. Adjust the scale and indicator as needed.
Use caution: From the factory, the tilt limits
are pre-set to 0 and 45 degrees tilt to the left.
Adjusting this limit will slightly alter that amount
which may cause throat plate or fence to
interfere. Adjusting these limits should only be
done to set the tilt limits to 0 and 45 degrees.
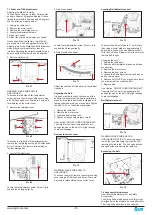
2. Remove motor cover
Pic. 67
WARNING: MAKE SURE SAW IS
UNPLUGGED.
To access the left side tilt limit adjustment
screw, remove the motor housing cover using
a #2 Philips head driver. There are 4 screws in
total holding on the motor cover..
3. Remove tool storage cover
Pic. 68
To access the right-side tilt adjustment screw,
remove the tool storage using a #2 Philips head
driver. There are 4 screws in total holding on
the tool storage box.
4. Locate Tilt Adjustment
Pic. 69
Locate the tilt adjustment screw. Screw it in to
expand the tilt range slightly.
5. Adjust as needed
Pic. 70
Locate the tilt adjustment screw. Screw it in to
expand the tilt range slightly.
6. Adjust scale (if needed)
Pic. 71
Adjust the scale and tilt indicator on the cabinet
if needed.
Adjusting the Belt:
It is good practice to check the tension of the
belt often to ensure that the saw is performing
properly. If the table saw blade is slipping or is
feeling underpowered, you may need to tighten
the belt. To do so, follow the steps below.
1. Unplug the table saw!
2. Remove the motor cover.
3. Locate belt adjustment bolt.
4. Tighten or loosen with weight of motor.
Use Caution: DO NOT OVERTIGHTEN BELT!
The weight of the motor is adequate to put
enough tension on the belt. Only tight enough
to prevent slippage.
Remove the motor cover
Pic. 72
WARNING: MAKE SURE SAW IS
UNPLUGGED.
To access the motor, remove the motor housing
cover using a #2 Philips head driver. There are
4 screws in total holding on the motor cover.
Locating Belt Adjustment bolt
Pic. 73
To adjust the belt, set blade to 0° on tilt scale,
then raise or lower blade to approximately 2“
above table. Loosen the belt adjustment bolt.
With the bolt loose, Raise or lower the motor so
that the belt is tight.
Changing the belt:
1. Unplug the table saw!
2. Remove all throatplates, blades, and blade
accessories.
3. Remove the motor cover.
4. Remove the dust shroud.
5. Loosen the Belt adjustment bolt and loosen
belt by raising motor.
6. Remove belt. NOTE: you may need to lower
the arbor height to access the belt.
7. Replace belt.
Use Caution: DO NOT OVERTIGHTEN BELT!
The weight of the motor is adequate to put
enough tension on the belt. Only tight enough
to prevent slippage.
Belt Adjustment bolt
Pic. 74
WARNING: MAKE SURE SAW IS
UNPLUGGED. NOTICE: The drawing shown
is with the top of the table removed. AVOID
removing the table top. The belt can easily be
changed without removing the table top.
Accessing the Belt
Pic. 75
7.4 Accessory Adjustments
Insert Block Adjustments (For all Safety
Accessories):
The Riving knife, blade guard, or splitter must
be aligned with the blade to be used affectively.
The riving knife should only be used with


