background image

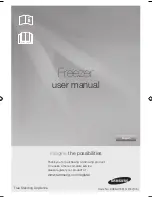
•  Your freezer has a basket. Removable basket allows you 

to store food more accessibly or you can remove it if not needed.
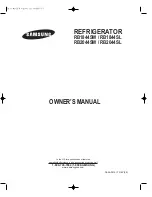
Power

Run

0

1

2

3

4

5

6

7

Food Storage Basket

•  For most efficient operation and minimum energy consumption, defrost 

whenever the frost becomes 1/4” thick. Never use a sharp or metal-

lic instrument to remove the frost, as it may damage the cooling coils. 

(A punctured coil will void the warranty). Use only provided plastic 

scraper. Do not use boiling water as it may damage the unit.

•  Remove frozen food from the freezer and place it in a cooler to  

protect the food. 

•  Unplug the unit. Defrosting usually takes a few hours. To defrost faster 

keep the freezer door open. 

•  For draining, place a tray beneath the outer drain plug. Unscrew and 

remove drain plug. This will let the water flow out in the tray. When 

done, screw on the drain plug in place.  

Note:

 monitor the container under the drain to avoid overflow. 

•  When draining is complete, wipe the interior of the freezer with a soft 

cloth. Plug in power cord back into the electrical outlet.

• Reset the temperature control to the desired setting.
• Return the food into the freezer.

Defrosting and Draining

7

Summary of Contents for FRF452-C

Page 1: ...Chest Freezer User Manual FRF452 C...

Page 2: ...reezer before cleaning or before making any repairs Note If for any reason this product requires service we strongly recommend that a certified technician performs the service 6 Do not use any electri...

Page 3: ...s you can 10 This freezer should not be recessed or built in an enclosed cabinet It is designed for freestanding installation only 11 Do not operate your freezer in the presence of explosive fumes SAV...

Page 4: ...Parts And Features 3 1 Interior Drain Plug See Insert 2 Hinges 3 Vinyl Coated Wire Basket 4 Temperature Control 5 Exterior Drain Plug 6 Compressor On Indicator 6 2 3 1 5 4 7 7 Power On Indicator...

Page 5: ...never tilt it more than a 45 degree angle This could damage the compressor and the sealed system If the freezer is tilted let it stand in an upright position for at least 24 hours prior to plugging T...

Page 6: ...e extension cord that has a 3 blade grounding plug and a 3 slot outlet that will accept the plug The marked rating of the extension cord must be equal to or greater than the electrical rat ing of the...

Page 7: ...turn the unit on turn the temperature control dial to ON and run for at least 2 hours then turn dial to 4 Note If the freezer has been placed in a horizontal or tilted position for any period of time...

Page 8: ...may damage the unit Remove frozen food from the freezer and place it in a cooler to protect the food Unplug the unit Defrosting usually takes a few hours To defrost faster keep the freezer door open F...

Page 9: ...perly packaged food Follow package or container instructions for proper storage Packaging Recommendations Plastic containers with air tight lids Heavy duty aluminum foil Plastic wrap made from saran f...

Page 10: ...cloth dampened with the cleaning solution to wipe down your freezer Rinse with clean warm water and dry with a soft cloth Do not use harsh chemicals abrasives ammonia chlorine bleach concentrated det...

Page 11: ...ezer before reusing For long vacations or absences empty food from freezer unplug the unit and clean the door gaskets according to General cleaning section Prop doors open so air can circulate inside...

Page 12: ...rature control is not set to ON setting for extended period of time Food temperature is too cold If temperature control setting is too cold adjust to a warmer setting and allow several hours for tempe...

Page 13: ...2 There will be no charge to the purchaser for parts and labor on any covered items during the initial 1 year period Beyond this period only parts are covered in the remaining warranty Labor is not p...

Reviews: