REFRIGERATION LTD
6
www.igloorefrigeration.com
|
Pastry Display Cases
Humidity may cause rust, condensation around glass or stainless steel and decrease the efficiency of the
unit.
3.3. Connection and start-up
Unpack the equipment.
Place the unit on an even and hard base. Then level the unit with the levelling legs.
Remove the protection foil from display case elements.
To securely transport the equipment, the unit may be shipped partially disassembled. If the user received
the unit partially disassembled, perform the following operations:
1.
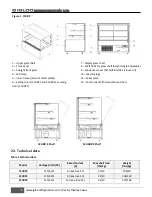
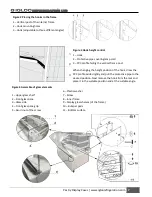
Place hooks in frame rails. (Figure 2)
2.
Install the glass elements in this order:
o
Install glass sides to the rack. (Figure 4/3)
o
Mount the front glass pane in the pane grip (Figure 4/4)
o
Mount the upper glass shelf. (Figure 4/1)
o
Mount glass shelves on the inner frame (Figure 4/8) and bottom surface (Figure 4/11). The shelves
should be placed on bumper pads (Figure 4/10) to prevent glass elements from moving.
The equipment should be cleaned right after unpacking and before turning it on. The unit should be cleaned
with warm water not exceeding 40°C with a neutral detergent. For washing and cleaning the equipment, it
is prohibited to use products containing chlorine and sodium varieties, which destroy the protective layer
and components of the equipment! Any residue of adhesives or silicone on metal elements should be
removed only with extraction naphtha (not applicable to items made of plastic). Do not use other organic
solvents.
When cleaning the unit, do not use water jet. The unit should be cleaned with a moist
cloth.
After installation of the equipment at the destination location it should be left to rest
for at least 2 hours before turning it on (for devices with built-in compressor) to set
the level of refrigerant in order to prevent problems with starting up.
WARNING: Keep out the cooling circuit from damage!
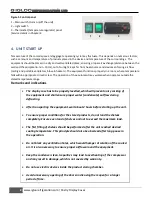
Turn on the main switch. (Figure 5/1)
The temperature on the thermostat control panel is PRE SET. (Figure 5/3)
Turn on the light switch. (Figure 5/2)


