PPC2-Cxxx-EHL Series Panel PC
Page 36
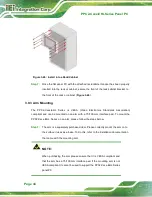
Figure 3-11: Mount the Chassis
Step 9:
Secure the panel PC with the wall
-
mounting kit. To do this, stick the protective
cushion to the wall
-
mounting kit first. Then, put the wall
-
mounting kit on the top
panel of the panel PC. Carefully mark the location of the wall
-
mounting kit screw
holes on the wall. Drill a pilot hole at the marked location on the wall. Secure the
wall
-
mounting kit to the wall by inserting a retention screw into the pilot hole on
the wall (
). This step is to avoid the panel PC being pushed apart
from the wall
-
mounting bracket accidentally.
Summary of Contents for PPC2-C-EHL Series
Page 13: ...PPC2 Cxxx EHL Series Panel PC Page xiii Table 5 23 USB 3 2 Gen 1 Connector USB3_CON1 69...
Page 14: ......
Page 15: ...PPC2 Cxxx EHL Series Panel PC Page 1 1 Introduction Chapter 1...
Page 36: ...PPC2 Cxxx EHL Series Panel PC Page 22 2 Unpacking Chapter 2...
Page 39: ...PPC2 Cxxx EHL Series Panel PC Page 25 3 Installation Chapter 3...
Page 51: ...PPC2 Cxxx EHL Series Panel PC Page 37 Figure 3 12 Secure the Chassis...
Page 68: ...PPC2 Cxxx EHL Series Panel PC Page 54 Chapter 4 4 System Maintenance...
Page 70: ...PPC2 Cxxx EHL Series Panel PC Page 56 5 Interface Connectors Chapter 5...
Page 84: ...PPC2 Cxxx EHL Series Panel PC Page 70 Appendix A A Regulatory Compliance...
Page 89: ...PPC2 Cxxx EHL Series Panel PC Page 75 B Safety Precautions Appendix B...
Page 95: ...PPC2 Cxxx EHL Series Panel PC Page 81 C Watchdog Timer Appendix C...
Page 98: ...PPC2 Cxxx EHL Series Panel PC Page 84 Appendix D D Hazardous Materials Disclosure...


