background image


AFOLUX Kiosk Application Series

Page 24 

2.6.3 Dual-Display 

The system supports dual display capabilities. An additional monitor can be connected to 

the AFL-315 through either the VGA connector or the DVI connector described above. 

2.7 Audio 

2.7.1 Audio Codec ’97 Controller 

The Integrated AC'97 v2.3 compliant audio controller on the Intel® ICH7 Southbridge is 

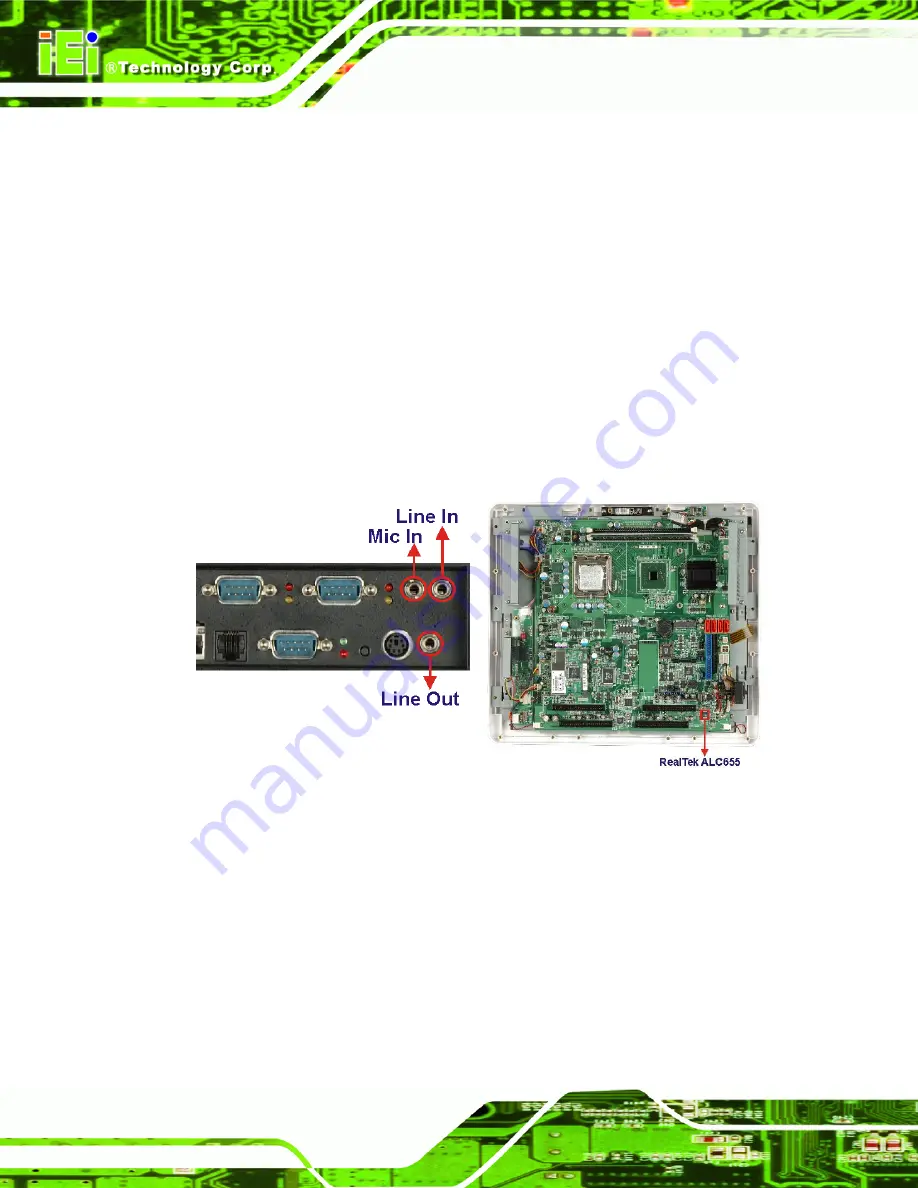
integrated to a RealTek ALC655 audio codec. The RealTek ALC655 is in turn connected 

to three external audio jacks, which are then connected to compliant audio devices. The 

RealTek ALC655 is a 16-bit, full-duplex AC'97 Rev. 2.3 compatible six-channel audio 

codec. The codec and the audio connectors are shown in 

Figure 2-13

Figure 2-13: Audio Codec and Audio Jacks 

2.7.2 Stereo Speakers 

Two stereo speakers on the front side of the AFL-315 are interfaced to the system through 

a Philips TDA1517p integrated class-B dual output amplifier. 

Summary of Contents for AFOLUX AFL-315AW/B

Page 1: ...AFOLUX Kiosk Application Series Page i...

Page 2: ...AFOLUX Kiosk Application Series Page ii Revision Date Version Changes 2008 04 1 00 Initial release...

Page 3: ...mages arising out of the use or inability to use the product or documentation even if advised of the possibility of such damages This document contains proprietary information protected by copyright A...

Page 4: ...ning message is shown below WARNING This is an example of a warning message Failure to adhere to warning messages may result in permanent damage to the AFOLUX AFL 315 series or personal injury to the...

Page 5: ...ical information These messages should be read carefully as any directions or instructions contained therein can help avoid making mistakes Notes are easy to recognize The word note is written as NOTE...

Page 6: ...o contact an IEI sales representative please send an email to sales iei com tw The items listed below should all be included in the AFOLUX AFL 315 series package 1 x Power cord 1 x Power adapter 1 x T...

Page 7: ...2 6 Rear Panel Connectors 8 1 3 INTERNAL OVERVIEW 8 1 4 SPECIFICATIONS 9 1 4 1 Preinstalled Hardware Components 9 1 4 2 System Specifications 9 2 DETAILED SPECIFICATIONS 13 2 1 DIMENSIONS 14 2 1 1 Fro...

Page 8: ...tereo Speakers 24 2 8 SYSTEM POWER 25 2 8 1 Power Mode 25 2 8 1 1 AT Power Mode 25 2 8 1 2 ATX Power Mode 26 2 8 2 Power Supply 26 2 8 3 Power Connectors 26 2 8 3 1 Power Input Connector 27 2 8 3 2 Po...

Page 9: ...SELECTION 50 4 9 MOUNTING THE SYSTEM 52 4 9 1 Wall Mounting 53 4 9 2 Panel Mounting 55 4 9 3 Arm Mounting 57 4 9 4 Cabinet and Rack Installation 58 4 10 BOTTOM PANEL CONNECTORS 60 4 10 1 LAN Connectio...

Page 10: ...N 94 6 3 ADVANCED 95 6 3 1 CPU Configuration 96 6 3 2 IDE Configuration 98 6 3 2 1 IDE Master IDE Slave 100 6 3 3 Super IO Configuration 105 6 3 4 Hardware Health Configuration 111 6 3 5 Power Configu...

Page 11: ...S 152 A 7 COOLING FAN SPECIFICATIONS 153 A 8 OPTIONAL GPRS MODULE SPECIFICATIONS 153 B EXTERNAL CONNECTOR PINOUTS 155 B 1 INTRODUCTION 156 B 2 DVI CONNECTOR 156 B 3 KEYBOARD MOUSE CONNECTOR 156 B 4 LA...

Page 12: ...plication Series Page xii E WATCHDOG TIMER 171 F HAZARDOUS MATERIALS DISCLOSURE 175 F 1 HAZARDOUS MATERIAL DISCLOSURE TABLE FOR IPB PRODUCTS CERTIFIED AS ROHS COMPLIANT UNDER 2002 95 EC WITHOUT MERCUR...

Page 13: ...sions mm 15 Figure 2 4 Processor 16 Figure 2 5 Memory Module and Memory Socket 17 Figure 2 6 COM Ports and LED Indicators 18 Figure 2 7 RJ 45 Ethernet Connector 19 Figure 2 8 External USB Ports 20 Fig...

Page 14: ...crews 54 Figure 4 14 Secure the Panel PC 55 Figure 4 15 AFL 315 Panel Opening 56 Figure 4 16 Tighten the Panel Mounting Clamp Screws 56 Figure 4 17 AFL 315 Arm Mounting Retention Screw Holes 58 Figure...

Page 15: ...ssor and DIMM Housing 78 Figure 5 8 HDD Bracket Retention Screws 79 Figure 5 9 HDD Retention Screws 80 Figure 5 10 Locate the CF Card 81 Figure 5 11 DIMM Socket Location 83 Figure 5 12 Installing a DI...

Page 16: ...Table 4 3 Clear CMOS Jumper Settings 45 Table 4 4 COM1 COM4 COM5 and COM6 Pin 9 Setting Jumper Settings 46 Table 4 5 COM6 RX Function Select Jumper Settings 47 Table 4 6 COM6 TX Function Select Jumpe...

Page 17: ...AFOLUX Kiosk Application Series Page 1 1 Introduction Chapter 1...

Page 18: ...controller hub GMCH coupled with an Intel ICH7 input output controller hub ensures optimal memory graphics and peripheral I O support The system comes with 1 0 GB of preinstalled DDR2 SDRAM and suppo...

Page 19: ...screen Bluetooth WebCAM RoHS comlpliance There is both a black AFL 315 model and a white AFL 315 model The model numbers are listed below AFL 315AB 945 WT R 1G Black AFL 315AW 945 WT R 1G White 1 1 2...

Page 20: ...el top panel bottom panel and two side panels left and right An ABS PC plastic front frame surrounds the front screen The rear panel provides screw holes for a wall mounting bracket compliant with VES...

Page 21: ...2 AFL 315 Front View 1 2 3 Rear Panel The rear panel provides access to retention screw holes that support the wall mounting and to the I O interface panel that enable connection to a wide range of e...

Page 22: ...FL 315 see Figure 1 3 above has the following I O interface connectors 1 x 24 V DC Out connector 1 x 12 V or 24 V DC In connector 8 x USB 2 0 connectors 1 x LAN connector 1 x RJ 12 connector 3 x RS 23...

Page 23: ...gure 1 4 Figure 1 4 AFL 315 I O Interface Connector Panel 1 2 5 Top Panel and Bottom Panel The top panel and side panels of AFOLUX AFL 315 series provides access to slots that support panel mount and...

Page 24: ...rior of the system The left panel also has a power switch near the bottom See Figure 1 7 Figure 1 7 AFL 315 Side Views 1 3 Internal Overview The AFOLUX AFL 315 has the following components installed i...

Page 25: ...ule 1 x Bluetooth module 1 x AT ATX switch 1 x GPRS module optional The technical specifications for some of these components and the system are shown in the sections below 1 4 2 System Specifications...

Page 26: ...1 5 W built in stereo speakers Camera 2 Mega pixel with auto focus 1 x PCIe mini card 1 x Mini PCI interface wireless LAN 802 11 b g module Expansion 1 x Bluetooth module USB interface Bluetooth v 2...

Page 27: ...Output 12 VDC at 15 A 24 VDC at 3 A Power Consumption 102 W 1 x 12 V 24 V DC input jack 1 x PS 2 connector 3 x RS 232 COM port connectors 1 x RS 232 422 485 COM port connector 1 x RJ 12 12 V 24 V cas...

Page 28: ...AFOLUX Kiosk Application Series Page 12 THIS PAGE IS INTENTIONALLY LEFT BLANK...

Page 29: ...AFOLUX Kiosk Application Series Page 13 2 Detailed Specifications Chapter 2...

Page 30: ...he dimensions of the AFL 315 2 1 1 Front Panel Dimensions Front panel dimensions are shown in Figure 2 1 and listed below Width 364 4 mm Height 323 4 mm Figure 2 1 AFL 315 Front Panel Dimensions mm 2...

Page 31: ...Bottom 12 9 mm Figure 2 2 AFL 315 Side Panel Dimensions mm 2 1 3 Top and Bottom Panel Dimensions Top and bottom panel dimensions are shown in Figure 2 3 and listed below Screen Protrusion Right 15 1...

Page 32: ...Hz and an 800 MHz front side bus FSB The processor also comes with a 1 0 MB L2 cache and a 1 8 GHz L2 cache speed The processor is shown in Figure 2 4 below Figure 2 4 Processor E2160 Intel LGA775 Pen...

Page 33: ...is installed in the AFL 315 and controlled by the Intel 945G GMCH installed on the internal motherboard 2 3 1 2 Additional Memory The Intel 945G is capable of supporting two 240 pin 2 0 GB max 667 MH...

Page 34: ...ystem 2 4 1 Serial Port Connectors The AFL 315 has four serial ports Three of these ports COM1 COM3 and COM4 are RS 232 only ports The COM2 serial port can be configured as a RS 232 RS 422 or an RS 48...

Page 35: ...faced to a Broadcom BCM5797 PCIe gigabit Ethernet GbE controller The BCM5797 is then connected directly to the RJ 45 connector on the rear panel and provides external PCIe GbE connectivity Figure 2 7...

Page 36: ...0 connectors are interfaced directly to the USB controllers on the ICH7 Southbridge The remaining four connectors are interfaced through the Southbridge through a Genesys GL850A USB hub controller All...

Page 37: ...ard and Mouse Connector 2 5 AFOLUX AFL 315 Front Side 2 5 1 Monitor A 15 XGA AUO G150XG01 LCD screen is installed on the front of the AFOLUX AFL 315 The installed monitor has a pixel resolution of 102...

Page 38: ...ard The sensitive touch screen is accurate reliable and durable 2 6 Graphics 2 6 1 Intel 945G Integrated Graphics Media Accelerator 950 The Intel 945G has the Intel GMA 950 integrated into the chipset...

Page 39: ...SDVO LVDS transmitter The Chrontel CH7308B single dual LVDS Transmitter transmits up to 165 mega pixels per second MP s The CH7308 is a display controller device which accepts digital graphics input s...

Page 40: ...outhbridge is integrated to a RealTek ALC655 audio codec The RealTek ALC655 is in turn connected to three external audio jacks which are then connected to compliant audio devices The RealTek ALC655 is...

Page 41: ...below 2 8 1 1 AT Power Mode With the AT mode selected the power is controlled by a central power unit rather than a power switch The AFOLUX AFL 315 panel PC turns on automatically when the power is c...

Page 42: ...and controlled remotely Other possible application includes Security surveillance Point of Sale POS Advertising terminal 2 8 2 Power Supply The system is shipped with a 100 V to 240 V IEI AC power su...

Page 43: ...standard 4 pin connector on the connector interface panel is provides 24 V of direct current to an external peripheral device such as a thermal printer 2 8 4 RJ 12 Connector for Cash Draw Power A RJ 1...

Page 44: ...onnected to ICH7 chipset through the USB bus The AFL 315 Bluetooth module enables wireless communications between the AFL 315 and various peripheral devices through a Bluetooth network The peripheral...

Page 45: ...thernet An integrate PIFA antenna on the AFOLUX AFL 315 ensures an uninterrupted wireless connection PIFA antennas can receive high quality uniform signals in any location from all directions without...

Page 46: ...The technical specifications of the GPRS module are listed in the Appendix 2 11 System Ventilation System ventilation is critical Failure to ensure proper airflow through the system may result in irre...

Page 47: ...Kiosk Application Series Page 31 Figure 2 20 Internal View of Cooling Fans The cooling fans are 50 mm x 50 mm x 10 mm in size Fan specifications are listed in the appendix Figure 2 21 Cooling Fan Dime...

Page 48: ...AFOLUX Kiosk Application Series Page 32 THIS PAGE IS INTENTIONALLY LEFT BLANK...

Page 49: ...AFOLUX Kiosk Application Series Page 33 3 Unpacking Chapter 3...

Page 50: ...cutters a knife or a sharp pair of scissors that seals the top side of the external second box Step 2 Open the external second box Step 3 Use box cutters a knife or a sharp pair of scissors that seals...

Page 51: ...eries Page 35 Quantity Item Image Standard 1 AFOLUX AFL 315 1 Power adapter 1 Power cord 1 User manual CD and driver CD 1 Touch pen Optional Panel mounting kit P N AFLPK 315A Wall mounting kit P N AFL...

Page 52: ...Application Series Page 36 Stand P N STAND B19 Stand P N STAND 210 RS Arm P N ARM 11 RS Arm P N ARM 31 RS If any of these items are missing or damaged contact the distributor or sales representative...

Page 53: ...AFOLUX Kiosk Application Series Page 37 4 Installation Chapter 4...

Page 54: ...e board touch any grounded conducting material During the time the board is handled frequently touch any conducting materials that are connected to the ground Use an anti static pad When configuring t...

Page 55: ...ory module Resistive type touch screen Wireless LAN module Bluetooth module AT ATX power switch Hard disk drive HDD Preinstalled OEM customizations may include the following Different DDR2 memory modu...

Page 56: ...nel please follow the steps below Step 1 Remove the rear panel Remove the seven retention screws Figure 4 1 from the rear panel and lift the panel off the AFL 315 Figure 4 1 Rear Panel Retention Screw...

Page 57: ...ard Installation The AFL 315 series has one CF Type II slot To install the CF card follow the instructions below Step 1 Remove the back panel See Section 4 5 Step 2 Install the CF Card Locate the CF c...

Page 58: ...screws Step 0 4 7 Jumper Settings NOTE A jumper is a metal bridge used to close an electrical circuit It consists of two or three metal pins and a small metal clip often protected by a plastic cover t...

Page 59: ...setting JP8 3 pin header COM4 Pin 9 setting JP5 3 pin header COM5 Pin 9 setting JP6 3 pin header COM6 Pin 9 setting JP7 3 pin header COM6 RX RS 232 422 485 Select J6 6 pin header COM6 TX RS 422 485 S...

Page 60: ...re 4 5 If the AFL 315 fails to boot due to improper BIOS settings the clear CMOS jumper clears the CMOS data and resets the system BIOS information To do this use the jumper cap to close the pins for...

Page 61: ...clear CMOS jumper is shown in Figure 4 5 below Figure 4 5 Clear CMOS Jumper 4 7 4 COM1 to COM6 Pin 9 Select Jumper Label JP5 JP6 JP7 and JP8 Jumper Type 10 pin header Jumper Settings See Table 4 4 Jum...

Page 62: ...JP5 COM4 RI Pin use 12 V COM4 RI Pin use RI JP6 COM5 RI Pin use 12 V COM5 RI Pin use 5 V JP7 COM6 RI Pin use 12 V COM6 RI Pin use RI JP8 COM1 RI Pin use 12 V COM1 RI Pin use 5 V Table 4 4 COM1 COM4 C...

Page 63: ...M6 as RS 232 RS 422 or RS 485 The COM6 RX Function Select jumper settings are shown in Table 4 7 COM6 RX Function Select Description Short 1 2 RS 232 Default Short 3 4 RS 422 Short 4 6 RS 485 Table 4...

Page 64: ...connector as RS 422 as an RS 485 The COM6 TX Function Select jumper selection options are shown in Table 4 6 AT Power Select Description Short 1 3 RS 422 Default Short 2 4 RS 422 Default Short 3 5 RS...

Page 65: ...y the second serial communications port COM6 as RS 232 RS 422 or RS 485 The COM6 RS 232 422 485 Serial Port Select settings are shown in Table 4 7 RS 232 485 Select Description Short 1 2 RS 232 Defaul...

Page 66: ...nd ATX power modes can both be used on the AFOLUX AFL 315 flat panel PC The selection is made through an AT ATX switch on the aluminum chassis inside the plastic back cover Figure 4 11 To select AT mo...

Page 67: ...AFOLUX Kiosk Application Series Page 51 Figure 4 10 Back Cover Retention Screws Step 2 Locate the AT ATX switch on the aluminum chassis Figure 4 11...

Page 68: ...gure 4 11 Step 0 4 9 Mounting the System WARNING When mounting the flat panel PC onto an arm onto the wall or onto a panel it is better to have more than one person to help with the installation to ma...

Page 69: ...l four pilot holes at the marked locations on the wall for the bracket retention screws Step 4 Align the wall mounting bracket screw holes with the pilot holes Step 5 Secure the mounting bracket to th...

Page 70: ...y pull the monitor downwards until the monitor rests securely in the slotted holes Figure 4 13 Ensure that all four of the mounting screws fit snuggly into their respective slotted holes Figure 4 13 C...

Page 71: ...elect the position on the panel to mount the flat panel PC Step 2 Cut out a section from the panel that corresponds to the rear panel dimensions of the flat panel PC Take care that the panel section t...

Page 72: ...t the panel Step 4 Insert the panel mounting clamps into the pre formed holes along the edges of the chassis behind the frame Step 5 Tighten the screws that pass through the panel mounting clamps unti...

Page 73: ...fer to the installation documentation that came with the mounting arm NOTE When purchasing the arm please ensure that it is VESA compliant and that the arm has a 100 mm interface pad If the mounting a...

Page 74: ...t and Rack Installation The AFL 315 series flat panel PC can be installed into a cabinet or rack The installation procedures are similar to the panel mounting installation To do this please follow the...

Page 75: ...clamps into the pre formed holes along the edges of the flat panel PC behind the ABS PC plastic frame Step 3 Tighten the screws that pass through the rack mounting clamps until the plastic caps at the...

Page 76: ...re 4 20 Step 0 4 10 Bottom Panel Connectors 4 10 1 LAN Connection There is one external RJ 45 LAN connector The RJ 45 connector enables connection to an external network To connect a LAN cable with an...

Page 77: ...ction The AFOLUX AFL 315 Series has four male DB 9 connectors on the bottom panel for serial devices to be connected Follow the steps below to connect a serial device to the AFOLUX AFL 315 Series pane...

Page 78: ...ion Series Page 62 Figure 4 22 Serial Device Connector Step 3 Secure the connector Secure the serial device connector to the external interface by tightening the two retention screws on either side of...

Page 79: ...ce please follow the instructions below Step 1 Located the USB connectors The locations of the USB connectors are shown in Chapter 2 Step 2 Align the connectors Align the USB device connector with one...

Page 80: ...p 1 Run the CD that came with the AFL 315 on the AFL 315 Step 2 Locate the Webcam installation program Step 3 Click the webcam driver installation icon Step 4 The program prepares for installation See...

Page 81: ...AFOLUX Kiosk Application Series Page 65 Figure 4 25 Driver Installation Starting Screen Step 6 Click NEXT in Figure 4 25 to continue Step 7 The program is ready for installation See Figure 4 26...

Page 82: ...AFOLUX Kiosk Application Series Page 66 Figure 4 26 Ready to Install Driver Step 8 Click INSTALL in Figure 4 26 to continue Step 9 The driver is then installed See Figure 4 27...

Page 83: ...AFOLUX Kiosk Application Series Page 67 Figure 4 27 Driver Installs Step 10 Click YES when asked for digital signature affirmation See Figure 4 28...

Page 84: ...AFOLUX Kiosk Application Series Page 68 Figure 4 28 Confirm Digital Signature Step 11 The installation process is complete See Figure 4 29 Click FINISH to confirm...

Page 85: ...AFOLUX Kiosk Application Series Page 69 Figure 4 29 Installation Complete Step 12 Restart the computer See Figure 4 30 Step 0...

Page 86: ...AFOLUX Kiosk Application Series Page 70 Figure 4 30 Restart the computer...

Page 87: ...AFOLUX Kiosk Application Series Page 71 5 System Maintenance Chapter 4...

Page 88: ...recautions WARNING Failure to take ESD precautions during the maintenance of the AFL 315 may result in permanent damage to the AFL 315 and severe injury to the user Electrostatic discharge ESD can cau...

Page 89: ...G Failing to turn off the system before opening it can cause permanent damage to the system and serious or fatal injury to the user Before any maintenance procedures are carried out on the system make...

Page 90: ...ntion Screws Back Step 4 Remove the retention screws from the bottom Remove the two retention screws from the bottom surface of the back panel See Figure 5 2 Figure 5 2 Rear Panel Retention Screws Bot...

Page 91: ...i static procedures See Section 5 2 Step 2 Turn off the power See Section 5 3 Step 3 Remove the back panel See Section 5 4 1 Step 4 Remove the plastic back cover To do this remove the 12 retention scr...

Page 92: ...1 Step 4 Remove the plastic cover See Section 5 4 2 Step 5 Remove the retention screws Ten retention screws secure the metal cover to the system Remove all ten retention screws Figure 5 4 Metal Enclo...

Page 93: ...ace Connector Screwdrivers Figure 5 6 Peripheral Connector Retention Screws Step 7 Remove the enclosure Pull the metal enclosure up gently Remember the CF Flash card and the HDD cables are also connec...

Page 94: ...e the back panel See Section 5 4 1 Step 4 Remove the plastic cover See Section 5 4 2 Step 5 Remove the metal enclosure See Section 5 4 3 Step 6 Remove the retention screws Four retention screws secure...

Page 95: ...e frame off the system Step 0 5 5 Replacing Components 5 5 1 Hard Disk Drive Replacement If the HDD fails please follow the steps below Step 1 Follow all anti static procedures See Section 5 2 Step 2...

Page 96: ...8 Install the new HDD Slide the new HDD into the bracket and secure the new HDD in the bracket with the four previously removed retention screws Step 9 Reinstall the cables Reconnect the SATA cable an...

Page 97: ...plate Pull the CF card out of the system See Figure 5 10 Figure 5 10 Locate the CF Card Step 6 Install the replacement CF card Correctly align the new CF Card with the CF card socket and slide the new...

Page 98: ...e the DIMM module please follow the steps below Step 1 Follow all anti static procedures See Section 5 2 Step 2 Turn off the power See Section 5 3 Step 3 Remove the back panel See Section 5 4 1 Step 4...

Page 99: ...has two handles that secure the DIMM into the socket Before the DIMM can be removed from the socket the handles must be opened Step 9 Open the DIMM socket handles The DIMM socket has two handles that...

Page 100: ...the DIMM can be inserted into the socket As the DIMM is inserted the white handles on the side of the socket will close automatically and secure the DIMM to the socket See Figure 5 12 Step 0 5 5 4 CP...

Page 101: ...nd DIMM housing See Section 5 4 4 Step 7 Remove the heat sink Six retention screws secure the heat sink to the system Remove all six retention screws See Figure 5 13 Figure 5 13 Heat Sink Retention Sc...

Page 102: ...the socket Disengage the load lever by pressing the lever down and slightly outward to clear the retention tab Rotate the load lever to a fully open position Then rotate the load plate towards the opp...

Page 103: ...n 1 and the two orientation notches on the CPU Carefully match the two orientation notches on the CPU with the socket alignment keys Step 14 Insert the CPU Gently insert the CPU into the socket If the...

Page 104: ...fans failed it must be replaced Two cooling fans cool the CPU and DIMM housing one cooling fan cools the system To replace the cooling fans please do the following Step 1 Follow all anti static proced...

Page 105: ...Retention Screws Step 8 Remove the fan cable connectors Fan cable connectors provide power to the fans Remove the cables See Figure 5 18 Figure 5 18 Fan Cable Connectors Step 9 Install the new fan Co...

Page 106: ...talling the covers WARNING Failing to reinstall the covers may result in permanent damage to the system Please make sure all coverings are properly installed When maintenance procedures are complete p...

Page 107: ...AFOLUX Kiosk Application Series Page 91 6 AMI BIOS Setup Chapter 6...

Page 108: ...message appears on the screen 0 If the message disappears before the DELETE key is pressed restart the computer and try again 6 1 2 Using Setup Use the arrow keys to highlight items press ENTER to se...

Page 109: ...ation Changes If the computer cannot boot after changes to the system configuration is made CMOS defaults Use the jumper described in Chapter 5 6 1 5 BIOS Menu Bar The menu bar on top of the BIOS scre...

Page 110: ...ystem information BIOS Menu 1 Main System Overview The System Overview lists a brief summary of different system components The fields in System Overview cannot be changed The items shown in the syste...

Page 111: ...m time Manually enter the hours minutes and seconds System Date xx xx xx Use the System Date option to set the system date Manually enter the day month and year 6 3 Advanced Use the Advanced menu to c...

Page 112: ...ge 96 Remote Access Configuration see Section 6 3 5 USB Configuration see Section 6 3 9 BIOS Menu 2 Advanced 6 3 1 CPU Configuration Use the CPU Configuration menu BIOS Menu 3 to view detailed CPU spe...

Page 113: ...the CPU revision number Cache L1 Lists the CPU L1 cache size Cache L2 Lists the CPU L2 cache size Speed Lists the CPU processing speed Current FSB Multiplier Specifies how much the FSB is increased b...

Page 114: ...system BIOS Menu 4 IDE Configuration ATA IDE Configurations Compatible Use the ATA IDE Configurations option to configure the ATA IDE controller Disabled Disables the on board ATA IDE controller Compa...

Page 115: ...e SATA Channels option to determine how SATA channels and PATA channels are ordered Before PATA Puts SATA channels before PATA channels Behind PATA DEFAULT Puts SATA channels behind PATA channels IDE...

Page 116: ...d IDE Slave configuration menu to view both primary and secondary IDE device details and configure the IDE devices connected to the system BIOS Menu 5 IDE Master and IDE Slave Configuration Auto Detec...

Page 117: ...Indicates the highest Asynchronous DMA Mode that is supported Ultra DMA Indicates the highest Synchronous DMA Mode that is supported S M A R T Indicates whether or not the Self Monitoring Analysis and...

Page 118: ...evented from using the LBA mode control on the specified channel Auto DEFAULT BIOS auto detects the LBA mode control on the specified channel Block Multi Sector Transfer Auto Use the Block Multi Secto...

Page 119: ...f 8 3MBps 3 PIO mode 3 selected with a maximum transfer rate of 11 1MBps 4 PIO mode 4 selected with a maximum transfer rate of 16 6MBps This setting generally works with all hard disk drives manufactu...

Page 120: ...Bps UDMA3 Ultra DMA mode 3 selected with a maximum data transfer rate of 44MBps To use this mode it is required that an 80 conductor ATA cable is used UDMA4 Ultra DMA mode 4 selected with a maximum da...

Page 121: ...fer Enabled Use the 32Bit Data Transfer BIOS option to enables or disable 32 bit data transfers Disabled Prevents the BIOS from using 32 bit data transfers Enabled DEFAULT Allows BIOS to use 32 bit da...

Page 122: ...I O Address 2D8h Use the Digital I O Address option to select the digital I O device base address 2C0h The digital I O device address is 2C1h 2C8h The digital I O device address is 2C9h 2D0h The digi...

Page 123: ...s 2E8 and the interrupt address is IRQ3 Serial Port1 Mode Normal Use the Serial Port1 Mode option to select the transmitting and receiving mode for the first serial port Normal DEFAULT Serial Port 1 m...

Page 124: ...rt base address Disabled DEFAULT No base address is assigned to the Parallel Port 378 Parallel Port I O port address is 378 278 Parallel Port I O port address is 278 3BC Parallel Port I O port address...

Page 125: ...aster than the Normal mode The parallel port is also be compatible with EPP devices described above Parallel Port IRQ IRQ7 Use the Parallel Port IRQ selection to set the parallel port interrupt addres...

Page 126: ...o base address is assigned to serial port 3 3E8 Serial port 4 I O port address is 3E8 2E8 DEFAULT Serial port 4 I O port address is 2E8 2E0 Serial port 4 I O port address is 2E0 Serial Port5 Address 2...

Page 127: ...6 I O port address is 3E8 2E8 Serial port 6 I O port address is 2E8 2E0 Serial port 6I O port address is 2E0 2D8 DEFAULT Serial port 6 I O port address is 2D8 6 3 4 Hardware Health Configuration The...

Page 128: ...AN n Mode Setting Full On Mode Use the FAN n Mode Setting option to configure the second fan Full On Mode DEFAULT Fan is on all the time Automatic mode Fan is off when the temperature is low enough Pa...

Page 129: ...FF 000 WARNING Setting this value too high may cause the fan to stop when the CPU is at a high temperature and therefore cause the system to be damaged The Temp Limit of OFF option can only be set if...

Page 130: ...WM option below To select a value select the CPU Temp Limit of Start option and enter a decimal number between 000 and 127 The temperature range is specified below Minimum Value 0 C Maximum Value 127...

Page 131: ...rature specified in the Temperature 3 Limit of Start is exceeded The Super I O chipset supports 128 PWM modes To select a value select the Fan 3 Start PWM option and enter a decimal number between 000...

Page 132: ...CPU Fan PWM Control option and enter a decimal number between 000 and 127 The PWM Duty Cycle control range is specified below PWM Minimum Mode 0 PWM Maximum Mode 127 Monitored Parameters The followin...

Page 133: ...u AT ATX power ATX power Use the AT ATX power option to specify the power mode of the system ATX power DEFAULT System is in the ATX power mode AT power System is in the AT power mode 6 3 6 ACPI Config...

Page 134: ...Mode option to specify the sleep state the system enters when it is not being used S1 POS DEFAULT System appears off The CPU is stopped RAM is refreshed the system is running in a low power mode S3 ST...

Page 135: ...nt options to be configured BIOS Menu 10 Advanced Power Management Configuration Power Button Mode On Off Use the Power Button Mode BIOS to specify how the power button functions On Off DEFAULT When t...

Page 136: ...oard or mouse to rouse the system from a suspend or standby state Disabled DEFAULT Wake event not generated by activity on the keyboard or mouse Enabled Wake event generated by activity on the keyboar...

Page 137: ...ime clock RTC cannot generate a wake event Enabled If selected the following appears with values that can be selected RTC Alarm Date Days System Time After setting the alarm the computer turns itself...

Page 138: ...ion Advanced Remote Access Disabled Use the Remote Access option to enable or disable access to the remote functionalities of the system Disabled DEFAULT Remote access is disabled Enabled Remote acces...

Page 139: ...ssed through COM1 COM2 System is remotely accessed through COM2 NOTE Make sure the selected COM port is enabled through the Super I O configuration menu Base Address IRQ 3F8h 4 The Base Address IRQ op...

Page 140: ...ion Software Software is set as the console redirection Redirection After BIOS POST Always Use the Redirection After BIOS POST option to specify when console redirection should occur Disabled The cons...

Page 141: ...101 key layout however The VT UTF8 convention makes available additional keys that are not provided by VT100 for the PC 101 keyboard Disabled DEFAULT Disables the VT UTF8 terminal keys Enabled Enable...

Page 142: ...ied number of USB ports If only two USB ports are being used disabling the remaining six USB frees up system resources that can be redirected elsewhere Disabled USB function support disabled 2 USB Por...

Page 143: ...system is fully booted with all USB drivers loaded When this option is enabled any attached USB mouse or USB keyboard can control the system even when there is no USB driver loaded onto the system Dis...

Page 144: ...may cause the system to malfunction BIOS Menu 13 PCI PnP Configuration IRQ Available Use the IRQ address to specify what IRQs can be assigned to a particular peripheral device Available DEFAULT The s...

Page 145: ...ble Use the DMA Channel option to assign a specific DMA channel to a particular PCI PnP device Available DEFAULT The specified DMA is available to be used by PCI PnP devices Reserved The specified DMA...

Page 146: ...Page 130 6 5 Boot Use the Boot menu BIOS Menu 14 to configure system boot options BIOS Menu 14 Boot 6 5 1 Boot Settings Configuration Use the Boot Settings Configuration menu BIOS Menu 15 to configur...

Page 147: ...option to make the computer speed up the boot process Disabled No POST procedures are skipped Enabled DEFAULT Some POST procedures are skipped to decrease the system boot time Quiet Boot Disabled Use...

Page 148: ...ting to be modified during boot up Off DEFAULT Does not enable the keyboard Number Lock automatically To use the 10 keys on the keyboard press the Number Lock key located on the upper left hand corner...

Page 149: ...N Enabled DEFAULT Can be booted from a remote system through the LAN 6 5 2 Boot Device Priority Use the Boot Device Priority menu BIOS Menu 16 to specify the boot sequence from the available devices T...

Page 150: ...nu 17 Security Change Supervisor Password Use the Change Supervisor Password to set or change a supervisor password The default for this option is Not Installed If a supervisor password must be instal...

Page 151: ...user password must be installed select this field and enter the password After the password has been added Install appears next to Change User Password 6 7 Chipset Use the Chipset menu to access the...

Page 152: ...OLUX Kiosk Application Series Page 136 BIOS Menu 18 Chipset 6 7 1 NorthBridge Chipset Configuration Use the NorthBridge Chipset Configuration menu BIOS Menu 19 to check the northbridge chipset setting...

Page 153: ...to work properly If an older ISA expansion card is used please refer to the documentation that came with the card to see if it is necessary to reserve the space Disabled DEFAULT Memory is not reserve...

Page 154: ...PC to ensure the correct settings are selected The following options are available By Jumper DEFAULT 1024x768 x 18 1280x1024 x 36 1600x1200 x 36 Internal Graphics Mode Select Enable 8MB The Internal...

Page 155: ...iosk Application Series Page 139 6 7 2 SouthBridge Configuration The SouthBridge Configuration menu BIOS Menu 20 enables the Southbridge chipset to be configured BIOS Menu 20 SouthBridge Chipset Confi...

Page 156: ...device Disabled Default EMI not reduced Enabled EMI reduced Cashdraw Controller Enabled Use the Cashdraw control BIOS option to enable or disable the cash draw function on the system Disabled Cashdra...

Page 157: ...o the BIOS options and to exit the BIOS configuration setup program Discard Changes and Exit Use the Discard Changes and Exit option to exit the BIOS configuration setup program without saving the cha...

Page 158: ...n to load the optimal default values for each of the parameters on the Setup menus F9 key can be used for this operation Load Failsafe Defaults Use the Load Failsafe Defaults option to load failsafe d...

Page 159: ...AFOLUX Kiosk Application Series Page 143 7 System Monitoring Chapter 7...

Page 160: ...ling fan speeds watchdog timer and the digital I O setup status The iSMM quickly captures and reports system conditions to ensure operators can prevent system damage Figure 7 1 iSMM 7 1 2 iSMM Feature...

Page 161: ...The four COM port connectors each have two LED indicators LED status indicators are described in below A green LED indicates the pin 9 signal on the COM port is a normal ring RI signal A red LED indi...

Page 162: ...AFOLUX Kiosk Application Series Page 146 THIS PAGE IS INTENTIONALLY LEFT BLANK...

Page 163: ...AFOLUX Kiosk Application Series Page 147 A System Specifications Appendix A...

Page 164: ...Hz or 533 MHz Supported Memory Two 240 pin 2 0 GB max 667 MHz 533 MHz or 400 MHz DDR2 SDRAM DIMM system max 4 0 GB System BIOS 4 0 MB AMI Hard disk drives Two IDE Four 3 0 Gbps SATA II VGA Integrated...

Page 165: ...essor specifications are given below Parameter Specification CPU Speed 1 8 GHz Bus Speed 800 MHz Bus Core Ratio 9 L2 Cache Size 1 MB L2 Cache Speed 1 8 GHz Package Type LGA775 Manufacturing Technology...

Page 166: ...x 12 0 Weight g 1100 A 4 Touch Screen Specifications A 5 wire resistive Panjit touch screen is installed in the monitor Specifications for the touch screen are shown below SPECIFICATION PANJIT Model...

Page 167: ...Range W 0 100 Input Current Low Line A 1 25 Input Current High Line A 0 5 Low Line Inrush Current A 12 15 High Line Inrush Current A 26 30 Efficiency 75 83 88 Line Regulation 0 5 1 Load Regulation 3 7...

Page 168: ...tion Method GFSK for 1Mbps 4 DQPSK for 2Mbps 8 DPSK for 3Mbps Spread Spectrum FHSS Frequency Hopping Spread Spectrum RF Output Power Class 2 under 4dBm Sensor UXGA Resolution Image Sensor Video Resolu...

Page 169: ...cification Everflow R125010BL Bearing Type Two ball bearings One Sleeve Bearing One ball one sleeve bearing Material Housing Plastic UL 94V 0 Material Impeller Plastic UL 94V 0 Protection Current limi...

Page 170: ...nds EDG GPRS GSM Air Interface GSM GPRS Rel 97 PCS 1900 Rel 98 EGPRS Rel 99 compliant GPRS Class 10 coding schemes 1 4 EDGE Class 10 Multi slot classes 1 9 GPRS EGPRS Class B type 1 MT Link Adaptation...

Page 171: ...AFOLUX Kiosk Application Series Page 155 B External Connector Pinouts Appendix B...

Page 172: ...al Name Pin Signal Name Pin Signal Name 1 TMDS Data2 9 TMDS Data1 17 TMDS Data0 2 TMDS Data2 10 TMDS Data1 18 TMDS Data0 3 GND 11 GND 19 GND 4 N C 12 NC 20 NC 5 N C 13 NC 21 NC 6 DDC Clock SCL 14 PVDD...

Page 173: ...hrough two RJ 45 LAN connectors There are two LEDs on the connector indicating the status of LAN The pin assignments are listed in the following table PIN DESCRIPTION PIN DESCRIPTION 1 TXA 5 TXC 2 TXA...

Page 174: ...D RS 232 Serial Port Pinouts B 7 USB Connector The AFL 315 has eight external USB 2 0 ports The ports connect to both USB 2 0 and USB 1 1 devices PIN NO DESCRIPTION PIN NO DESCRIPTION 1 USBV3L 5V 2 GN...

Page 175: ...AFOLUX Kiosk Application Series Page 159 PIN DESCRIPTION PIN DESCRIPTION 7 GND 8 GND 9 VCC NC 10 GND 11 NC 12 DDC DAT 13 HSYNC 14 VSYNC 15 DDCCLK VGA Connector Pinouts...

Page 176: ...AFOLUX Kiosk Application Series Page 160 THIS PAGE IS INTENTIONALLY LEFT BLANK...

Page 177: ...AFOLUX Kiosk Application Series Page 161 C Safety Precautions Appendix C...

Page 178: ...X AFL 315 series is being installed moved or modified Do not apply voltage levels that exceed the specified voltage range Doing so may cause fire and or an electrical shock Electric shocks can occur i...

Page 179: ...i static wristband can help to prevent ESD from damaging any electrical component Self grounding Before handling any electrical component touch any grounded conducting material During the time the ele...

Page 180: ...ng Tools Some components in the AFOLUX AFL 315 series may only be cleaned using a product specifically designed for the purpose In such case the product will be explicitly mentioned in the cleaning ti...

Page 181: ...AFOLUX Kiosk Application Series Page 165 Foam swabs Whenever possible it is best to use lint free swabs such as foam swabs for cleaning...

Page 182: ...AFOLUX Kiosk Application Series Page 166 THIS PAGE IS INTENTIONALLY LEFT BLANK...

Page 183: ...AFOLUX Kiosk Application Series Page 167 D BIOS Configuration Options Appendix D...

Page 184: ...ed Drive Parameters 100 Type Auto 101 ZIP 102 LS 120 102 LBA Large Mode Auto 102 Block Multi Sector Transfer Auto 102 PIO Mode Auto 103 DMA Mode Auto 103 S M A R T Auto 104 32Bit Data Transfer Enabled...

Page 185: ...POS 118 Power Button Mode On Off 119 Restore on AC Power Loss Power Off 120 Resume on Keyboard Mouse Disabled 120 Resume on Ring Disabled 120 Resume on PCIE Enabled 120 Resume On RTC Alarm Disabled 12...

Page 186: ...uick Boot Enabled 131 Quiet Boot Disabled 131 AddOn ROM Display Mode Force BIOS 132 Bootup Num Lock Off 132 Boot From LAN Support Disabled 132 Change Supervisor Password 134 Change User Password 135 M...

Page 187: ...AFOLUX Kiosk Application Series Page 171 E Watchdog Timer Appendix E...

Page 188: ...A BIOS function call INT 15H is used to control the Watchdog Timer INT 15H AH 6FH Sub function AL 2 Sets the Watchdog Timer s period BL Time out value Its unit second is dependent on the item Watchdo...

Page 189: ...the system resets Example program INITIAL TIMER PERIOD COUNTER W_LOOP MOV AX 6F02H setting the time out value MOV BX 05 time out value is 5 seconds INT 15H ADD THE APPLICATION PROGRAM HERE CMP EXIT_A...

Page 190: ...AFOLUX Kiosk Application Series Page 174 THIS PAGE IS INTENTIONALLY LEFT BLANK...

Page 191: ...AFOLUX Kiosk Application Series Page 175 FHazardous Materials Disclosure Appendix F...

Page 192: ...the presences of small quantities of certain materials in the product and is applicable to China RoHS only A label will be placed on each product to indicate the estimated Environmentally Friendly Us...

Page 193: ...ircuit Board X O O O O X Metal Fasteners X O O O O O Cable Assembly X O O O O X Fan Assembly X O O O O X Power Supply Assemblies X O O O O X Battery O O O O O O O This toxic or hazardous substance is...

Page 194: ...OLUX Kiosk Application Series Page 178 RoHS RoHS Pb Hg Cd CR VI PBB PBDE X O O O O X X O O O O X X O O O O X X O O O O O X O O O O X X O O O O X X O O O O X O O O O O O O SJ T11363 2006 X SJ T11363 20...

Page 195: ...AFOLUX Kiosk Application Series Page 179 G Index...

Page 196: ...ettings 46 COM 2 function select jumper location 47 COM1 pin 9 setting jumper 45 settings 45 COM4 pin 9 setting jumper settings 45 COM4 pin 9 setting jumper 45 COM5 pin 9 setting jumper 45 settings 45...

Page 197: ...pin 9 setting jumper 45 COM6 RS 232 422 485 serial port select 49 COM6 RX function select 46 COM6 TX function select 47 jumper configuration 43 LAN connection 60 LAN connector 157 LVDS 138 memory mod...

Page 198: ...d pinouts 158 system voltages 111 116 temperature 111 Touch screen 9 USB 125 126 127 external USB device connection 63 USB 2 0 4 127 USB 2 0 port 158 USB device connection 63 single connector 63 USB p...

Reviews: