background image


BLUEBOX Panel Reader 


Page 21 of 36 

5.1


RF Front-End Board 

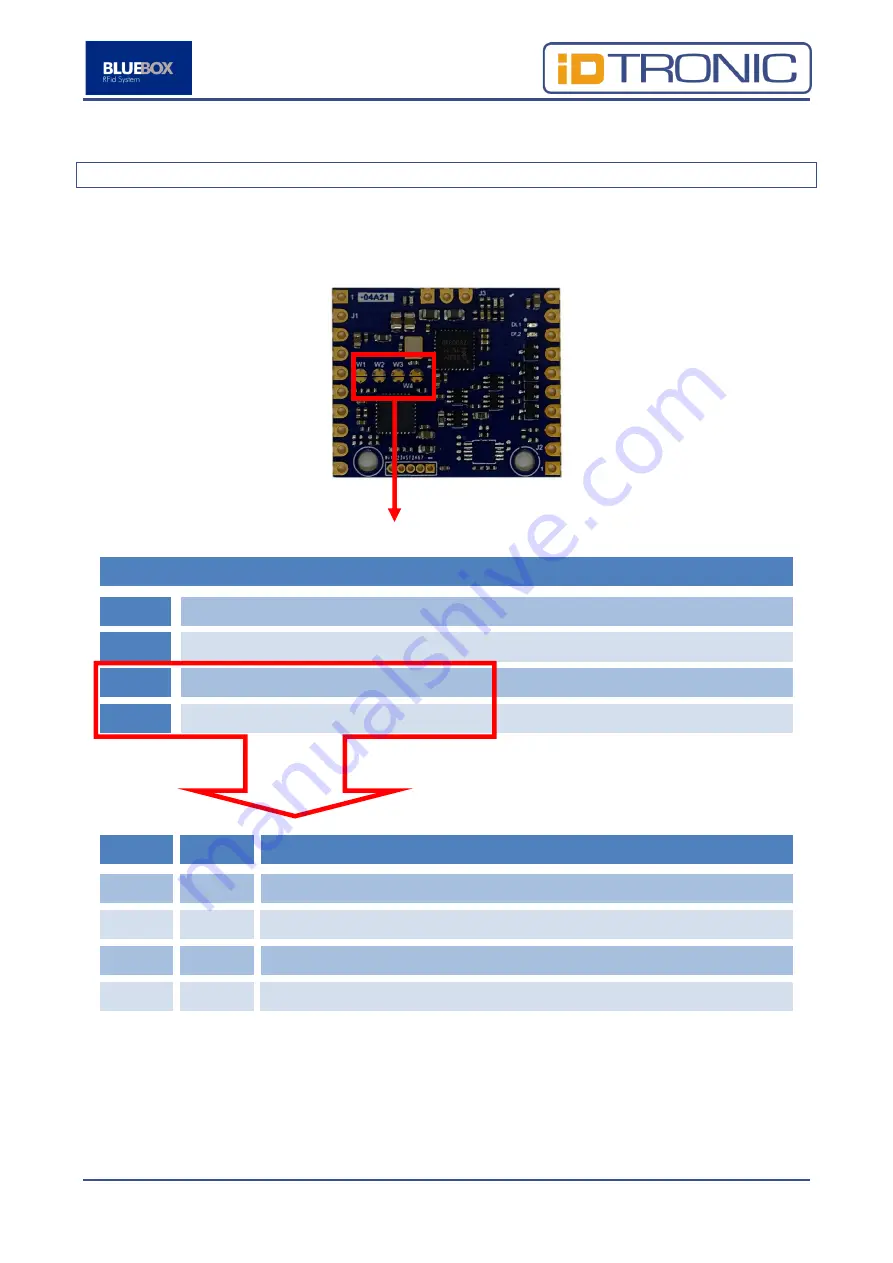
The RF Front-End Board


is equipped with 4 solder jumpser as defined below. 


Solder Jumper 

W1 

Not used. Leave opened.


W2 

Not used. Leave opened.


W3 

Transponder type (See table below) 

W4 

Transponder type (See table below) 


W3 

W4 

Description 

Off 

Off 

ISO 15693 and ISO 14443A/B. 

Off 

On 

Only ISO 14443A. 

On 

Off 

Only ISO 15693. 

On 

On 

Only ISO 14443B. 


W1, W2, W3, W4 

Summary of Contents for BLUEBOX Panel Reader HF NFC

Page 1: ...BLUEBOX Panel Reader Page 1 of 36 13 56 MHz RFID System BLUEBOX Panel Reader HF NFC ...

Page 2: ...ed without previous notice Composition of the information in this manual has been done to the best of our knowledge IDTRONIC does not guarantee the correctness and completeness of the details given in this manual and may not be held liable for damages ensuing from incorrect or incomplete information Since despite all our efforts errors may not be completely avoided we are always grateful for your ...

Page 3: ...ccuracies errors or omissions in the manual or automatically set parameters for a device or for an incorrect application of a device Repairs may be executed by the manufacturer only Only qualified personnel should carry out installation operation and maintenance procedures Use of the device and its installation must be in accordance with national legal requirements and local electrical codes When ...

Page 4: ... Version Hardware Version Firmware Version 3223N 2 2 01 2 2 8 Main carrier with hardware version 1 and firmware version 1 xx could be upgraded only with firmware version 1 xx Main carrier with hardware version 2 and firmware version 2 xx could be upgraded only with firmware version 2 xx RF front end with hardware version 1 and firmware version 1 xx could be upgraded only with firmware version 1 xx...

Page 5: ... 2 Spontaneous Message 13 4 Installation 17 4 1 General Instructions 17 4 2 Notes on Tag Mounting 17 4 3 Avoiding Interference 17 4 4 Mechanical Design 18 4 5 Fixing 18 4 6 Mounting Distances 19 4 7 Positioning of the Tags 19 5 Hardware SettingsMain Carrier Board 20 5 1 RF Front End Board 21 6 Electrical Connections 22 7 Status Indications 23 8 Antenna 25 9 Maintenance Repair and Disposal 26 10 Me...

Page 6: ...BOX to send a message as an HID Keyboard with Italian layout keyboard emulation Hereinafter the list of the supported O S Windows XP SP3 32 64 bit Windows Vista 32 64 bit Windows 7 32 64 bit Windows 8 8 1 32 64 bit Windows 10 32 64 bit From a mechanical point of view the BLUEBOX easy to assemble consists of four main components as shown the antenna placed in the front element of the device with a ...

Page 7: ...ed Supported Transponders ISO 15693 ISO 14443A Communication Interface USB Virtual COM USB HID Keyboard Status Display 4 LEDs Connections USB Full Speed 12Mbit s 2 2 Mechanical Features This section provides details on the mechanical features of the BLUEBOX Dimensions Front Ø28mm x 9mm Rear 41 x 34 5 x 30 7 mm Panel thickness 2 5 to 4 mm 2 3 Environmental Conditions This section provides details o...

Page 8: ...s read transponder If the transponder is different it is defined as new its code will be inserted in the queue and the filter time will be started Otherwise the transponder is the same of the previous read one the BLUEBOX verifies if the filter time is expired In this case the filter time is expired the transponder is defined as new and will be processed as described above otherwise only the filte...

Page 9: ...lative to device configuration and tag read write specific activities If not required the continuous identification activity can be disabled through a flag defined in the general parameters In this case the BLUEBOX will only execute the on request commands already defined above 3 1 General Parameters This section provides details on the configurable general parameters of the BLUEBOX Parameter Desc...

Page 10: ...ad General Parameters and Write General Parameters commands as described in protocol technical manuals where the parameters 1 7 fields and default values are 1 2 3 4 5 6 7 Device Address Serial1 Serial2 Hold Time 0x00 Filter Time Functional Flags 0xFF 0x48 0x10 0x01 0x00 0x01 0x00 Where Parameter Description Device Address Device address of the reader 0x00 0xFF Serial1 USB Virtual COM communicatio...

Page 11: ...ated to disable 0 value or enable 1 value functions Bit Description Bit 7 Not used Bit 6 Not used Bit 5 Not used Bit 4 Not used Bit 3 Spontaneous mode Bit 2 Not used Bit 1 Not used Bit 0 Continuous mode 0 enabled 1 disabled 3 2 Configuration Parameters This section provides details on the configurable operational parameters of the BLUEBOX 3 2 1 USB HID Keyboard Emulation This section provides deta...

Page 12: ...ome effective only after a reboot of the reader None UID only Decimal D 10 Decimal D 18 None Message Index The start position index in the message to remove leading characters from the message 0 means no leading characters remove Note that this parameter become effective only after a reboot of the reader 0 255 0 Max Message Length The max length of the message 0 means all the message starting from...

Page 13: ...ans no Start of Text character End of Text The character added at the end of the message before End of Message It must be in the range 0x20 0x7D except values 0x27 0x3C 0x3E 0x60 Value 0x00 means no End of Text character Message Index The start position index in the message to remove leading characters from the message except of Start of Text End of Text and End of Message chars Value 0 means no l...

Page 14: ...age 11 Message is sent like in option 5 with an STX char at the begin of the message 12 Message is sent like in option 6 with an STX char at the begin of the message Note that this parameter become effective only after a reboot of the reader 1 2 3 4 5 6 7 8 9 10 11 12 Content Data Encoding The spontaneous message content data encoding Note that this setting different from default value overrides t...

Page 15: ...Parameters and Write RAM ROM Configuration Parameters commands as described in protocol technical manuals where the parameters 1 7 fields with default values are 1 2 3 4 5 6 7 0x00 Interface Packet Format Content Data Encoding Content Data Manipulation 0x00 0x00 0x00 0x00 0x00 0x00 0x00 0x00 0x00 Where Parameter Description Interface The interface where to send the spontaneous message Single bits ...

Page 16: ...5 with an STX char at the begin of the message 0x0C Message is sent like in option 6 with an STX char at the begin of the message Content Data Encoding The spontaneous message content data encoding 0x00 None no message content data encoding 0x01 Decimal decimal conversion of the UID of the identified tag 0x03 Decimal D 10 decimal conversion of the UID of the identified tag The UID is trimmed right...

Page 17: ...mance or shorten the life of the device When mounting several nearby adhere to the minimum distances between them Installing a device in or on metal reduces the read and write distance 4 2 Notes on Tag Mounting For installation in and on metal tags provided for this purpose must be used The tag must be placed in the reading area of the device antenna The angle of aperture and the operating distanc...

Page 18: ...t have a thickness between 2 5 and 4 mm if shorter it is necessary to shim with appropriate washers placed between the panel itself and the fixing support of the device Mount the antenna on the front of the panel by arranging the device fixing support and the ring on the back of the panel Before tightening the ring nut correctly align the fixing bracket of the device so as to match the antenna str...

Page 19: ...ge 19 of 36 4 6 Mounting Distances Operating Mode Distance Side A Distance Front B Reading and writing 400mm 400mm 4 7 Positioning of the Tags Align the tag on the antenna central axis See the tag datasheet for the distance D ...

Page 20: ...ard is equipped with 4 solder jumpers as defined below Solder Jumper W1 Closed sets default communication parameters 255 19200 8 n 1 W2 On enables spontaneous mode on USB Virtual COM serial line W3 On enables keyboard emulation mode on USB HID Keyboard line W4 Not used Leave opened W1 W2 W3 W4 ...

Page 21: ... solder jumpser as defined below Solder Jumper W1 Not used Leave opened W2 Not used Leave opened W3 Transponder type See table below W4 Transponder type See table below W3 W4 Description Off Off ISO 15693 and ISO 14443A B Off On Only ISO 14443A On Off Only ISO 15693 On On Only ISO 14443B W1 W2 W3 W4 ...

Page 22: ... qualified person Connect the BLUEBOX using the 4 poles pin header 1 25mm single row right angle connector Hirose DF13 4P 1 25H xx Pin No Min Typical Max Description USB VBUS 1 4 75Vdc 5Vdc 5 25Vdc DC power supply VBUS USB D 2 USB Data D USB D 3 USB Data D USB GND 4 DC power supply GND An adapter cable supplied allows a standard USB connection type A connector Pin 1 ...

Page 23: ...clic with 1Hz antenna RF field is deactivated in continuous mode or continuous mode is disabled yellow on antenna RF field is activated in continuous mode and a tag is detected or RF front end system initialization off off power supply for the RF front end board is missing or RF front end board hardware defect or RF front end system upgrade SYSTEM2 red flashing RF front end system upgrade red on R...

Page 24: ...missing or RF front end board hardware defect LINK yellow flashing exchanging data with host yellow on system initialization off off power supply is missing or hardware defect ERROR red on main carrier board solder jumper W1 closed or system initialization or system error or system upgrade off off power supply is missing or hardware defect ...

Page 25: ...s like antenna size transponder size transponder IC type orientation between transponder and reader antenna position of the transponder versus the reader antenna noise environment metallic environment etc Therefore all data about read ranges can only be typical values measured under laboratory conditions In real live applications the read range may differ from the data mentioned in the datasheet ...

Page 26: ... used correctly no maintenance and repair measures are necessary The device must only be repaired by the manufacturer After use dispose of the device in an environmentally friendly way in accordance with the applicable national regulations Keep the device free from soiling ...

Page 27: ...BLUEBOX Panel Reader Page 27 of 36 10 Mechanical Drawings Dimensions in mm ...

Page 28: ...BLUEBOX Panel Reader Page 28 of 36 11 Document Revision History Date Revision Description 25 02 22 2 00 First release ...

Page 29: ...ion Signature Windows NT Class Ports ClassGuid 4D36E978 E325 11CE BFC1 08002BE10318 Provider Kronotech DriverVer 16 02 2022 2 1 0 0 Manufacturer Kronotech DeviceList ntamd64 DeviceList BLUEBOXCXUHF Reader USB VID_c251 PID_0001 BLUEBOXCXEUHF Reader USB VID_c251 PID_0002 BB2DESKTOPv2 Reader USB VID_28AD PID_0004 MI_00 PANELREADER22 Reader USB VID_c251 PID_0003 MI_00 PANELREADER22v2 Reader USB VID_28...

Page 30: ...PID_0005 MI_00 Installation Reader include mdmcpq inf CopyFiles FakeModemCopyFileSection AddReg Reader AddReg Reader AddReg HKR DevLoader ntkern HKR NTMPDriver usbser sys HKR EnumPropPages32 MsPorts dll SerialPortPropPageProvider Reader Services AddService usbser 0x00000002 DriverService DriverService DisplayName DRIVER SVC ServiceType 1 StartType 3 ErrorControl 1 ServiceBinary 12 usbser sys Strin...

Page 31: ... SVC BlueBox USB VCom Driver BLUEBOXCXUHF BlueBox CX UHF USB VCom Port BLUEBOXCXEUHF BlueBox CX E UHF USB VCom Port BB2DESKTOPv2 BlueBox Gen2 DESKTOP USB VCom Port PANELREADER22 BlueBox Panel Reader 22 v1 USB VCom Port PANELREADER22v2 BlueBox Panel Reader 22 v2 USB VCom Port ...

Page 32: ...ow installing drivers that are not signed by Microsoft Below is described how to de activate the driver signing check 1 First select Settings on the right side of your screen 2 Select Change PC Settings 3 Navigate to General settings and then scroll down to Advanced Startup Click on Restart ...

Page 33: ...BLUEBOX Panel Reader Page 33 of 36 4 After that Click on Troubleshoot 5 On the next screen choose Advanced Options ...

Page 34: ...BLUEBOX Panel Reader Page 34 of 36 6 Then click on Startup Settings 7 Then click on the Restart button ...

Page 35: ...BLUEBOX Panel Reader Page 35 of 36 8 After your computer reboots another screen will appear where you will be asked to press a number to choose an option So press 7 or F7 ...

Page 36: ...BLUEBOX Panel Reader Page 36 of 36 9 When you install the driver this prompt will appear on screen Select Install this driver software anyway ...

Reviews: