background image


V0.12                                                                                                   9 


Turing on the product in the condition of the fixed screen or 4:3 screen for a long time 
may also cause an afterimage or stain on the screen. 
- When using the product for a long time, set a screen saver of the connected computer 

or signaling equipment products or set it in sleep mode. 


When you are not using the product for a long time, after unplugging the power cable 
and take action to prevent the product from a dust. 
- Dust accumulation, heat generation or sparks can occur and cause fire. 


Set a resolution and frequency appropriately to the product. 
- The state of the screen can result in poor or blurred vision. 


For products with a stand, do not move the product by holding only the stand or lift the 
product upside down. 
- The stand might be split from the product and it may cause damage or injury. 


Look at the screen from a distance of about longer 2.5 times than the screen diagonal 
length. 
- Looking at the screen for a long time can lead to vision loss.  


Do not use anything that causes the water vapor near the product. (moisturizers, etc.). 
- This may cause a malfunction or an electric shock or fire.  


After 1 hours use, rest your eyes for more than 5 minutes. 


If the product is turned on for a long time, do not touch the screen surface or vent 
because it may be hot. 


Keep the accessories of the products out of reach of children. 


For products with a stand, be careful when adjusting the angle and height of the stand of 
the product. 
- Tilting severely the product may cause the product to fall off and injury. 
- Stuck a finger or hand may cause an injury. 
 

Summary of Contents for sm-u841

Page 1: ...USER MANUAL KT LL84ULFX PD KT LL84ULFX PD NS LL84ULFX PD LL84ULFX PD1 LL84ULFX PD2 LL84ULFX PD3 ...

Page 2: ...ursuant to Part 15 of the FCC Rules These limits are designed to provide reasonable protection against harmful interference when the product is operated in a commercial environment The product generates uses and can radiate radio frequency energy and if not installed and used in accordance with the instruction manual may cause harmful interference to radio communications Operation of the product i...

Page 3: ...TING INSTALLATION 21 3 7 REMOTE CONTROLLER 22 3 8 SETUP 23 4 REMOTE CONTROL 24 4 1 RS 232C CONNECTION 24 4 2 COMMUNICATION COMMAND 25 4 3 COMMUNICATION COMMAND LIST 27 5 CONNECT THE EXTERNAL DEVICE 28 5 1 DP DISPLAY PORT CONNECTION 28 5 2 HDMI CONNECTION 29 5 3 DVI D CONNECTION 30 5 4 VGA CONNECTION 31 6 MENU CONTROL 32 6 1 INPUT SELECTION 32 6 2 PICTURE ADJUSTMENT 32 6 3 SOUND ADJUSTMENT 34 6 4 O...

Page 4: ...ccess USER MANUAL easily This illustration below is for reference only Warning Do not use a damaged power cable or plug which does not meet the standard This may cause a fire or an electric shock If you are using a power strip do not use several devices at the same time Due to the heat generated by the multi outlet it may cause fire Do not touch the power plug with wet hands This may cause an elec...

Page 5: ...ury Do not install the product in poorly ventilated places such as a bookshelf or closet Otherwise it may affect internal temperature to be increased and cause a fire Install the product at least 10 cm far from the wall Otherwise it may affect internal temperature to be increased and cause a fire After unpacking the product packaging vinyl should be kept away from the hands of young children If a ...

Page 6: ... product This may result in poor quality of display or cause amblyopia This may cause a fire or electric shock When moving the product turn off the power and remove all of the cables including power cables connected to the product If the cable is damaged it may cause a fire or electric shock When smelling something burning or hearing strange sound from the product disconnect the power cable immedi...

Page 7: ...on the product Make sure to ventilate A spark in the appliance power can cause an explosion or fire Do not store or use flammable material and flammable sprays near the product This may cause an explosion or fire Please do not block a vent with the curtain or cloth etc The rise of internal temperature may cause a fire Do not put a steel rod coin hair pin etc in the vent and input output terminals ...

Page 8: ...uct carefully not to occur the twist and drop This may cause a malfunction or injury Put the product s screen faces upwards The screen may be damaged Work together more than one person if the product is heavy This may cause a malfunction or injury When installing the product on a cabinet or shelf use the larger size of the tray than the product to use and maintain the horizon The product may fall ...

Page 9: ...holding only the stand or lift the product upside down The stand might be split from the product and it may cause damage or injury Look at the screen from a distance of about longer 2 5 times than the screen diagonal length Looking at the screen for a long time can lead to vision loss Do not use anything that causes the water vapor near the product moisturizers etc This may cause a malfunction or ...

Page 10: ...atteries with new one If it is different from the polarity of the battery it may cause a fire or injury to break or leak This may also contaminate the surrounding The depleted Battery and rechargeable batteries must be handled separately from the general waste and it needs to be collected for recycling If the end of life battery please bring your nearest recycling center or battery dealer This may...

Page 11: ...r dealer or service center The following images may differ from the image shown Other parts not packed in contents may cause performance degradation or problem during use Power Cable Option Remote Control AAA 1 5V Battery x 2 IR Receiver Screw x 2 3M x 6L HDMI Cable RS232 Cable ...

Page 12: ...product by using the control buttons on the rear side of the product Control buttons Power on off button To move to the upper menu or select To move to the lower menu To move to the right menu or turn up the volume To move to the left menu or turn down the volume M To display or hide the on screen menu ...

Page 13: ...xed to external remote sensor on the product by using two screws on the bottom of the left of the front panel 2 Connect the cable of the external remote controller receiver to IR In connector Remote Sensor Power indicator Power on Green Stand by Red Power Saving Eco Red Power Saving Eco Orange or Red Green Blinking ...

Page 14: ... connect audio input 3 5Φ VGA In To connect VGA video input DVI D In To connect DVI D video input HDMI 1 In To connect HDMI 1 4b video audio input 1 HDMI 2 In To connect HDMI 1 4b video audio input 2 DP In To connect 2DisplayPort 1 1a video audio input Service In To connect with USB device for software update IR In To connect external remote controller transmitter input 3 5Φ Power Input Power conn...

Page 15: ... the above picture of the input output terminal and connect in the right direction If connected incorrectly it may cause damage or breakdown of the input output terminals If the product does not operate even though the power is supplied check if the power switch is set to power on or not ...

Page 16: ...on SOURCE Select input signal Move to the upper menu Move to the lower menu SEL Select to change menu Move to the left menu or turn down the volume Move to the right menu or turn up the volume MENU Display or hide menu on the screen INFO Display information of input source and program version MUTE Not available AUTO Automatically adjust VGA position clock and phase RGB input only ...

Page 17: ... is fading If direct sunlight or strong artificial light halogen lamps etc shines on the front screen of the product if the product has touch function it may cause of malfunction of touch install the product in the shady environments or in the opposite direction of the source of the sunshine or the artificial light Ambient temperature Install the product in the well ventilated place with maintaini...

Page 18: ...ing mages may differ from the actual items Before unpacking the box refer to the diagram below 1 Remove the outer packing box 2 Remove the top foam 3 Lower down or remove the wrapping 4 Three or more people remove the packing from the product ...

Page 19: ...transportation Two persons should hold the each left and right handle of the backside of the product with one hand of the each person and with the other hand grip the bottom portion of the rear side of the product to move The illustration below may differ from the actual items 2 Wrong way Do not use or touch any part of the front screen of the product during transportation ...

Page 20: ... product horizontally and slowly on the floor If firstly laying the edge of the bezel of the product the screen panel of the product may be fragile or damaged 2 Wrong way Put down carefully not to damage the outside of the product If the corner part of the product is placed first the bezel may be damaged easily Cushions ...

Page 21: ...M8 maximum length of 35mm of the screws by size Warning We are not responsible for the product damage or personal injury caused by user s own installation 3 6 Wall mounting Installation Install the product only on the robust and vertical wall When installing inside the wall or cabinet install the product with the space behind between the product and the wall as the illustration below Ambient tempe...

Page 22: ...ontroller for long time remove the batteries to prevent damage caused by battery fluid leak Don t expose the battery to direct sunlight or excessive heat such as a fire Notes on the remote controller If anything interrupts in front of IR receiver or between IR receiver and remote controller the remote controller may not work If the receiving distance of the remote controller becomes narrow or does...

Page 23: ...he remote controller or operate to turn on the power Changing language of the menu The language of the menu is basically English as the default set Users can select a language among English French German Italian Russian Spanish Danish Dutch Norwegian Finnish and Swedish To change the menu language 1 Press the Menu button to go to the menu 2 Select the OSD from the main menu 3 Select the language o...

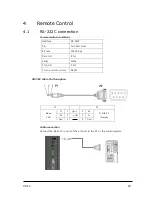
Page 24: ... Pin Txd Rxd Gnd Bit rate 19200 bps Data bits 8 bit Parity None Stop bits 1 bit Communication codes ASCII RS 232C Cable Pin Description P1 P2 Stereo 3 5Φ Tx 1 2 Rx D SUB 9P female Rx 2 3 Tx Gnd 3 5 Gnd Cable connection Connect the RS 232C in port of the product to the PC or the control system ...

Page 25: ...MMAND VALUE END Ex To adjust the volume to 50 K ALL CON 050 K ALLCON050 HEAD Represents the beginning of a statement Put K always SET ID Specifies the product that perform as the command Put ALL or ID number of the product ID range 000 to 100 COMMAND It is always composed with 3Bytes As for command refer to page 28 VALUE Adjusted value It consists of 3Bytes ranging from 000 to 100 END Represents t...

Page 26: ... on ALL PWR 001 ALL PWR 001 SET ID Specifies the product that perform as the command Put ALL or ID number of the product ID range 000 to 100 Put the always COMMAND It always consists of 3Bytes As for command refer to page 28 Put the always Reply Represents the end of a statement Put a always Command receiving status message It is a message that the product replies about commend receiving status up...

Page 27: ...PWR Off 000 On 001 Mute off MOF Mute on MON Mute status MUT Off 000 On 001 Adjusting volume VOL 000 100 000 100 Inputting image SRC VGA 000 DVI 001 HDMI1 005 HDMI2 009 DisplayPort 006 VGA input selection SPC DVI input selection SH1 HDMI1 input selection SH2 HDMI2 input selection SH4 DP input selection SH3 ...

Page 28: ...atically to output the optimal resolution In order to operate the plug and play after connecting the product connect the video cable of the PC to the product before turning on your PC and turn on the power of this product first and then turn on the power of the PC When the incompatible resolution of the input signal is input to the product no image is shown on the screen or normal display is not s...

Page 29: ...n which helps the PC recognize the product automatically to output the optimal resolution In order to operate the plug and play after connecting the product connect the video cable of the PC to the product before turning on your PC and turn on the power of this product first and then turn on the power of the PC When the incompatible resolution of the input signal is input to the product no image i...

Page 30: ...t automatically to output the optimal resolution In order to operate the plug and play after connecting the product connect the video cable of the PC to the product before turning on your PC and turn on the power of this product first and then turn on the power of the PC When the incompatible resolution of the input signal is input to the product no image is shown on the screen or normal display i...

Page 31: ...omatically to output the optimal resolution In order to operate the plug and play after connecting the product connect the video cable of the PC to the product before turning on your PC and turn on the power of this product first and then turn on the power of the PC When the incompatible resolution of the input signal is input to the product no image is shown on the screen or normal display is not...

Page 32: ...ton and then press the or the button to go to the PICTURE menu Press button to go to the PICTURE SETTING menu and after moving to the menu press the or button to the menu which you want to move and setup menu screen by pressing or button then press the MENU button to exit Input Description VGA VGA input DVI DVI input HDMI1 HDMI1 input HDMI2 HDMI2 input DISPLAY PORT Display Port input ...

Page 33: ...ust To adjust location frequency phase of the VGA input screen automatically H Position To adjust the horizontal position of the VGA input screen V position To adjust the vertical position of the VGA input screen Clock To adjust the frequency of the VGA input screen Phase To adjust the phase of the VGA input screen Color Temp Normal Cool Warm User To select the color temperature mode Red To adjust...

Page 34: ...ng or button then press the MENU button to exit Menu Sub Menu Description Sound Treble To adjust the strength of treble region Bass To adjust the strength of the bass region EQ 120Hz To adjust the strength of 120Hz 500Hz To adjust the strength of 500Hz 1 2kHz To adjust the strength of 1 2kHz 7 5kHz To adjust the strength of 7 5kHz 12kHz To adjust the strength of 12kHz Balance To adjust the left ri...

Page 35: ... SETTING menu and press the or button to move to a menu which you want to go to and set value by pressing the or button and then press the MENU button to exit Menu Description Language To set the menu language OSD Turn off To adjust the display time of the OSD screen Off 5 seconds 10 seconds 15 seconds OSD Reset To reset the OSD menu ...

Page 36: ...ECO When the product is in standby mode or if the product changes to be in standby mode due to absence of video signal while setting power saving mode You can cut down on the energy by maintaining the power consumption under 0 5W However even though the video signal is input the screen is not automatically turned on and you cannot turn on it by RS 232C 2 NORMAL When the product is in standby mode ...

Page 37: ... Press the MENU button and then press the or the button to move to the ABOUT menu Or press the INFO button on the remote control Then you can check model name ID current input resolution and software version etc of the product ...

Page 38: ...ower switch to the on position Try to connect other electric equipment to AC outlet to check if there is no problem in power source The remote controller does not work Replace the battery If the remote controller receiver of the product is prevented by any object delete the object and try to operate again If the remote controller receiver of the product is exposed to direct sunlight or strong ligh...

Page 39: ...e is turned on Check if computer is on power saving mode by handling the mouse or pressing keyboard to wake Check to see if the external signal devices and cables are connected Check to see if the cable connections are loose or missing out Try changing the cable Check if the input selection of products is correctly set to an external device by using the SOURCE button on the remote controller HDMI ...

Page 40: ...range Try adjusting the automatic position by using the AUTO button on the remote controller The screen is too bright and the image is not separated From the menu try making the value of the black level lower on the screen menu setting Or try to initialize the screen menu settings The dark area of the screen is too bright From the menu try make the value of the contrast lower on the screen menu se...

Page 41: ...In Audio Out IR In Communication Terminals RS 232C In Cosmetic Dimensions 1910 x 1102 x 90 5 mm Weight Product 68 2kg Packing 98 3kg Wall mount 600mm x 600mm VESA bolt M8 OSD function Adjustment Control buttons IR remote control RS 232C Language Korean English French German Italian Russian Spanish Danish Dutch Norwegian Finnish Swedish Power Power supply AC 100V 240V 50 60 Hz Power consumption act...

Page 42: ...8 47 396 59 995 68 25 O O O O 1360 x 768 47 712 60 015 85 5 O O O O 1280 x 1024 63 981 60 02 108 O O O O 80 75 135 O O O O 1920 x 1080 67 5 60 148 5 O O O O EDTV 480p 31 5 60 27 03 O O O 4 4 4 4 2 2 format 576p 31 25 50 27 O O O HDTV 720p 37 5 50 74 25 O O O 44 995 59 94 74 176 O O O 45 60 74 25 O O O 1080i 28 13 50 74 25 O O O 33 716 59 94 74 175 O O O 33 75 60 74 25 O O O 1080p 56 25 50 148 5 O ...

Page 43: ...t warranty Thus please refer to the following information for the prevention of image sticking When external device PC is not used for a long time please use screensavers The screensaver should be monochrome or moving image If 4 3 aspect ratio is used for a long time image sticking might occur So it is recommended to use the full screen In case of displaying still picture for long time change pict...

Page 44: ...V0 12 44 ...

Reviews: