Part 2 - Configuration
80
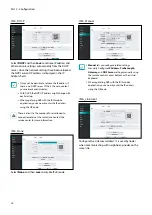
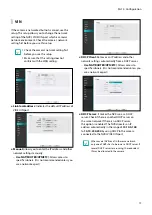
FEN
If using a dynamic IP address, FEN service makes it easy
to connect to the NVR from a remote program without
having to configure dynamic IP or router settings.
●
Use FEN
: Check if you wish to use FEN service.
●
FEN Name
: After entering the NVR name you wish
to register on the FEN server, check and register the
entered name. This is a unique NVR name that will be
registered on the FEN server.0
•
You will not be able to save FEN settings unless you
click on the Check button next to the NVR Name
field and check the entered name's availability.
•
You will be prompted with an error message if you
do not enter NVR name or enter a name already
registered to the FEN Server.
•
If the device name contains the #, \, and/or %
symbol, it might not be able to connect to the NVR
from the IDIS Web program.
•
When registering NVR with the IDIS mobile
application, you can easily enter the IP address
using the QR code.
●
FEN Server
: Enter the FEN server’s IP address or
domain name.
If you have configured the DNS Server setting under
Network - WAN
, you can enter the FEN server's
domain name instead of its IP address in the
FEN
Server
field.
●
Port
: Specify the FEN server’s port number.
If using an IP router (or NAT), port configuration and
other network functions will depend on the usage
method of the IP router (or NAT).
●
Status
: Used to check the status of the device being
registered to the FEN server.
Select
Save
after making changes to register the NVR’s
name to the FEN server.
If FEN has been configured correctly, the FEN server's
help desk information will be displayed in the
Help
Desk
field the next time you access the FEN Setup
screen.

