background image

Part 1 - Remote Setup

9

Quick Setup

Quick Setup allows you to set up 

System

Network

Video

, and other basic settings needed for camera use.

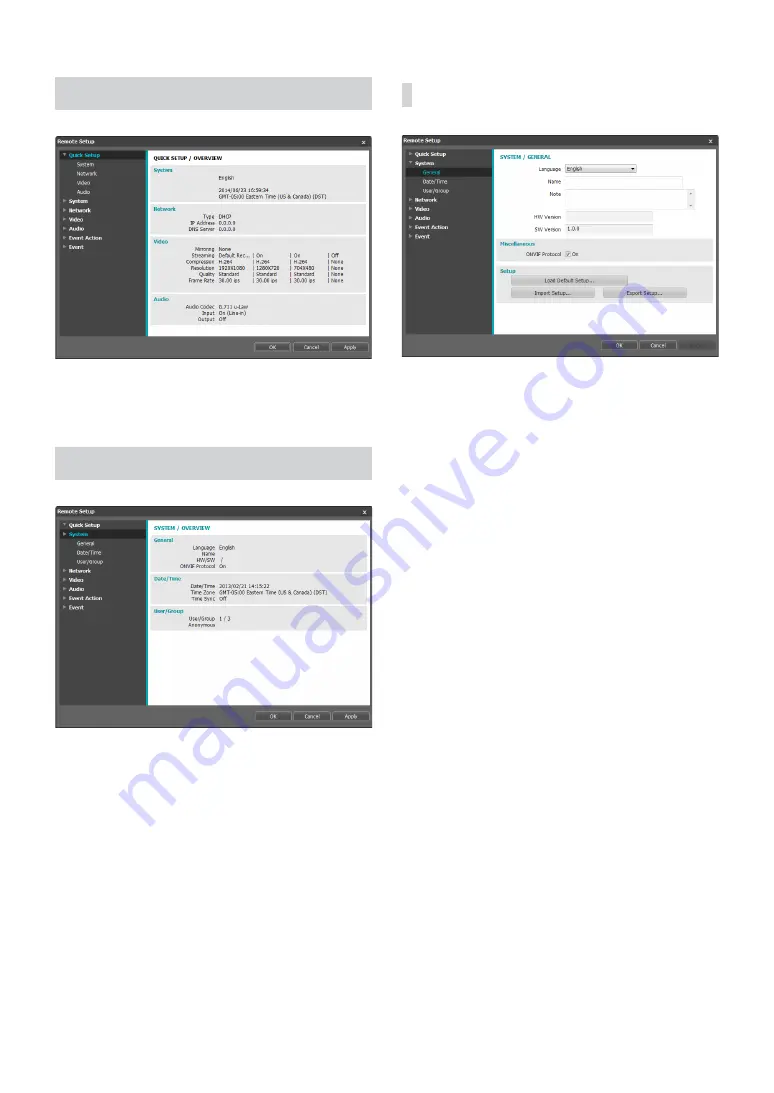
System

Change the camera’s system information, add users/
groups, and/or import/export settings.

General

 •

Language

: Select the language you wish to use for 

remote setup.

 •

Name

: Enter a name for the camera. (Up to 31 

alphanumeric characters, including spaces)

 •

Note

: Enter a description for the camera.

 •

HW Version/SW Version

: Indicates the camera’s 

hardware and software versions.

 •

Miscellaneous

 -

ONVIF Protocol

: Select to enable ONVIF protocol 

use. However, ONVIF Protocol is available only 
to users belonging to the standard user groups 
(

Administrator

Operator

, and 

User

). When you 

have connected to the camera by using the ONVIF 
protocol, only the currently enabled streams or 
events are supported and you cannot change it.  
There may be some more settings that cannot be 
changed, too.  If you want to change those settings, 
connect to the camera by using the IDIS Discovery 
program.

Summary of Contents for DC-S1283WRX

Page 1: ...Powered by Network Camera Operation Manual DC S1283WRX ...

Page 2: ...problems resulting from the use thereof The information contained herein is subject to change without notice Revisions or new editions to this publication may be issued to incorporate such changes It is recommended that first time users of this network camera and individuals who are not familiar with its use seek technical assistance from their retailer regarding product installation and use If yo...

Page 3: ...ble system This will prevent damage to the equipment due to lightning and power line surges If thunder or lightning is common where the equipment is installed use a surge protection device 10 Overloading Do not overload wall outlets and extension cords as this can result in the risk of fire or electric shock 11 Objects and Liquids Never push objects of any kind through openings of this equipment a...

Page 4: ...terature indicates that it should not be disposed with other household wastes at the end of its working life To prevent possible harm to the environment or human health from uncontrolled waste disposal please separate this from other types of wastes and recycle it responsibly to promote the sustainable reuse of material resources Household users should contact either the retailer where they purcha...

Page 5: ... General 9 Date Time 10 User Group 11 Network 12 IP Address 12 FEN 13 Port QoS 14 Bandwidth Control 15 Security 16 IEEE 802 1X 17 Video 17 Camera 17 Streaming 21 Webcasting 22 MAT 23 Privacy Masking 24 PTZ 25 Audio 30 In Out 30 Event Action 30 Alarm out 30 Email 31 Remote Callback 31 Audio Alarm 32 FTP Upload 32 Record 34 ...

Page 6: ...tents 6 Event 36 Alarm In 36 Motion Detection 37 Face Detection 38 Tampering 39 System Event 40 Part 2 IDIS Web 42 Web Live Mode 44 Web Search Mode 46 Part 3 Appendix 49 Setup Menu Tree Remote Setup 49 Index 50 2 3 ...

Page 7: ...nual IDIS protocol Control the camera over the network from software installed on a computer or a separate NVR Ideal for using the camera over the network from a remote location Switching Protocols 1 Launch the IDIS Discovery program and from the list select a camera whose protocol you wish to change 2 Click on the Setup icon and then select Setup Protocol Setup Alternatively you can right click o...

Page 8: ...up screen Alternatively you can select Network Camera from the main screen and then right click to access the Remote Setup screen System settings can also be changed using a remote program From the Remote Setup screen select the menu on the left to display the current settings Select an option under the menu to change the corresponding settings Once you have changed the settings click OK to apply ...

Page 9: ...a description for the camera HW Version SW Version Indicates the camera s hardware and software versions Miscellaneous ONVIF Protocol Select to enable ONVIF protocol use However ONVIF Protocol is available only to users belonging to the standard user groups Administrator Operator and User When you have connected to the camera by using the ONVIF protocol only the currently enabled streams or events...

Page 10: ...so can interfere with establishing a connection with the other camera If IP Address Admin Port and or SSL settings have been changed Remote Setup will terminate after applying the current settings Date Time Date Time Change the camera s date time settings and display formats and configure the time zone and daylight saving time settings Click Apply to apply the changes right away Time Sync Automati...

Page 11: ... Anonymous PTZ Control Select to control the PTZ remotely from a website using webcasting User Group settings can only be configured by users belonging to the Administrator group There is no default password for the Administrator group s admin user Standard groups Administrator Operator and User cannot be edited or deleted Authorities assigned here apply identically to ONVIF protocol user groups G...

Page 12: ...password for ADSL connection and then click OK to log in and retrieve the IP address and other network settings automatically DNS Server Enter the DNS server s IP address By using the DNS server you will be able to use domain names instead of IP addresses when configuring the FEN time or SMTP server If the camera is connected to the network via DHCP select the From DHCP option to retrieve the DNS ...

Page 13: ...gs have been changed click OK at the bottom of the setup window to save the changes and then setup the FEN Inquire with your network administrator for the FEN Server s IP address or domain name If a DNS server has been configured under Network setup you can enter the FEN Server s domain name instead of its IP address for the FEN Server setting FEN Server s default address is fen idisglobal com DNS...

Page 14: ...the network bandwidth allocation priority list Use 0 if you do not want to assign a QoS level The network environment must support DSCP in order for this feature to function properly Contact your network administrator for more details Use HTTPS Select this option to apply https protocol based security on IDIS Web Use UPnP If the camera is connected to the network via an IP router or NAT select thi...

Page 15: ...tream Number 1 if Primary 2 if Secondary and 3 if Tertiary e g rtsp admin 10 0 152 35 554 trackID 1 User admin Password None Camera IP Address 10 0 152 35 RTSP Port Number 554 Stream Primary Via Mobile Device Launch the web browser and then enter http IP Address IDIS Web Port Number If Use HTTPS has been enabled enter https instead of http Camera s IDIS Web port number and RTSP port number must be...

Page 16: ...applies SSL protocol protection on data transmitted out However programs and systems that do not support SSL will not be able to connect to the camera If this option has been changed Remote Setup will terminate after applying the current settings Time server FEN Server and SMTP server s IP addresses must be added to Allow List under IP Filtering in order to use Time Sync FEN and Send Email feature...

Page 17: ...tion authentication method Selected method must be identical to the authentication method used on the authentication server EAPOL Version Choose EAP authentication s version EAP Identity EAP Password Enter authentication ID and password The authentication server and AP must support IEEE 802 1X authentication in order for the IEEE 802 1X network connection authentication feature to function properl...

Page 18: ...ions It does not cause overall image blurring which might occur when using noise filter but it may cause afterimage lag White Balance Configure White Balance settings Mode Set the white balance mode Auto Select to adjust the white balance automatically The system identifies the light source of where the camera is installed and sets up the proper white balance for the conditions Auto WIDE The wider...

Page 19: ...e frequencies can reduce flickering NTSC 60Hz PAL 50Hz Slow Shutter Activate Slow Shutter The slow shutter mode functions only at night When the slow sh utter mode is enabled images are displayed bright even in the low light conditions Shutter Speed Control Adjust Shutter Speed This option is available only when Anti Flicker and Slow Shutter are both set to Off Auto The system will assess the ligh...

Page 20: ...nd times as Nighttime IR Cut Filter IR Cut Filter blocks out the infrared spectrum You can ensure clear images at all times by blocking out the infrared spectrum in high lighting conditions and allowing the infrared spectrum to pass through in low lighting conditions When configuring Event Alarm In this feature will not function if B W Mode event action has been configured Nighttime Mode Daytime M...

Page 21: ...y Tertiary Quaternary Enable disable streaming use Compression Choose the streaming compression method Resolution Choose a resolution setting for video streaming Quality Choose a quality setting for video streaming Frame Rate Choose a frame rate setting for video streaming Default Record Stream Choose a stream to use for recording This setting however may not apply if a recording stream has been d...

Page 22: ...t Display whether the BNC video output works or not The BNC video out may not work depending on the settings under Video Streaming If multiple users are connected to the camera the increase in bandwidth use can lower the frame rate Webcasting Use the webcasting service to view live images from the camera on a web site HTML Code Copy and paste the html code shown on the screen within the code of th...

Page 23: ...or the duration of time specified video is transmitted and recorded using the frame rate designated below until movement is detected again Frame Rate Designate the frame rate to be used between the end of the Inactivity Period and the next motion detection Video is transmitted and recorded at the designated frame rate between then end of the Inactivity Period and the next motion detection Once mot...

Page 24: ...vacy mask Click on the button and drag drop using the mouse to set up a privacy mask Direction Used to tilt and pan the camera Zoom In Out Zoom in and out Focus Near Far Adjust camera focus to far or near Speed Specify the camera s panning and tilting speed No Name Displays a list of active privacy masks The numbers indicate privacy mask numbers Select the empty space next to a number to assign a ...

Page 25: ...d pan the camera Zoom In Out Zoom in and out Focus Near Far Adjust camera focus to far or near Speed Specify the camera s panning and tilting speed Set Choose a preset number and then enter a name This saves the current preset under the specified preset number and name Go To Select a preset from the list and then click Go to to move the camera to the selected preset position Edit Name Used to chan...

Page 26: ...tup button to configure the scan settings Set Displays a setup window Name Enter a name for the scan profile Start Stop Specify which presets to use as start and stop points Dwell Time sec Specify how long the camera will dwell at start and stop positions Speed Direction Specify scanning speed and direction Run Select a scan profile and then click the Run button to perform the scan function Edit U...

Page 27: ... OK to save the pattern Move the camera using directional zoom and focus buttons and then click Stop to save the pattern profile You can record up to two minutes of movement Direction Used to tilt and pan the camera Zoom In Out Zoom in and out Focus Near Far Adjust camera focus to far or near Speed Specify the camera s panning and tilting speed Go To Select a pattern profile and then click the Run...

Page 28: ... settings Set Displays a setup window Name Enter a name for the tour profile No Indicates the order of the function in the tour sequence Function Select a function to be performed Dwell Time sec Specify how long to perform the selected function for Speed Specify the preset speed Run Select a tour profile and then click the Run button to perform the tour function Edit Used to edit the selected tour...

Page 29: ...at this setting must be adjusted manually PTZ Reset Click the button to reset the camera s pan tilt zoom location Home Position Specify the camera s home position Default Uses the factory default position as the camera s home position User Setting Uses the user defined position as the home position Select Setup to change the home position Auto Run Specify which action to take if the camera has not...

Page 30: ... and therefore require the user to purchase a speaker system with a built in amplifier separately Event Action Designate event detection alert actions Alarm out Select Alarm Out to enable alarm out Dwell Time Designate the alarm out duration When an event occurs alarm out will be generated for the specified duration Schedule Specify the alarm out schedule Alarm out is generated during the specifie...

Page 31: ...ter a user ID and password if user authentication is required by the SMTP server Sender Recipient s Enter the sender and recipients addresses Up to 10 The addresses must be properly formatted and include the symbol Remote Callback Select Remote Callback to send callback messages to a remote system Not supported from the IDIS Web program The camera must be registered to the remote system in order t...

Page 32: ... image of the event detected to an FTP server FTP Server Click Add to register a new FTP server Click Remove to remove a registered FTP server When an event is detected a jpg image of the event detected image is uploaded to the Primary Server If the upload to the Primary Server fails the file will be uploaded to the Secondary Server Upload to the Secondary Server will continue to be attempted unti...

Page 33: ...s active to upload images at the specified speed only while event status is active Resolution Quality Choose the resolution and quality of the images to upload to the FTP server Range of resolution settings you can use here can vary depe nding on the resolution setting applied under Video Streaming Base File Name Enter a name for the files to be uploaded to the FTP server and then choose file iden...

Page 34: ...ecording mode video is recorded continuously irrespective of event detection Always Time Lapse Event Records video in time lapse mode when event has not been detected and in event mode when one is detected Date Time Video is recorded in the specified mode according to the dates and times selected in the schedule Select On or Off at the bottom of the schedule table and then choose a recording mode ...

Page 35: ...re Event and Event streams designated above Network Recording Record from the remote program using the designated recording streams If the remote program does not support recording streams however Default Recording Stream specified under Video Streaming will be used None Record using the SD Recording stream or the Network Recording stream whichever has the higher resolution Network Recording Failo...

Page 36: ...ite Compact program or remotely from the remote program For more information refer to each program s operation manual Video search and playback may not function properly on the remote program while video is being recorded on to the SD card To remove the SD card unselect the Record option and wait 30 seconds before doing so Removing the SD card while recording is in progress of without waiting 30 s...

Page 37: ... preset position to move the camera to that position Preset positions can be set from the Remote Setup Video PTZ Preset Event Action settings must be configured correctly in order to perform event actions Motion Detection Select Motion Detection to configure motion detection event settings With motion detection event enabled motion detections within the designated area will be assumed as events Sen...

Page 38: ...Select this option to generate an audio alert and then choose an audio file wav FTP Upload Select this option if you wish to upload images to the FTP server Record Select this option to record video Move PTZ to Select a preset position to move the camera to that position Preset positions can be set from the Remote Setup Video PTZ Preset Face Detection Select Face Detection to configure face detect...

Page 39: ...o record video Move PTZ to Select a preset position to move the camera to that position Preset positions can be set from the Remote Setup Video PTZ Preset Event Action settings must be configured correctly in order to perform event actions Tampering Select Tampering to configure tampering detection event settings With tampering detection event enabled a sudden change in the video such as due to mo...

Page 40: ... to that position Preset positions can be set from the Remote Setup Video PTZ Preset Event Action settings must be configured correctly in order to perform event actions System Event Select System Event and configure system event settings With system event enabled system status alarm in status and disk status will be checked periodically and corresponding alerts will be generated System Alive Sele...

Page 41: ... option to send a message to a remote system when the SD card is inserted removed and then select which system to send the message to Email and Remote Callback settings under Event Action must be configured correctly in order to send out emails and messages Remote Callback is not supported on IDIS Web The camera must be registered to the remote system in order to use the Remote Callback feature ...

Page 42: ...r Or http web idisglobal com it is required to enter the camera IP address when logging in If the camera uses the FEN feature you can enter the FEN name registered to the FEN server instead of the camera IP address after selecting the USE FEN option If the Use HTTPS option has been selected during IDIS Web port number setup enter https instead of http If prompted with a security certificate warnin...

Page 43: ...ge Internet Options so that the address bar or the status bar is hidden Tools Internet Options Security Custom level Allow websites to open windows without address or status bars Enable Launching a new version of IDIS Web for the first time can cause Internet Explorer to load information from the previous version In this case navigate to Tools Internet Options General delete temporary Internet fil...

Page 44: ...E 1 to view the video in full screen Press the ESC key on the keyboard to return to the previous screen 5 Click TYPE 1 to print the current video screen using a printer connected to the computer 6 Click TYPE 1 to save the current video screen as an image file 7 Click TYPE 1 to configure rendering mode and OSD settings Select rendering mode to adjust the video output rate or select which OSD elemen...

Page 45: ...ne Enables playback of audio from the remote locale on speakers Enables two way audio communication with the remote locale Disables audio transmission If the remote locale connected to supports audio transmission TYPE 1 icon appears on the corresponding camera screen Aspect Ratio Change the aspect ratio of the video displayed on the screen Fit to Screen Fit the video to the size of the camera scre...

Page 46: ... 3 Displays time information of the video recording from the remote locale 4 Click TYPE 1 to view the video in full screen Press the ESC key on the keyboard to return to the previous screen 5 Click TYPE 1 to print the current video screen using a printer connected to the computer 6 Click TYPE 1 to save the video recording as an executable file 7 Click TYPE 1 to save the current video screen as an ...

Page 47: ...d on the selected dates is shown on the time table at the bottom of the screen Select a point in time to display video from that moment If multiple recordings are available for the selected point in time you can select the desired segment Select TYPE 1 to enable event search mode and search for events matching user designated parameters Use the playback controls to play back video TYPE 1 Go to Fir...

Page 48: ...mote system If no name is entered for the camera the name used at the remote locale is shown on the screen Enable Audio If audio was recorded with the video enabling this option plays audio upon playback Aspect Ratio Change the aspect ratio of the video displayed on the screen Anti Aliasing Screen Removes stair step effect blocks that are caused when zooming a video to improve overall quality of v...

Page 49: ...Record Alarm In Alarm Out Camera IP Address General System In Out Motion Detection Email Streaming FEN Date Time Network Tampering Remote Callback Webcasting Port QoS User Group Video Audio MAT Bandwidth Control Privacy Masking PTZ Security IEEE 802 1X Face Detection Part 3 Appendix Setup Menu Tree Remote Setup ...

Page 50: ... 9 Compression 21 D Date Time 10 DSCP 14 F FEN Name 13 FEN Server 13 Frame Rate 21 I IPFiltering 16 M MAT 23 N Network Bandwidth Limit 15 O ONVIF Protocol 9 Q Quality 21 R Resolution 21 RTSP Port 14 S SSL 16 T Time Sync 10 U Use FEN 13 Use HTTPS 14 User Group 11 Use UPnP 14 V1 0 ...

Page 51: ......

Page 52: ...IDIS Co Ltd For more information please visit at www idisglobal com ...

Reviews: