background image

53

EVOMAX 

Installation & Servicing

fAuLt fInDInG


f

A

u

L

t f

In

DI

n

G

 f

A

u

L

t f

In

DI

n

G

 f

A

u

L

t f

In

DI

n

G

 f

A

u

L

t f

In

DI

n

G

 f

A

u

L

t f

In

DI

n

G

 f

A

u

L

t f

In

DI

n

G


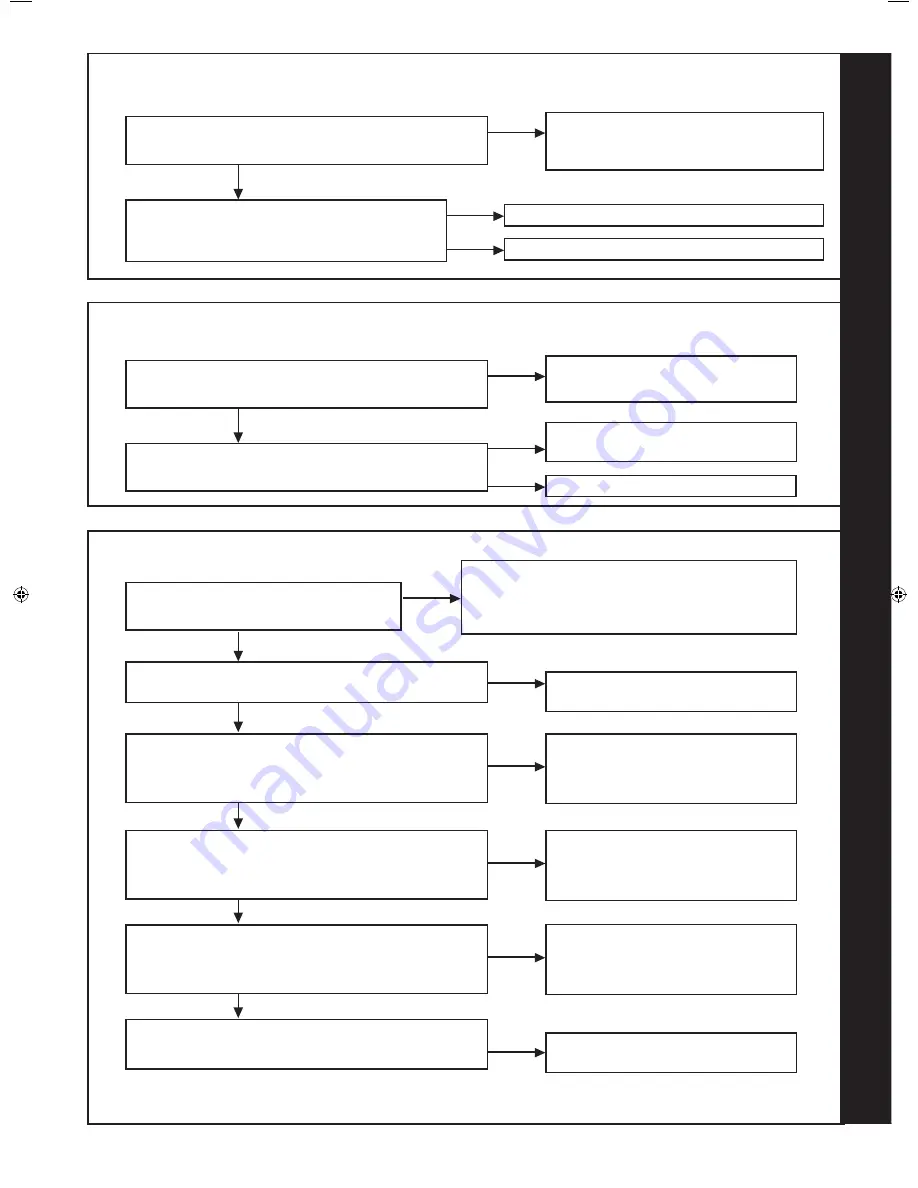
76  FAlSE FlAME lOCKOUT / ERROR 20

Check routing and integrity of internal boiler 

wiring is OK.  Check condition of Flame 

Sense Electrode and replace if deteriorated.

yes

Reset the boiler, does boiler work OK?

no

Replace Flame Detection Electrode

Replace Water Pressure Switch

Check routing and integrity of internal boiler wiring

yes

yes

no

Disconnect the electrical connection to the Flame 

Sense Electrode.  Is there continuity between the 

Electrode and earth?

77  LoW WAtER PRESSuRE

Fill and vent the system and open all 

Isolation Valves

no

Are the boiler and CH system filled with water and all 

Isolation and Radiator Valves open?

yes

Ensure wiring has continuity and is 

securely connected

no

Does the wiring from the Water Pressure Switch to the 

PCB have continuity and is it securely connected?

78  fLAmE LoSS

Check the Detection Electrode and associated Harness 

for continuity, visual condition and position (refer to 

Frame 67).  Check if the Condensate Pipe is blocked.  

Check if the Flue is blocked.  Replace as necessary

yes

If the boiler is Reset, does the boiler Ignite 

for a short time and then Extinguish

no

Check Gas Supply and rectify fault

no

Is the Gas Pressure available at the boiler > 18mBar?

yes

Is the following voltage available at the Gas Valve? 

(approximately 215Vdc for 30, 40, 60, 80 and 150kW) 

(approximately 240Vac for 100 and 120kW) (*See note)

Check wiring from Gas Valve to PCB 

and replace if necessary, otherwise 

replace the main PCB

no

yes

Check Spark Generator and associated Harness for 

continuity, visual condition and position (refer to Frame 

58).  Are these functioning correctly?

Replace Spark Generator and 

Harness as necessary

no

yes

Check Ignition Electrode and associated Harness for 

continuity, visual condition and position (refer to Frame 

66).  Are these functioning correctly?

Replace Ignition Electrode and 

associated Harness as necessary

no

yes

Check Syphon and condensate drain pipework for 

blockage and rectify if necessary.  Boiler now working OK?

Replace Gas Valve

no

* Note: due to the wave form of the rectified voltage, the reading will vary depending on the type of meter used to measure the 

value.  In general terms a reading of greater than 150V indicates that the correct voltage is supplied to the gas valve

206210-3.indd   53

09/06/2011   13:35:00

Summary of Contents for Evomax 30

Page 1: ...can download the relevant information in PDF format For users guide see reverse of book INSTALLATION AND SERVICING EVOMAX 30 40 60 80 100 120 150 30P 40P 60P 80P When replacing any part on this applia...

Page 2: ...iler Output condensing Mean 40 C Max kW 31 54 30 9 42 0 41 2 63 5 62 1 84 4 82 6 103 9 124 7 158 0 Btu hr 107600 105450 143300 140600 216650 211900 288000 281850 357360 428900 539100 Min kW 6 5 6 4 8...

Page 3: ...vertical terminal which admits fresh air to the burner and discharges the products of combustion to the outside through orifices which in this case are concentric The fan is up stream of the combusti...

Page 4: ...ation The Evomax boilers have been tested and certified to EN 483 EN 677 PREN 15420 BSEN 15417 BSEN 656 BSEN 60335 2 102 BSEN 55014 1 and BSEN 55014 2 for use with Natural Gas LPG Detailed recommendat...

Page 5: ...d may be cut to the desired length If obstructions prevent direct flue routing then both 90o and 45o elbows can be provided to offset the flue system Terminal Position Due to the high efficiency of th...

Page 6: ...w rate to achieve a temperature differential of no greater than 35o C at minimum rate Water Treatment These boilers incorporate an ALUMINIUM heat exchanger IMPORTANT The application of any other treat...

Page 7: ...top clearances for vertical flue 200mm for horizontal flue 350mm 415mm for 100 150 for open flue 350mm 100 150 Concentric Flue Connector EVOMAX 100 120 150 Minimum boiler top clearances for vertical f...

Page 8: ...g features a A non adjustable preset lift pressure not exceeding 4 bar 60 lbf in2 b A manual testing device c Provision for connection of a discharge pipe The valve or discharge pipe should be positio...

Page 9: ...310 301 501 Evomax 80 shown KEY 105 Auto Air Vent 208 Burner Fixings Kit 230 Fan 231 Gas Valve Kit 232 Venturi 30kW Kit 301 Dry Fire Thermistor Kit 302 Lead Ignition Kit 304 Ignitor Unit 305 Electrode...

Page 10: ...rd wall mounting template from the front of the boiler Remove the packing piece from the top of the boiler Check the contents against the list in Frame 6 Unpacking Note some items are contained within...

Page 11: ...age or personal injury 1 Cut the flue hole ensuring that the hole is square to the wall Both wall faces immediately around the cut hole should be flat 2 Drill 4 boiler top fixing holes with a 12mm 1 2...

Page 12: ...om internal space If to a room internal space it must itself be adequately ventilated as above The temperature within the boiler room shall not exceed 25 C within 100mm of the floor 32 C at mid height...

Page 13: ...hat flue option Note Horizontal terminal resistance includes 1 x 90o elbow Worked examples are shown on page 17 and 18 Alternatively the resistances of flue components are given on page 16 together wi...

Page 14: ...FLUE OUTLET Evomax vertical concentric flue application maximum lengths and pressure differentials Model 30 30P 40 40P 60 60P 80 80P 100 120 150 Max flue length m 42 42 7 5 12 20 17 6 7 5 Max flue pr...

Page 15: ...elbow concentric 152618 152619 n a n a 3 90o elbow n a n a 158773 158774 4 45o elbow pair n a n a 158775 158776 5 Flat Weather Collar 152611 152612 158780 158780 6 Pitched Weather Collar 152609 152610...

Page 16: ...00 3 3 172 4 3 Horizontal wall kit 80 125 90 21 6 45 7 86 6 2 135 4 8 Horizontal wall kit 100 150 90 30 7 6 70 8 65 3 5 100 3 3 Pipes Elbows 45 bend 80 125 3 5 1 1 7 5 1 1 13 5 1 1 22 1 1 45 bend 100...

Page 17: ...0 125 Vertical Flue Kit 80 125 135 4 8 2 x 1m extension flue 2 x 21 7 2 x 1 2 x 45 elbow 2 x 22 2 x 1 1 Total Flue Resistance 222 9 Horizontal Flue for Evomax 40 Resistance Pa Resistance m Flue Size 8...

Page 18: ...MPLE 4 The total maximum flue resistance for an Evomax 120 is 288 Pa or 17 6m 100 150 Therefore this installation is acceptable Example 4 FLUE OUTLET Horizontal Flue for Evomax 120 Resistance Pa Resis...

Page 19: ...duct it is important that the inner duct is maintained at 20mm longer than the outer duct to allow correct connection of the ducts Care should be taken to support the inner duct when cutting the flue...

Page 20: ...ng in the car port into the building Vertically from a terminal on the same wall Horizontally from a terminal on the same wall 300 mm 300 mm 300 mm 75 mm 200 mm 200 mm 150 mm 300 mm 300 mm 600 mm 1200...

Page 21: ...ts Heat output to a maximum of 600kW can be achieved by cascading up to six Evomax boilers This can be achieved by the use of Evomax multiple boiler Frame Header Option Kits Boilers can be fitted eith...

Page 22: ...7 Flue gas terminal 8 Drain cock 9 Shunt pump 10 Room Sensor 3 3 3 2 3 2 1 3 3 2 1 9 9 9 1 6 4 6 10 6 7 5 206210 10275 8 8 8 The condensate trap provided within the hardware pack must be connected to...

Page 23: ...il and vent stack Make connection to SVP using a solvent welded saddle BOILER External wall Ground Level Open end of pipe direct into gulley below grating but above water level DRAIN cla7775 3 Termina...

Page 24: ...rminated with a 1 1 4 BSP male taper connection located at the bottom of the appliance Note This appliance is NOT suitable for use with a direct hot water cylinder Plastic plugs fitted into the open e...

Page 25: ...dulating sequencer kit a bms outside temperature sensor DHW demand can be controlled by 230V programmer and or cylinder thermostat tank sensor kit The electrical supply and their inputs onto the boile...

Page 26: ...connections as appropriate e g Grundfos 40 60 UPS is satisfactory If the current draw is more than this eg a Grundfos 40 120 UPS then an external relay should be operated by the CH Pump or DHW Pump co...

Page 27: ...210b Fan Flow Thermistor Return Thermistor Flame Sensor Electrode Spark Electrode Spark Generator PCB Gas Valve Water Pressure Switch Diagnostic Connection Chassis Earth w bk bk bk bk br b b b b b b r...

Page 28: ...creen similar to the following will be displayed line 5 may vary depending on setup Line 5 indicates Switched Live or OpenTherm or 0 10V depending on which controls are connected to the boiler Hot Wat...

Page 29: ...erates See Frame 42 for adjusting the system frost protection temperature setpoint Cylinder Frost Protect Burner Power 100 Outside Temp 10 C Frost Setpoint 5 C Hot Water Temp 4 C Cylinder Frost Protec...

Page 30: ...d press SELECT to return to normal operation Ideal Evomax 80kW Normal Operation Set Flow Temp Set DHW Temp Press SELECT and a screen similar to the following will be displayed The kW output number in...

Page 31: ...uts will vary as the boiler operates Press SELECT to exit this option Rotate the KNOB anti clockwise until Normal Operation is highlighted again and press SELECT to return to normal operation Viewing...

Page 32: ...10V Input 0 10V Off 0 10V Capacity 0 10V Temperature Press and to change to the required setting and then press ENTER to store Rotate the KNOB anti clockwise until Normal Operation is highlighted aga...

Page 33: ...ter Press SELECT and the following screen will be displayed Set Night Setback On Off Press and to change to required setting and then press ENTER to store Rotate the KNOB anti clockwise until Normal O...

Page 34: ...Operation Set Flow Temp Set DHW Temp Note that System Frost Protection Function is only operational if an Outside Sensor has been connected The CH pump is switched on if the Outside Temp is less than...

Page 35: ...O S Room Temp 20 C Press and to change to required setting press ENTER to store Rotate the KNOB clockwise until Normal Operation is highlighted again and press SELECT to return to normal operation Rev...

Page 36: ...ration is highlighted again and press SELECT to return to normal operation Changing the Volt Free Burner On Relay to Operate as an LPG Relay for below Ground Level LPG applications Installer Mode Norm...

Page 37: ...he link from position 9 to position 10 in the installer terminal block should be removed and a wire added from position 10 to the DHW Call input on the boiler Note that a hydraulic bypass is required...

Page 38: ...into CH Call INSTALLATION 48 Evomax with boiler control of Pump and diverter valve Pump CH Pump Timer L N CH On HW On Boiler DHW Pump Fused Spur L N E C S R S 206210 10233 Note 1 The boiler can use an...

Page 39: ...trols Fused Spur L N E 206210 10236 External Controls via OpenTherm External Controls via 0 10V Input External Controls via Switched Live Note that the boiler requires a 4 minute pump overrun period T...

Page 40: ...issioning and Testing A Electrical Installation 1 Checks to ensure electrical safety should be carried out by a competent person 2 ALWAYS carry out the preliminary electrical system checks i e earth c...

Page 41: ...is set for winter operation see Evomax user interface basic operating instructions 7 The boiler will commence the ignition sequence If after 5 attempts the boiler has failed to light then it will loc...

Page 42: ...e kit 53 General Checks 54 Handing Over IMPORTANT Point out to the owner that the boiler must have regular maintenance and cleaning at least annually in order to ensure reliable and efficient operatio...

Page 43: ...o Frames 59 and 60 5 Inspect the heat exchanger through the burner opening If there are signs of aluminium oxide build up spray water down the flueways Refer to Frame 60 6 Remove the sump cover and sc...

Page 44: ...elbow fixing screws and remove elbow by pulling downwards 7 Disconnect the electrical connections from the gas valve s 8 Disconnect the electrical connections from the fan 9 Undo the gas valve union n...

Page 45: ...2 Remove the front panel Refer to frame 57 3 Remove the fan and gas assembly Refer to frame 58 4 Remove the burner Refer to frame 59 5 Remove the ignition and detection electrodes Refer to frame 66 6...

Page 46: ...r venturi and gas valve assembly to the new fan 8 Reassemble in reverse order replacing all gaskets 9 Check the operation of the boiler Refer to frame 55 Evomax 30 40 60 Evomax 80 Evomax 100 Evomax 12...

Page 47: ...e to gas valve transfer to new valve 100 120 only 9 Fit new gas valve to venturi using the new seal provided ensure gas injector is fitted correctly 10 Reassemble in reverse order replacing all gasket...

Page 48: ...e the front panel Refer to frame 57 3 Pull off the spark lead and earth connection 4 Remove the two retaining cap head screws 5 Pull out the electrode and pull off the old gasket 6 Replace with new el...

Page 49: ...he boiler 4 Disconnect the electrical connections from the switch 5 Unscrew the water pressure switch 6 Refit new switch 7 Connect electrical connections 8 Refill the system ensuring all the air escap...

Page 50: ...the operation of the boiler Refer to Frame 55 4 72 User Interface Board 1 Refer to Frame 55 2 Remove the upper front panel put the control panel into the service position Refer to Frame 57 3 Fit the...

Page 51: ...ylinderThermistor Fault Ext Interlock Off External Interlock Operated Reset Interlock Go to Frame 85 Ext Interlock Off Ignition Lockout Check Gas to Boiler Check Condensate Pipe Refer to Instructions...

Page 52: ...heck gas supply and rectify fault no yes Is the following voltage available at the Gas Valve approximately 215Vdc for 30 40 60 80 and 150kW approximately 240Vac for 100 and 120kW See note Check wiring...

Page 53: ...e Pipe is blocked Check if the Flue is blocked Replace as necessary yes If the boiler is Reset does the boiler Ignite for a short time and then Extinguish no Check Gas Supply and rectify fault no Is t...

Page 54: ...ing a suitable multimeter connected across the thermistor s terminal pins At 25 C expect 9 700 10 300 At 60 C expect 2 400 2 600 At 85 C expect 1 000 1 100 Is the thermistor value correct yes Check an...

Page 55: ...expect 19 000 21 000 W At 20 C expect 12 000 13 000 W Is the thermistor value correct yes Ensure the wiring has continuity and is securely connected no Does the Outside Sensor wiring between the boil...

Page 56: ...no Is the wiring securely connected at both the boiler and cylinder thermistor yes 85 External Interlock off Is an External Interlock connected to the boiler yes Has the External Interlock operated no...

Page 57: ...vice connected to the boiler note that the Ideal Prog Room Stat is an OpenTherm device Does the wiring from the boiler to the OpenTherm device have continuity yes no Rectify wiring from boiler to Open...

Page 58: ...for a Power Closed Diverter Valve no no Set boiler correctly See page 41 yes Is there 230Vac at D Check wiring from PCB to D no yes yes Does wiring to external DHW Pump have continuity and is to the c...

Page 59: ...ain PCB connected securely yes yes Connect the cable from the main PCB to the user interface PCB securely no Is the cable from the main PCB to the user interface PCB connected securely yes yes Replace...

Page 60: ...to Winter Mode see Frame 36 no Is the boiler set to Winter Mode yes yes Ensure between 2V and 10V is correctly connected to these terminals from the external device no Is a voltage of between 2V and 1...

Page 61: ...120kW 1 176365 207 Burner Seal kit 150kW 1 176366 208 Burner Fixings Kit 1 176367 230 Fan 30 40 60kW 1 176272 230 Fan 80 00kW 1 176273 230 Fan 120 150kW 1 176274 231 Gas Valve Kit 30 40 60 80 150kW 1...

Page 62: ...Technical Helpline 01482 498 376 www idealheating com Ideal Boilers P O Box 103 National Ave Kingston upon Hull HU5 4JN Telephone 01482 492 251 Fax 01482 448 858 Registration No London 322 137 Ideal...

Reviews: