background image

10

EVOMAX 

Installation & Servicing 

InStALLAtIon

6 unPACkInG

5  PACkAGInG REmoVAL

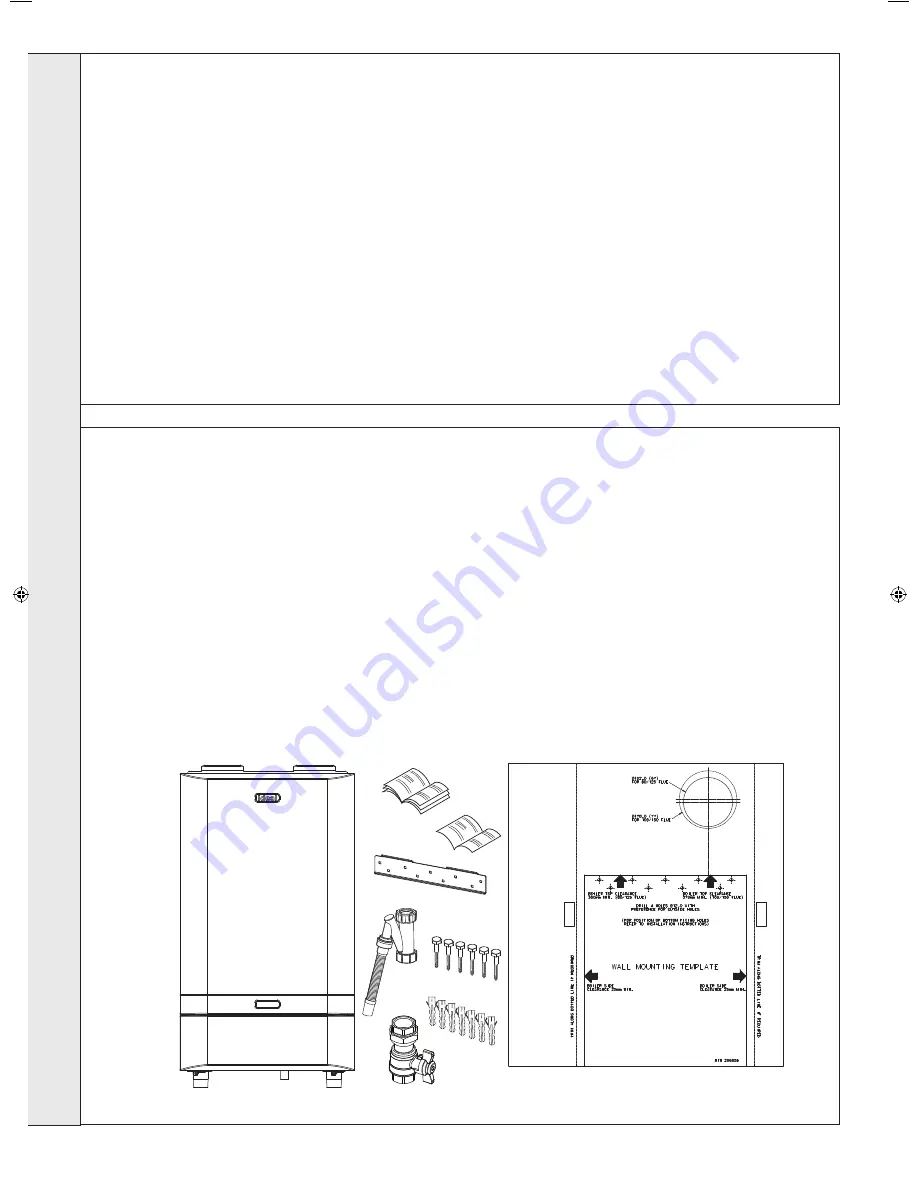
The boiler is supplied fully assembled in one pack.  When 

unpacking the boiler check the contents against the list 

shown.  Do not dispose of the packaging until all contents 

are accounted for, as some parts are held within the 

cardboard packing pieces.

  The boiler should be laying on its back with the straps 

removed.

  Carefully read the installation instructions before proceeding.

  Remove the outer packing sleeve.

  Remove the protective cardboard wall mounting template 

from the front of the boiler.

  Remove the packing piece from the top of the boiler.

  Check the contents against the list in Frame 6 ‘Unpacking’. 

Note: some items are contained within the top packing 

piece.

  The boiler may now be stood on its base, with the 

cardboard bottom packing piece still in place to protect the 

connections.  Due care should be taken when standing up 

the boilers, with respect to their weights, see Table 2 on 

page 2.

In

S

t

ALLA

t

Ion

B

A

C

D

F

E

G

H

J

Pack Contents

Fully assembled boiler

B

  Installation & Servicing/User Instructions

C

  Log Book

D

  Wall mounting bracket

E

  Wall mounting template

F

  Condensate Trap

G

  M10 x 70 Hex Head Coach Screws - 6 off

H

  M10 Wall Plug - 6 off

J

  Gas cock

206210-3.indd   10

09/06/2011   13:34:14

Summary of Contents for 100

Page 1: ... can download the relevant information in PDF format For users guide see reverse of book INSTALLATION AND SERVICING EVOMAX 30 40 60 80 100 120 150 30P 40P 60P 80P When replacing any part on this appliance use only spare parts that you can be assured conform to the safety and performance specification that we require Do not use reconditioned or copy parts that have not been clearly authorised by Id...

Page 2: ...oiler Output condensing Mean 40 C Max kW 31 54 30 9 42 0 41 2 63 5 62 1 84 4 82 6 103 9 124 7 158 0 Btu hr 107600 105450 143300 140600 216650 211900 288000 281850 357360 428900 539100 Min kW 6 5 6 4 8 5 8 3 12 6 12 4 17 3 17 21 6 26 0 32 5 Btu hr 22200 21850 29000 28300 43000 42300 59050 58000 81620 98250 110800 Boiler Input Max Rate Nett kW 30 4 30 4 40 5 40 5 60 8 60 8 82 0 82 102 4 122 9 153 7 ...

Page 3: ...r vertical terminal which admits fresh air to the burner and discharges the products of combustion to the outside through orifices which in this case are concentric The fan is up stream of the combustion chamber C63 A room sealed appliance intended to be connected to a separately approved and marketed system for the supply of combustion air and discharge of combustion products The fan is up stream...

Page 4: ...lation The Evomax boilers have been tested and certified to EN 483 EN 677 PREN 15420 BSEN 15417 BSEN 656 BSEN 60335 2 102 BSEN 55014 1 and BSEN 55014 2 for use with Natural Gas LPG Detailed recommendations are contained in the following Codes of Practice BS 6891 Installation of low pressure gas pipework of up to 28mm R1 in domestic premises 2nd family gas BS 5482 Pt 1 Domestic butane and propane g...

Page 5: ...nd may be cut to the desired length If obstructions prevent direct flue routing then both 90o and 45o elbows can be provided to offset the flue system Terminal Position Due to the high efficiency of the boilers pluming will occur For this reason vertical termination is recommended and in any case terminal positions which could cause problems should where possible be avoided Particular care should ...

Page 6: ...ow rate to achieve a temperature differential of no greater than 35o C at minimum rate Water Treatment These boilers incorporate an ALUMINIUM heat exchanger IMPORTANT The application of any other treatment to this product may render the guarantee of Ideal Stelrad Group INVALID Ideal Stelrad Group recommend Water Treatment in accordance with Guidance Notes on Water Treatment in Central Heating Syst...

Page 7: ... top clearances for vertical flue 200mm for horizontal flue 350mm 415mm for 100 150 for open flue 350mm 100 150 Concentric Flue Connector EVOMAX 100 120 150 Minimum boiler top clearances for vertical flue 200mm for horizontal flue 370mm for open flue 350mm Flue centre line im9245 X 224 5 80 125 X 289 5 100 150 with 100 150 adaptor See Frame 13 Flue centre line X 232 RF 2544 500 C B A 850 59 59 155...

Page 8: ...ng features a A non adjustable preset lift pressure not exceeding 4 bar 60 lbf in2 b A manual testing device c Provision for connection of a discharge pipe The valve or discharge pipe should be positioned so that the discharge of water or steam is visible but will not cause hazard to user or plant 3 Pressure Gauge A pressure gauge covering at least the range 0 4bar must be fitted to the system The...

Page 9: ... 310 301 501 Evomax 80 shown KEY 105 Auto Air Vent 208 Burner Fixings Kit 230 Fan 231 Gas Valve Kit 232 Venturi 30kW Kit 301 Dry Fire Thermistor Kit 302 Lead Ignition Kit 304 Ignitor Unit 305 Electrode Detection Kit 306 Ignition Electrode Kit 308 Fascia Plastic 309 HMI Board 310 Primary PCB 501 Jacket Assembly Evomax Kit 502 Door Assembly Evomax Kit ...

Page 10: ...ard wall mounting template from the front of the boiler Remove the packing piece from the top of the boiler Check the contents against the list in Frame 6 Unpacking Note some items are contained within the top packing piece The boiler may now be stood on its base with the cardboard bottom packing piece still in place to protect the connections Due care should be taken when standing up the boilers ...

Page 11: ...age or personal injury 1 Cut the flue hole ensuring that the hole is square to the wall Both wall faces immediately around the cut hole should be flat 2 Drill 4 boiler top fixing holes with a 12mm 1 2 masonry drill and insert the plastic plugs provided for the wall mounting plate 3 Drill the 2 boiler lower fixing holes with a 12mm 1 2 masonry drill insert the plastic plugs provided 4 Fix the wall ...

Page 12: ...oom internal space If to a room internal space it must itself be adequately ventilated as above The temperature within the boiler room shall not exceed 25ºC within 100mm of the floor 32ºC at mid height and 40ºC within 100mm of the ceiling Evomax 80 80P 100 120 150 and multiple boiler applications Detail reference should be made to BS 6644 for inputs between 70kW and 1 8MW net In IE refer to the cu...

Page 13: ...that flue option Note Horizontal terminal resistance includes 1 x 90o elbow Worked examples are shown on page 17 and 18 Alternatively the resistances of flue components are given on page 16 together with the maximum flue resistance each boiler can work against These may be used to calculate the total flue resistance of the system and to determine if they are acceptable to run on the boiler Multipl...

Page 14: ...s FLUE OUTLET Evomax vertical concentric flue application maximum lengths and pressure differentials Model 30 30P 40 40P 60 60P 80 80P 100 120 150 Max flue length m 42 42 7 5 12 20 17 6 7 5 Max flue press diff Pa 140 200 117 260 220 288 290 Flue Size 80 125 100 150 Vertical flue kit No 158654 158656 Evomax 60 80 vertical concentric flues of longer length Model 60 60P 80 80P Max flue length m 30 35...

Page 15: ... elbow concentric 152618 152619 n a n a 3 90o elbow n a n a 158773 158774 4 45o elbow pair n a n a 158775 158776 5 Flat Weather Collar 152611 152612 158780 158780 6 Pitched Weather Collar 152609 152610 158779 158779 7 1m Extension concentric 152400 152401 n a n a 8 1m Extension pair n a n a 158771 158772 9 Increaser 80 100 n a n a 152404 n a 206210 5757 1 2 5 3 4 6 7 8 9 ...

Page 16: ...100 3 3 172 4 3 Horizontal wall kit 80 125 90 21 6 45 7 86 6 2 135 4 8 Horizontal wall kit 100 150 90 30 7 6 70 8 65 3 5 100 3 3 Pipes Elbows 45 bend 80 125 3 5 1 1 7 5 1 1 13 5 1 1 22 1 1 45 bend 100 150 8 1 2 15 1 2 24 1 2 35 1 2 50 1 2 90 bend 80 125 7 0 1 6 14 0 1 6 25 1 6 40 1 6 90 bend 100 150 13 2 23 2 37 2 50 2 75 2 Straight 1m length 80 125 3 3 1 4 8 1 15 6 1 21 7 1 Straight 1m length 100...

Page 17: ...0 125 Vertical Flue Kit 80 125 135 4 8 2 x 1m extension flue 2 x 21 7 2 x 1 2 x 45º elbow 2 x 22 2 x 1 1 Total Flue Resistance 222 9 Horizontal Flue for Evomax 40 Resistance Pa Resistance m Flue Size 80 125 80 125 Horizontal Wall Flue Kit 80 125 45 7 2 x 1m extension flue 2 x 4 8 2 x 1 1 x 90º elbow 14 1 6 Total Flue Resistance 68 6 10 6 19 Examples of CALCULATING FLUE RESISTANCES LENGTHS EXAMPLE ...

Page 18: ...MPLE 4 The total maximum flue resistance for an Evomax 120 is 288 Pa or 17 6m 100 150 Therefore this installation is acceptable Example 4 FLUE OUTLET Horizontal Flue for Evomax 120 Resistance Pa Resistance m Flue Size 100 150 100 150 Horizontal Wall Flue Kit 100 150 100 3 3 2 x 1m extension flue 2 x 16 4 2 x 1 1 x 90º elbow 50 2 Total Flue Resistance 183 7 3 Open Flue for Evomax 30 Resistance m Fl...

Page 19: ... duct it is important that the inner duct is maintained at 20mm longer than the outer duct to allow correct connection of the ducts Care should be taken to support the inner duct when cutting the flue Note Horizontal flue runs must be angled down between 1 5o 3o towards the boiler to allow the condensate to drain For this reason it is recommended that a support bracket is used for every 1m of exte...

Page 20: ...ing in the car port into the building Vertically from a terminal on the same wall Horizontally from a terminal on the same wall 300 mm 300 mm 300 mm 75 mm 200 mm 200 mm 150 mm 300 mm 300 mm 600 mm 1200 mm 1200 mm 1500 mm 300 mm 12 12 12 3 8 8 6 12 12 24 48 48 60 12 300 mm 500 mm 500 mm 500 mm 1000 mm 2000 mm 600 mm 12 20 20 20 40 80 24 A B C D E F G H I J K L M N Minimum spacing Concentric Roof Te...

Page 21: ...its Heat output to a maximum of 600kW can be achieved by cascading up to six Evomax boilers This can be achieved by the use of Evomax multiple boiler Frame Header Option Kits Boilers can be fitted either side by side or back to back using Frame Header Option Kits INSTALLATION ...

Page 22: ...N 7 Flue gas terminal 8 Drain cock 9 Shunt pump 10 Room Sensor 3 3 3 2 3 2 1 3 3 2 1 9 9 9 1 6 4 6 10 6 7 5 206210 10275 8 8 8 The condensate trap provided within the hardware pack must be connected to the condensate drain on the bottom of the boiler and then connected to a drainage point preferably within the building The pipe size from the condensate trap is 25mm The routing of the drain must be...

Page 23: ...oil and vent stack Make connection to SVP using a solvent welded saddle BOILER External wall Ground Level Open end of pipe direct into gulley below grating but above water level DRAIN cla7775 3 Termination to soak away 5 termination to drain gully BOILER External wall Ground Level Termination to Soak away cla7774 minimum 500mm BOILER esp8882 BOILER cla7771a DRAIN Ground Level Open end of pipe dire...

Page 24: ...erminated with a 1 1 4 BSP male taper connection located at the bottom of the appliance Note This appliance is NOT suitable for use with a direct hot water cylinder Plastic plugs fitted into the open ends of the flow and return pipes must be removed before connecting the system pipework 30 Frost Protection The Evomax boiler has built into its control system the facility to protect the boiler only ...

Page 25: ...odulating sequencer kit a bms outside temperature sensor DHW demand can be controlled by 230V programmer and or cylinder thermostat tank sensor kit The electrical supply and their inputs onto the boiler can be seen in Frame 34 4 An optional outside temperature sensor may be fitted for outside weather compensation See Frame 34 for connection details Warning This appliance MUST be efficiently earthe...

Page 26: ... connections as appropriate e g Grundfos 40 60 UPS is satisfactory If the current draw is more than this eg a Grundfos 40 120 UPS then an external relay should be operated by the CH Pump or DHW Pump connections with the external relay then powering the pump 2 The Lockout Volt Free Relay contacts will close 4 minutes after a Fault occurs 3 The Burner On Volt Free Relay contacts will close when the ...

Page 27: ...6210b Fan Flow Thermistor Return Thermistor Flame Sensor Electrode Spark Electrode Spark Generator PCB Gas Valve Water Pressure Switch Diagnostic Connection Chassis Earth w bk bk bk bk br b b b b b b r r r bk bk bk bk bk bk bk bk bk pk or or bk y y b r pk gry pk y g y g y g y g y g y g y g y br br g y br br br b br br br br r bk LEGEND b blue bk black br brown r red pk pink y yellow w white y g ye...

Page 28: ...screen similar to the following will be displayed line 5 may vary depending on setup Line 5 indicates Switched Live or OpenTherm or 0 10V depending on which controls are connected to the boiler Hot Water DHW Switched Live On Burner On DHW Thermostat Flow Temp 80 C Domestic Hot Water Mode DHW Thermostat If there is an ongoing Domestic Hot Water Demand using a DHW Thermostat screens similar to the f...

Page 29: ...perates See Frame 42 for adjusting the system frost protection temperature setpoint Cylinder Frost Protect Burner Power 100 Outside Temp 10 C Frost Setpoint 5 C Hot Water Temp 4 C Cylinder Frost Protection Mode If a Domestic Hot Water Thermistor is connected to the boiler and the DHW temperature drops below 5C a screen similar to the following will be displayed Line 3 indicates the current operati...

Page 30: ...nd press SELECT to return to normal operation Ideal Evomax 80kW Normal Operation Set Flow Temp Set DHW Temp Press SELECT and a screen similar to the following will be displayed The kW output number in the 1st line will vary depending the maximum output of the boiler Ideal Evomax 80kW Set DHW Temp Set Off Sum Win Out Sensor Slope Normal Operation Rotate KNOB clockwise until a screen similar to foll...

Page 31: ...puts will vary as the boiler operates Press SELECT to exit this option Rotate the KNOB anti clockwise until Normal Operation is highlighted again and press SELECT to return to normal operation Viewing the Fault History of the Boiler Press SELECT and a screen similar to the following will be displayed The kW output number in the 1st line will vary depending the maximum output of the boiler Ideal Ev...

Page 32: ...0 10V Input 0 10V Off 0 10V Capacity 0 10V Temperature Press and to change to the required setting and then press ENTER to store Rotate the KNOB anti clockwise until Normal Operation is highlighted again and press SELECT to return to normal operation 10000 9000 8000 7000 6000 5000 4000 3000 2000 1000 0 Minimum CH Fan Speed Maximum CH Fan Speed Heat request is OFF Capacity Control 0 10V Capacity Co...

Page 33: ...ster Press SELECT and the following screen will be displayed Set Night Setback On Off Press and to change to required setting and then press ENTER to store Rotate the KNOB anti clockwise until Normal Operation is highlighted again and press SELECT to return to normal operation Installer Mode Normal Operation Set Flow Temp Set DHW Temp Note Booster Function is only operational if Outside Sensor has...

Page 34: ... Operation Set Flow Temp Set DHW Temp Note that System Frost Protection Function is only operational if an Outside Sensor has been connected The CH pump is switched on if the Outside Temp is less than the System Frost Protection Temp The CH pump is switched off if the Outside Temp is more than the System Frost Protection Temp 5 C The boiler default setting is the system frost protection temp setpo...

Page 35: ... O S Room Temp 20ºC Press and to change to required setting press ENTER to store Rotate the KNOB clockwise until Normal Operation is highlighted again and press SELECT to return to normal operation Reverting to Factory Settings Installer Mode Normal Operation Set Flow Temp Set DHW Temp Press SELECT hold and together for more than 5s the following screen will be displayed Rotate the KNOB clockwise ...

Page 36: ...eration is highlighted again and press SELECT to return to normal operation Changing the Volt Free Burner On Relay to Operate as an LPG Relay for below Ground Level LPG applications Installer Mode Normal Operation Set Flow Temp Set DHW Temp If LPG is to be used in an application below ground level then an additional valve is required to control the LPG input to the boiler This valve should be wire...

Page 37: ...the link from position 9 to position 10 in the installer terminal block should be removed and a wire added from position 10 to the DHW Call input on the boiler Note that a hydraulic bypass is required to allow pump overrun Note that a Frost Stat can be connected into CH call S Plan Valve g g b b g y g y br o o br 46 Evomax with Y plan system Pump Boiler Y Plan Valve L Timer Fused Spur N L N CH On ...

Page 38: ... into CH Call INSTALLATION 48 Evomax with boiler control of Pump and diverter valve Pump CH Pump Timer L N CH On HW On Boiler DHW Pump Fused Spur L N E C S R S 206210 10233 Note 1 The boiler can use an Outside Sensor which is available from Ideal as a Weather Compensation Kit Note 2 The boiler can use a Tank Sensor rather than a Cylinder Thermostat which is available from Ideal as a kit Note 3 A h...

Page 39: ...ntrols Fused Spur L N E 206210 10236 External Controls via OpenTherm External Controls via 0 10V Input External Controls via Switched Live Note that the boiler requires a 4 minute pump overrun period The boiler warranty will be invalid if this is not provided It is recommended that the pump overrun functionality is achieved by connecting the pump to the boiler CH Pump connections see diagram altho...

Page 40: ...missioning and Testing A Electrical Installation 1 Checks to ensure electrical safety should be carried out by a competent person 2 ALWAYS carry out the preliminary electrical system checks i e earth continuity polarity resistance to earth and short circuit using a suitable meter WARNING Whilst effecting the required gas soundness test and purging air from the gas installation open all windows and...

Page 41: ...r is set for winter operation see Evomax user interface basic operating instructions 7 The boiler will commence the ignition sequence If after 5 attempts the boiler has failed to light then it will lock out Press the reset button to restart the ignition sequence 8 Operate the boiler for 10 minutes and check the gas rate Table 1 You should be able to read at least 90 of the nominal Evomax Flue CO2 ...

Page 42: ...he kit 53 General Checks 54 Handing Over IMPORTANT Point out to the owner that the boiler must have regular maintenance and cleaning at least annually in order to ensure reliable and efficient operation Regular attention will also prolong the life of the boiler and should preferably be performed at the end of the heating season After servicing complete the service section of the log book and retur...

Page 43: ...to Frames 59 and 60 5 Inspect the heat exchanger through the burner opening If there are signs of aluminium oxide build up spray water down the flueways Refer to Frame 60 6 Remove the sump cover and scrape out any deposits Refer to Frame 61 7 Remove the condensate trap and flush through with water Refer to Frame 62 8 Check that the flue terminal is unobstructed and that the flue system is sealed c...

Page 44: ... elbow fixing screws and remove elbow by pulling downwards 7 Disconnect the electrical connections from the gas valve s 8 Disconnect the electrical connections from the fan 9 Undo the gas valve union nut nuts and retain the fibre washer s 10 Remove the four nuts washers or screws depending upon boiler size retaining the fan assembly and remove the fan assembly 11 Inspect clean as necessary 12 Re a...

Page 45: ...5 2 Remove the front panel Refer to frame 57 3 Remove the fan and gas assembly Refer to frame 58 4 Remove the burner Refer to frame 59 5 Remove the ignition and detection electrodes Refer to frame 66 67 6 Inspect the heat exchanger for signs of aluminium oxide deposits If necessary clean the heat exchanger by spraying water down the flue ways 7 Reassemble in reverse order replacing all gaskets 8 C...

Page 46: ...er venturi and gas valve assembly to the new fan 8 Reassemble in reverse order replacing all gaskets 9 Check the operation of the boiler Refer to frame 55 Evomax 30 40 60 Evomax 80 Evomax 100 Evomax 120 Evomax 150 206210 10389_2 4 5 4 4 4 4 6 6 Model 30 30P 40 40P 60 60P 80 80P 100 120 150 176272 176272 176272 176272 176272 176272 176273 176273 176273 176274 176274 176359 176359 176360 176360 1763...

Page 47: ...ge to gas valve transfer to new valve 100 120 only 9 Fit new gas valve to venturi using the new seal provided ensure gas injector is fitted correctly 10 Reassemble in reverse order replacing all gaskets 11 Check the operation of the boiler Refer to frame 55 Evomax 30 40 60 Evomax 80 Evomax 100 Evomax 120 206210 10389_3 Evomax 150 7 7 4 6 4 6 8 8 8 8 8 176272 176272 176272 176272 176272 176272 1762...

Page 48: ...ve the front panel Refer to frame 57 3 Pull off the spark lead and earth connection 4 Remove the two retaining cap head screws 5 Pull out the electrode and pull off the old gasket 6 Replace with new electrode and gasket supplied checking the spark gap is 4mm 7 Reassemble in reverse order 8 Check the operation of the boiler Refer to frame 55 1 Refer to Frame 55 2 Remove the front panel Refer to fra...

Page 49: ...the boiler 4 Disconnect the electrical connections from the switch 5 Unscrew the water pressure switch 6 Refit new switch 7 Connect electrical connections 8 Refill the system ensuring all the air escapes via the air vent 9 Reassemble in reverse order 10 Check the operation of the boiler Refer to frame 55 70 Flow Return Thermistor Replacement 1 Refer to Frame 55 2 Remove the front panel Refer to Fr...

Page 50: ...k the operation of the boiler Refer to Frame 55 4 72 User Interface Board 1 Refer to Frame 55 2 Remove the upper front panel put the control panel into the service position Refer to Frame 57 3 Fit the earth strap provided with the spare PCB to your wrist and to a suitable earthed metal 4 Pull off all of the main PCB edge connectors refer to Frame 71 5 Remove the four plastic nuts retaining the mai...

Page 51: ...CylinderThermistor Fault Ext Interlock Off External Interlock Operated Reset Interlock Go to Frame 85 Ext Interlock Off Ignition Lockout Check Gas to Boiler Check Condensate Pipe Refer to Instructions Reset Boiler False Flame Lockout Check Flame Sense Electrode Check Flame Sense Electrode Wiring Low Water Pressure Fill System to 1 Bar Vent System Flame Loss Check Gas to Boiler Check Condensate Pip...

Page 52: ...heck gas supply and rectify fault no yes Is the following voltage available at the Gas Valve approximately 215Vdc for 30 40 60 80 and 150kW approximately 240Vac for 100 and 120kW See note Check wiring from Gas Valve to PCB and replace if necessary otherwise replace the main PCB no yes Unplug the Gas Valve is the resistance between the outside pins between 1kΩ and 10kΩ Replace Gas Valve no yes Chec...

Page 53: ...te Pipe is blocked Check if the Flue is blocked Replace as necessary yes If the boiler is Reset does the boiler Ignite for a short time and then Extinguish no Check Gas Supply and rectify fault no Is the Gas Pressure available at the boiler 18mBar yes Is the following voltage available at the Gas Valve approximately 215Vdc for 30 40 60 80 and 150kW approximately 240Vac for 100 and 120kW See note C...

Page 54: ... suitable multimeter connected across the thermistor s terminal pins At 25 C expect 9 700 10 300 Ω At 60 C expect 2 400 2 600 Ω At 85 C expect 1 000 1 100 Ω Is the thermistor value correct yes Check and replace wiring as necessary Replace main PCB no yes Is there continuity between the PCB and the Thermistor 81 Return Thermistor Fault Fit a new thermistor no Remove the Return Thermistor from the C...

Page 55: ...C expect 19 000 21 000 W At 20 C expect 12 000 13 000 W Is the thermistor value correct yes Ensure the wiring has continuity and is securely connected no Does the Outside Sensor wiring between the boiler terminal strip and the PCB have continuity and is securely connected yes Replace main PCB Securely connect the wiring at both the boiler and Outside sensor no Is the wiring securely connected at b...

Page 56: ...tor no Is the wiring securely connected at both the boiler and cylinder thermistor yes 85 External Interlock off Is an External Interlock connected to the boiler yes Has the External Interlock operated no Does the wiring from the Interlock Relay mounted within the boiler to the terminal strip have continuity and is securely connected Replace the Interlock Relay Kit Ensure that a link wire is secur...

Page 57: ...evice connected to the boiler note that the Ideal Prog Room Stat is an OpenTherm device Does the wiring from the boiler to the OpenTherm device have continuity yes no Rectify wiring from boiler to OpenTherm device no Is there 230Vac at A There is no voltage from the Timer Room Stat This is not a boiler fault Ensure voltage is supplied to the boiler by correcting external wiring no yes Is there 230...

Page 58: ... for a Power Closed Diverter Valve no no Set boiler correctly See page 41 yes Is there 230Vac at D Check wiring from PCB to D no yes yes Does wiring to external DHW Pump have continuity and is to the correct connections Rectify wiring to external DHW pump valve no yes Is the DHW Pump Valve stuck Replace the DHW pump valve no D C yes Is the boiler set for DHW priority default setting Set boiler for...

Page 59: ...main PCB connected securely yes yes Connect the cable from the main PCB to the user interface PCB securely no Is the cable from the main PCB to the user interface PCB connected securely yes yes Replace cable from main PCB to user interface PCB no Does the cable from the main PCB to the user interface PCB have continuity and is un damaged yes yes Check for shorts on Pumps Diverter Valve Fan Spark G...

Page 60: ... to Winter Mode see Frame 36 no Is the boiler set to Winter Mode yes yes Ensure between 2V and 10V is correctly connected to these terminals from the external device no Is a voltage of between 2V and 10V being supplied to F with positive and negative connected correctly yes yes Ensure that the wiring is securely connected and has continuity no Is the wiring from the boiler terminal strip to the ma...

Page 61: ...kW 1 176365 207 Burner Seal kit 150kW 1 176366 208 Burner Fixings Kit 1 176367 230 Fan 30 40 60kW 1 176272 230 Fan 80 00kW 1 176273 230 Fan 120 150kW 1 176274 231 Gas Valve Kit 30 40 60 80 150kW 1 176313 231 Gas Valve Kit 100 120kW 1 176358 232 Venturi Kit 30kW 1 176359 232 Venturi Kit 40kW 1 176360 232 Venturi Kit 60kW 1 176361 232 Venturi Kit 80 150kW 1 176362 232 Venturi 100kW 1 175232 232 Vent...

Page 62: ...r Technical Helpline 01482 498 376 www idealheating com Ideal Boilers P O Box 103 National Ave Kingston upon Hull HU5 4JN Telephone 01482 492 251 Fax 01482 448 858 Registration No London 322 137 Ideal Stelrad Group pursues a policy of continuing improvement in the design and performance of its products The right is therefore reserved to vary specification without notice For additional fault findin...

Reviews: