29
Mexico Super RS485 - RS4125 -
Installation & Servicing
SERVICING
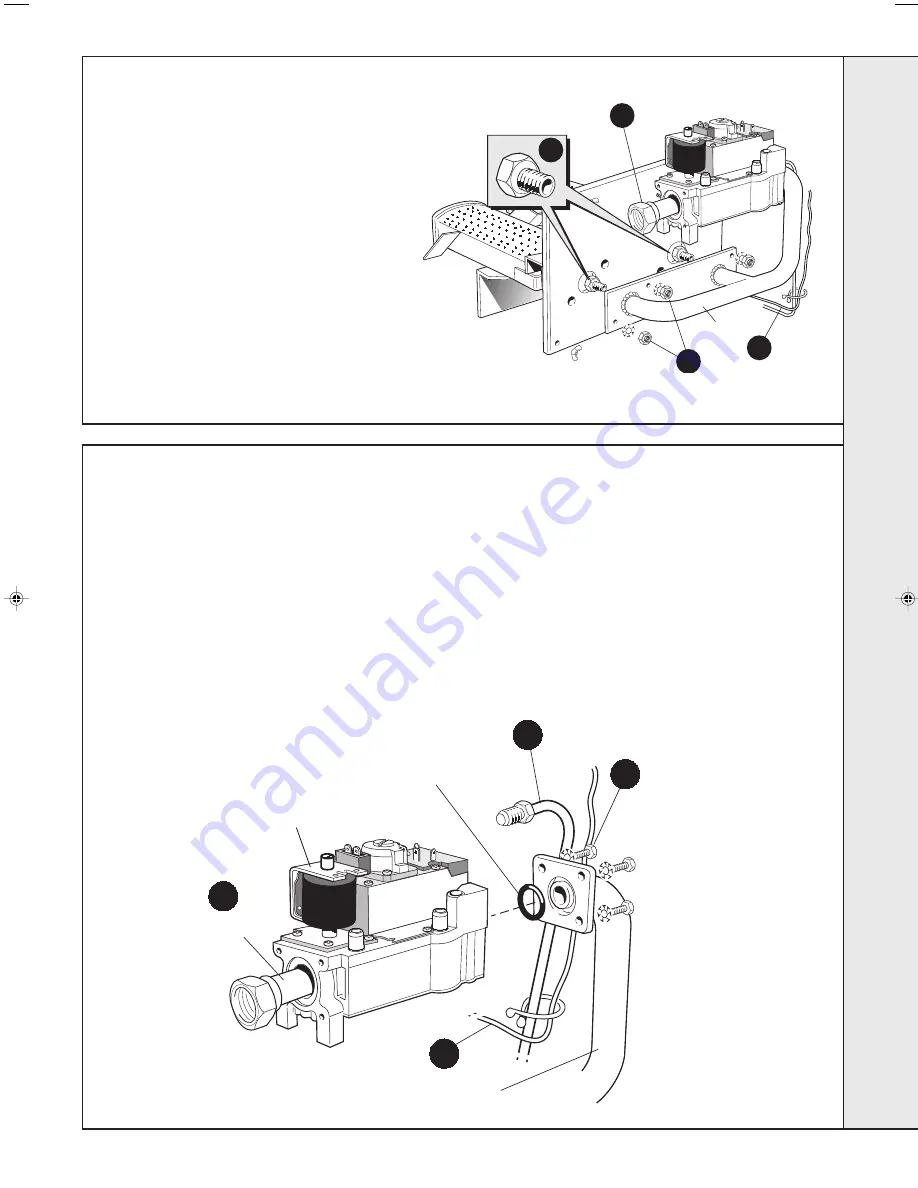
46 MAIN BURNER INJECTOR REPLACEMENT
Burner
manifold
MEX 2185
7
5
Ignition
lead
8
4
47 GAS VALVE REPLACEMENT
7
1.
Refer to Frame 37.
2.
Remove the 2 screws, lift off the lower front panel
then remove the grille assembly. Refer to Frame
31.
3.
Disconnect the electrical leads from the gas
valve.
4.
Undo the gas cock union. Remove the 4 wing
nuts and withdraw the burner and controls
assembly, complete, from the boiler.
5.
Disconnect the ignition lead from the PCB.
6.
Undo the pilot supply connection.
7.
Undo the manifold securing nuts and remove the
manifold from the front plate.
8.
Unscrew the burner injector from the manifold.
9.
Fit the new injector, using an approved jointing
compound, and reassemble in reverse order.
Gas control
valve
Gas inlet
pipe
Pilot supply connection
MEX 2217
Burner manifold
6
7
4
8
'O' ring seal
Securing
screws
1.
Refer to Frame 37.
2.
Remove the 2 screws, lift off the lower front panel then
remove the grille assembly. Refer to Frame 31.
3.
Disconnect the electrical leads from the gas valve.
4.
Disconnect the ignition lead from the PCB.
5.
Undo the gas cock union. Remove the 4 wing nuts and
withdraw the burner and controls assembly, complete, from
the boiler.
6.
Undo the pilot supply connection.
7.
Unscrew the gas inlet pipe from the valve.
8.
Remove the 4 securing screws and withdraw the valve
from the burner manifold.
9.
Fit the new gas valve, ensuring that:
a.
The valve is fitted the correct way round - an arrow
engraved on the valve indicates the direction of flow.
b.
The sealing 'O' ring supplied with the valve is
correctly fitted at the outlet flange.
c.
An approved jointing compound is used when
reconnecting the gas inlet pipe.
SER
VICING
200942-1.p65
3/4/2004, 9:25 AM
29


