background image

Q

U

IC

K

 S

ET

U

P

SE

R

V

ER


13


STEP 5

 QUICK SETUP, SERVER


Access The Configurator


1.


Connect your device (Phone, Tablet or Laptop) to the chargers 
Wi

-

Fi. You will see the charger produces it’s own Wi

-

Fi network 

(ICS

-

2.4GHz

-

*******) connect to this network using the default 

password which is “ics654321”. This information can be found 
on the sticker on the side of the unit.


2.


Open the web

-

based setup page by entering the IP address 

192.168.10.1:8080 and enter the username and password: 
USERNAME: install


PASSWORD: icspass21


3.


Click the ‘Basic’ tab and follow the instructions below.


Offline Mode:


If smart functionality is not required then turn on the Offline 
mode by selecting ‘Offline’ from the drop down, If smart features 
are required, ensure that this mode is left as ‘Online’


Pre

-

set Server:


This is where you select what server you would like the charger 
to connect to either ICS2.0 Lite, ICS2.0 or a third party OCPP.


Check the OCPP Identity is the same as the serial number of the 
charger.


Q

U

IC

K

 S

ET

U

P

N

ET

W

O

R

K


14


STEP 6

 QUICK SETUP, NETWORK
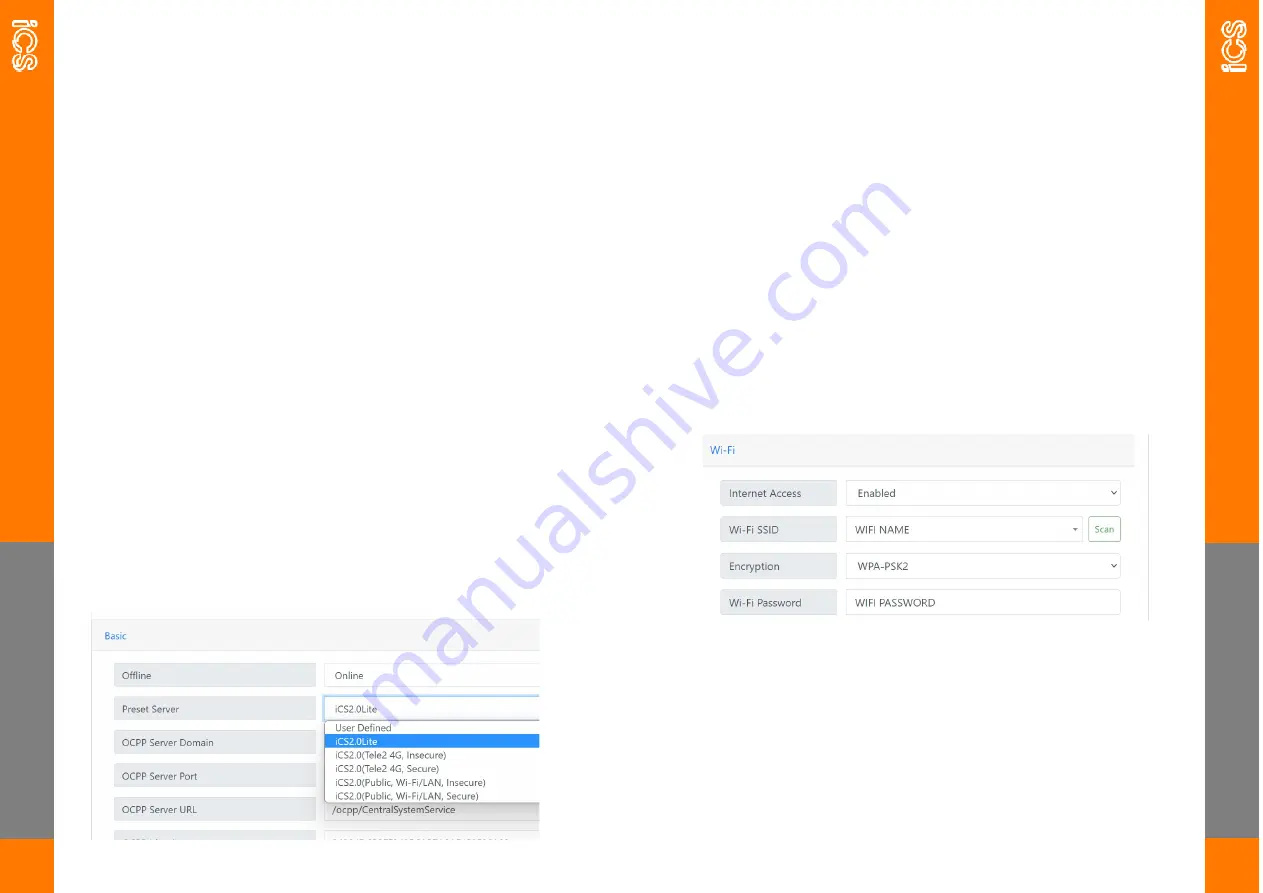
 

Network Setup


Navigate to the ‘Network’ tab in the user configuration page.


Ethernet  Setup:


When an ethernet cable is plugged into the charger it will use 
DHCP and connect to the network automatically.


Wi

-

Fi Setup:


Internet Access should be set as enabled to allow you to connect 
the charger to Wi

-

Fi.


Wi

-

Fi SSID press the scan button and then select the Wi

-

Fi from 

the drop down list.


Wi

-

Fi Password type in the Wi

-

Fi Password.


4G Setup:


If the unit has a SIM card inserted then enable the 4G and fill out 
the information as per information provided by the SIM card op-
erator. If the unit is connecting to ICS2.0 then this information 
will be pre populated using the pre

-

set server drop down.


After any changes, press the green submit button and 
then the red reboot button at the bottom of the page.


Summary of Contents for ICSW7C

Page 1: ...RICIAN THE ENTIRE INSTALLATION MUST COMPLY WITH THE LATEST BS 7671 REGULATIONS CONTENTS CONTENTS SPECIFICATIONS 1 FEATURES 2 4 SAFETY 5 6 INSTALLATION 8 22 Step 1 Check the box contents 8 Step 2 Wall...

Page 2: ...EATURES 2 PME EARTH FAULT MONITORING The charger has been developed for installations to meet and comply with wiring regulations BS7671 2018 including amendment 1 2020 If installed on a TN C S PME sys...

Page 3: ...otected by an external Residual Current Device RCD to be installed in the upstream circuit which complies with the following Rated residual operating current not exceeding 30mA Type A Complies with on...

Page 4: ...nsulation or displays any other indication of damage Do not use this charger if the enclosure or the EV charging connector is broken cracked open or shows any other indication of damage This document...

Page 5: ...Step 2 Wall mounting and wiring Step 3 Install the charger Step 4 Verify the installation Step 5 Quick Setup Server Step 6 Quick Setup Network Step 7 Further con guration Scan the QR code below to vie...

Page 6: ...junction box and if required an ethernet cable to the WAN port Secure the cable with the securing clip no additional glands are required INSTALLATION 10 Notes Electrical connection There are four poss...

Page 7: ...essing the button highlighted in red in Step 3 2 lift the bottom section of the cover towards you Once removed you will see a SIM card slot on the right hand side of the charger insert the SIM card an...

Page 8: ...ou would like the charger to connect to either ICS2 0 Lite ICS2 0 or a third party OCPP Check the OCPP Identity is the same as the serial number of the charger QUICK SETUP NETWORK 14 STEP 6 QUICK SETU...

Page 9: ...ed by them OCPP Server Port this is prepopulated when using the Preset Server drop down if connecting to a third party OCPP server this information will be provided by them OCPP Server URL this is pre...

Page 10: ...SSID or press the scan button and select the network from the drop down Encryption this relates to the type of encryption the Wi Fi network has Set this to no encryption if the network has no password...

Page 11: ...ons to be started by pressing the button on the charger Software Switcher Default LCD Display RFID when unticked the chargers default screen will be connect the charging plug RFID Big Endian should re...

Page 12: ...ightness the brightness of the screen when idle 0 5 Active Brightness the brightness of the screen when active 0 5 Charging Brightness the brightness of the screen when charging 0 5 LED BALANCE 22 LED...

Page 13: ...lug Charging in progress Suspended by EV Suspended by EVSE Remove the charging plug Automatic upgrade mode Software downloading INFORMATION 24 Network upgrade mode Micro SD upgrade mode Software updat...

Page 14: ...s contact iCS for technical support Issue The status light does not ash when the charger is connected to the EV 1 Unplug the charging plug and reconnect it fully to the receptacle on the EV 2 Inspect...

Page 15: ...up process as well as giving you more information about other products we have to offer ICS2 0 Our market leading software intelligently controls and manages your EV network Charging stations are admi...

Page 16: ......

Reviews: