background image

5.2  Utility introduction 


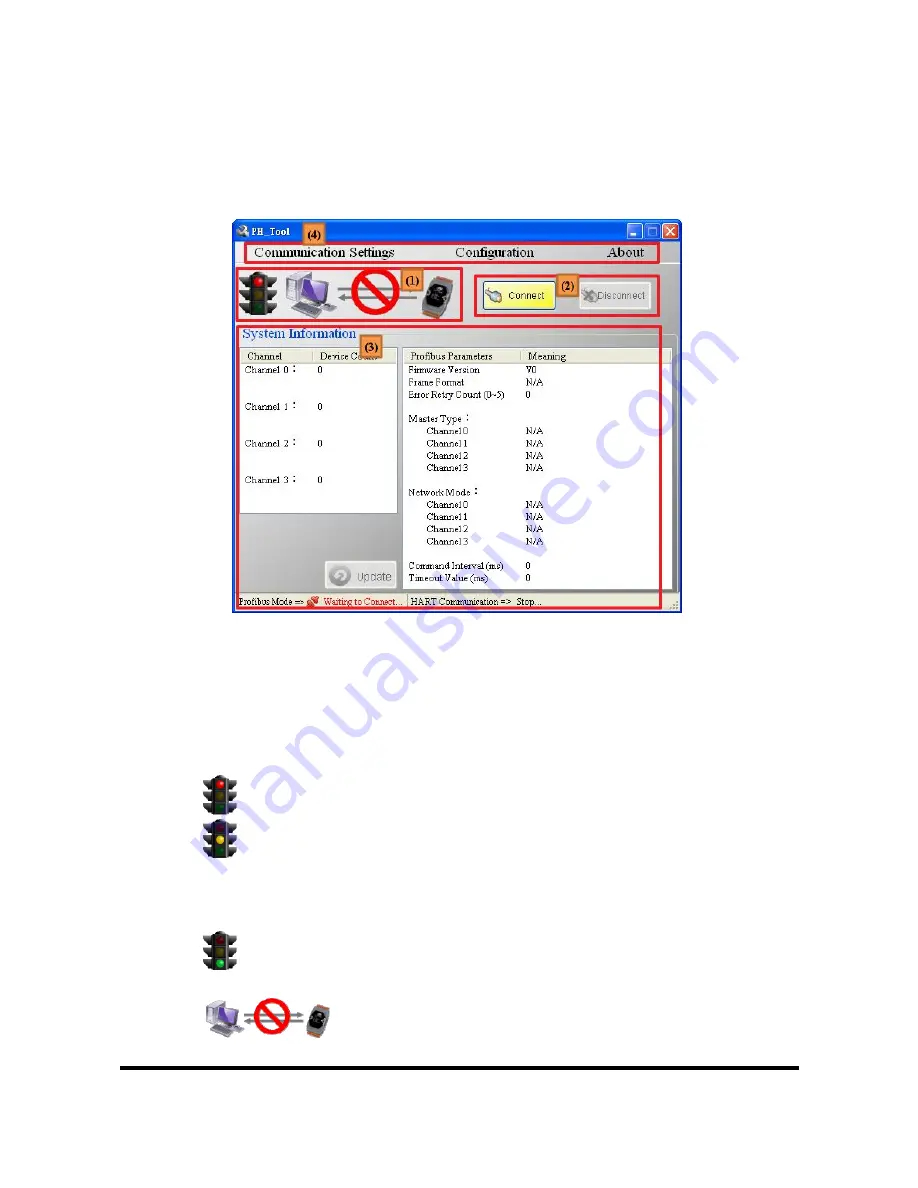
It introduces main window of the utility first, as shown in 

Figure 54


Figure 54    Main window of the utility 


Main window of the utility has 4 parts, they are (1)Connection status

(2)Connection control

(3)System information

and (4)Tools, as shown in the 

below. 


5.2.1  Connection status


=> It means the com port of PC has not been opened yet. 


  => 1. It means the com port of PC is open and PROFIBUS is in   

Offline state. 

2. It means the com port of PC is open and trying to connect with 

the GW-7557 


  => It means the PC connects with the GW-7557 successfully and   

PROFIBUS is in Operate state. 


  => It means the com port of PC has not been opened yet. 


GW-7557 PROFIBUS/HART Gateway User Manual 

(Version 1.00, Dec/2011)     

    PAGE: 58 

Summary of Contents for ICP CON GW-7557

Page 1: ...GW 7557 PROFIBUS HART Gateway User s Manual GW 7557 PROFIBUS HART Gateway User Manual Version 1 00 Dec 2011 PAGE 1 High Quality Industrial Data Acquisition and Control Products...

Page 2: ...reserves the right to change this manual at any time without notice The information furnished by ICP DAS is believed to be accurate and reliable However no responsibility is assumed by ICP DAS for its...

Page 3: ...exchange 19 3 3 Communication protocol transfer 20 4 Communication 23 4 1 Field of application 23 4 2 GSD file 24 4 3 The Configuration of the common parameters 26 4 4 The Configuration of the module...

Page 4: ...plication example for the GW 7557 module Figure 1 Application architecture of the GW 7557 module The GW 7557 gateway is specially designed for the slave device of PROFIBUS DP protocol In the HART appl...

Page 5: ...500Vrms High Speed iCoupler Isolation Protection for PROFIBUS network 3000VDC Isolation Protection on the PROFIBUS side Provide LED indicators Built in Watchdog Mountable on DIN Rail 1 2 Specification...

Page 6: ...r Voltage brown out protection Power consumption 2 0W Module specs Dimensions 119mm x 72mm x 33mm Operating temperature 25 75 C Storage temperature 30 85 C Humidity 5 95 RH non condensing LED Status I...

Page 7: ...2 Hardware 2 1 Block Diagram of GW 7557 Figure 2 Block diagram of GW 7557 2 2 Pin Assignment Figure 3 Pin assignment of GW 7557 GW 7557 PROFIBUS HART Gateway User Manual Version 1 00 Dec 2011 PAGE 7...

Page 8: ...ansmit Data of RS 232 11 GND GND of RS 232 12 INIT Initial Pin 13 VS V of Power Supply 10 30 VDC 14 GND GND of Power Supply Table 3 PROFIBUS DB9 Female Connector Pin Name Description 1 N A 2 N A 3 B N...

Page 9: ...a DB9 female connector The connector uses the standard PROFIBUS 9 pin assignment It is recommended to use a standard PROFIBUS cable and connector DB9 male As with every serial bus the rate of safe dat...

Page 10: ...ignal transmission both ends first node and last node of a PROFIBUS segment needs to be equipped with an active terminal resistor as shown in Figure 5 A standard PROFIBUS connector is usually already...

Page 11: ...the PROFIBUS specification up to 32 stations are allowed per segment A repeater has to be used to link the bus segments 2 3 3 HART connection The HART connection is divided into two types Loop Power S...

Page 12: ...Figure 8 Loop Power Source 2 Figure 9 Loop Power Source 3 GW 7557 PROFIBUS HART Gateway User Manual Version 1 00 Dec 2011 PAGE 12...

Page 13: ...s of setting the station address by using the DIP switch The DIP switches are accessed by opening the modules housing Figure 11 Table 6 explains which address will be used by the module after power on...

Page 14: ...er to be able to communicate with the master To change the address by using the configuration tool it is necessary to first set the address that stored in the EEPROM to 126 This is done by setting the...

Page 15: ...ing or receiving HART frame on Power supply is ok The firmware has loaded PWR off Power supply has failed flash When the GW 7557 connects with the utility tool it will flash fast flash once about 55ms...

Page 16: ...needs to set the DIP switch to the Normal position If the user forgets the communication settings of COM port The user can sets the DIP switch to the Setting position the communication settings of CO...

Page 17: ...l connect to HART channel 0 When the pin 2 3 of JP5 is closed it will disconnect the resistor from HART channel 0 By default the pin1 2 of JP5 is closed Please refer to section 2 3 3 HART connection f...

Page 18: ...hen configured and finally it goes into the data exchange mode Figure 15 Figure 15 State machine of PROFIBUS DP Slave device The GW 7557 exchanges data cyclically between internal Output Queue Input Q...

Page 19: ...ter device have different data type and data address the GW 7557 can transfer different data format to PROFIBUS master device through module parameters 3 2 HART data exchange HART protocol belongs to...

Page 20: ...derstand that data exchange is through Output Queue Input Queue of the GW 7557 between PROFIBUS Master HART slave devices and the GW 7557 The data exchange runs continuously between PROFIBUS master HA...

Page 21: ...Figure 18 GW 7557 communication protocol transfers GW 7557 PROFIBUS HART Gateway User Manual Version 1 00 Dec 2011 PAGE 21...

Page 22: ...Figure 19 GW 7557 flowchart GW 7557 PROFIBUS HART Gateway User Manual Version 1 00 Dec 2011 PAGE 22...

Page 23: ...smart device The system can be a mono master system Figure 20 or a multi master system Figure 21 The GW 7557 enables the integration of the HART slave devices into a PROFIBUS DP network Figure 20 Mono...

Page 24: ...CD ROM PATH CD profibus gateway gw 7557 gsd The user can copy GSD file IPDS0D61 gsd and the Bitmap file ICP_7557 bmp GW_7557 bmp to the PROFIBUS configuration tool 4 2 1 The example of how to load GSD...

Page 25: ...Project Wizard to open a new project Step 2 Double Click Hardware to open HW Config Step 3 Click Install GSD File Step 4 Select the directory of GW 7557 s GSD file IPDS0D61 gsd GW 7557 PROFIBUS HART G...

Page 26: ...lable 4 3 The Configuration of the common parameters GW 7557 has twelve common parameters The user can configure the common parameters to set the communication mode and data format by the PROFIBUS GW...

Page 27: ...onfiguration of HART slave devices can configure by utility tool About how to configure HART slave devices please refer to section 5 2 for detail b Error Retry Count If the HART communication has erro...

Page 28: ...odules else the GW 7557 will send the diagnostic messages to PROFIBUS Master and the system will be abnormal The modules have module parameters about the communication settings The module parameters a...

Page 29: ...n this case the user should select the following modules 1 Transparent mode The user can select a 8 Words Output module and a 8 Words Input module 2 Compact mode The user can select a Command 108 modu...

Page 30: ...is bigger than 15 the GW 7557 will not process other diagnostic message The diagnostic messages have 5 types They are Command Response Error System Setting Module Error Output Data Error Input Data Er...

Page 31: ...e and this value is less than 5 or greater than 20 then GW 7557 will set preamble length to 20 automatically and a diagnostic message Preamble length out of Range will be send by the GW 7557 to the PR...

Page 32: ...ata Description 0 1 Data The number of HART commands that have to be sent 2 3 Data The number of HART commands that have been sent 4 5 Data The number of HART commands that have been received 6 7 Data...

Page 33: ...a output command 1 0x01 Control bit 2 Data Output HART Command module select for Compact 3 0 3 Output HART channel for Transparent 4 5 20 Output preamble length for Transparent System Setting module 5...

Page 34: ...d module Output HART channel byte 3 If HART Frame Format is Transparent user can set the HART channel for HART command The range is 0 3 Output preamble length byte 4 If HART Frame Format is Transparen...

Page 35: ...ate mode GW 7557 will initial the modules Then GW 7557 allocates the memory space and waits for Set_Prm telegram The next step is waiting for Check_Cfg telegram in order If there is no error occurs GW...

Page 36: ...tep 2 Connect the RS 232 port of the GW 7557 module to a COM port of the PC and the PROFIBUS port to a PROFIBUS master Figure 23 Figure 23 Wiring diagram between PC and GW 7557 Step 3 Set the paramete...

Page 37: ...lways has to be selected otherwise no communication can be established between the gateway and the Modbus network Select Output module module In this example a 16 Words Output module is selected Selec...

Page 38: ...modules Step 5 Click Save and Compile then click Download to download the configuration into PROFIBUS master as shown in Figure 26 and Figure 27 GW 7557 PROFIBUS HART Gateway User Manual Version 1 00...

Page 39: ...ad configuration into PROFIBUS master Note In this example device configurations of HART slave device are listed as follows HART channel channel 2 Preamble length 0x07 HART frame type Long frame GW 75...

Page 40: ...iable table 1 and fill in address of PROFIBUS output area Input 0x82 0x96 0x85 0x0A 0x0B 0x42 0x01 0x00 in output data area of 16 Words Output module and input 1 0 0 2 7 8 in output data area of syste...

Page 41: ...variable table Click Monitor Modify Variables in main windows to establish variable table 2 and fill in address of PROFIBUS input area It shows 1 1 1 0 0 2 15 0 in input area of system setting module...

Page 42: ...nput are of 16 Words Input module Please refer to section 4 6 1 The value of primary variable is 0 3916812 as shown in Figure 31 and Figure 32 Figure 31 fill in address of PROFIBUS output area GW 7557...

Page 43: ...Figure 32 Response data of HART frame Note HART frame Master to Slave frame Slave to Master frame GW 7557 PROFIBUS HART Gateway User Manual Version 1 00 Dec 2011 PAGE 43...

Page 44: ...S port to a PROFIBUS master Figure 33 Step 3 Set the parameters of the GW 7557 We just need to change HART Frame Format to Compact and the default setting is being used in the other parameters for thi...

Page 45: ...nd 1 module is selected Figure 35 Select modules Figure 36 Set module parameters of Command 1 module Step 5 Click Save and Compile then click Download to download the configuration into PROFIBUS maste...

Page 46: ...iguration into PROFIBUS master Step 6 Set the device configurations of HART slave device by using PROFIBUS HART gateway utility please refer section 5 2 Step 7 Reset the power of the GW 7557 for an ac...

Page 47: ...Click Monitor Modify Variables in main windows to establish variable table 1 and fill in address of PROFIBUS input area The value of PIW0 PIW2 PIW4 increase in order and the value of PIB13 PIB19 alwa...

Page 48: ...Figure 40 Response data of Command 1 Note HART frame Master to Slave frame Slave to Master frame GW 7557 PROFIBUS HART Gateway User Manual Version 1 00 Dec 2011 PAGE 48...

Page 49: ...herwise no communication can be established between the gateway and the Modbus network Select HART Command module module In this example a Command 1 module is selected Select HART Command module modul...

Page 50: ...08 module and input 1 command 1 at PQB6 then click button to send command 108 to HART slave device for write burst mode command number After send command 108 input 2 at PQB0 input 4 at PQB2 module add...

Page 51: ...Figure 43 fill in address of PROFIBUS output area Figure 44 Send Command 108 Figure 45 Send Command 109 GW 7557 PROFIBUS HART Gateway User Manual Version 1 00 Dec 2011 PAGE 51...

Page 52: ...PIW4 increase in order and the value of PIB13 PIB19 always change It means GW 7557 receives burst frame of command 1from HART slave continuously as shown in Figure 46 and Figure 47 Figure 46 fill in...

Page 53: ...input 4 at PQB2 module address of Command 109 module and input 0 at PQB7 then click button to send command 109 to HART slave device for disable burst mode as shown in Figure 48 Figure 48 Send command...

Page 54: ...command number command 109 Burst mode control 1 enable burst mode 0 disable burst mode Output Mode of Command 108 module and Command 109 module set to Manual because command 108 and command 109 don t...

Page 55: ...www microsoft com download en details aspx id 17718 5 1 2 Setup steps Step 1 Download the PROFIBUS HART gateway utility setup file from the CD ROM disk following the path of CD profibus gateway gw 755...

Page 56: ...installation destination click Browse button to set the installation path Figure 50 Set the installation path Step 4 Click the Next button to confirm installation Figure 51 Confirm installation GW 75...

Page 57: ...igure 52 Installation complete Step 6 After finishing the installation of the PROFIBUS HART Gateway Utility users can find the Utility as shown in the following screen shot Figure 53 The path of Utili...

Page 58: ...shown in the below 5 2 1 Connection status It means the com port of PC has not been opened yet 1 It means the com port of PC is open and PROFIBUS is in Offline state 2 It means the com port of PC is...

Page 59: ...will open the com port and try to connect the GW 7557 module 2 Disconnect button When the user clicks this button the PC will break the connection of the GW 7557 and close the com port 5 2 3 System in...

Page 60: ...It means PROFIBUS is in Operate state In this state utility support Device Configuration Please refer to section 5 2 4 2 4 HART communication state 1 GW 7557 has not communicate with HART slave device...

Page 61: ...gs of PC com port by this window These settings have to be the same with the GW 7557 or else the connection will be failed Port Com 1 Com 8 Baudrate 2400 115200 bps Parity None Odd Even Data Bits 7 8...

Page 62: ...1 The node information When the user selects the node at the left side of window it will show the node information at the right side of window Value Format supports the decimal representation or the...

Page 63: ...r ID 1 byte Device Type 1 byte Device ID 3 byte Device Right click It will pop a menu the menu include Edit Device Save to File Load from File and Device Test Edit Device The user can edit HART slave...

Page 64: ...Length The user can set the preambles for HART slave device The range is 5 20 Short Address The user can set the address for HART slave device The range is 0 15 If the frame type is Long the user can...

Page 65: ...ad from File The user can click Load from File to open a load file dialog to load single HART slave device settings from a file info for backup as shown in Figure 62 Figure 62 Load from File 1 2 4 3 E...

Page 66: ...ation If the user enables this function the system will detect HART frame type address preamble length manufacturer ID device type and device ID automatically as shown in Figure 64 GW 7557 PROFIBUS HA...

Page 67: ...m that there is only one HART slave device in each HART channel or else this function will be failed 3 Operation buttons Operation buttons have 3 parts they are 1 Save to GW 7557 2 Save Project File a...

Page 68: ...tility version will show in this window as shown in Figure 67 A Save to GW 7557 The user can click Save to GW 7557 button t c B Save Project File The user can click Save Project File button to open a...

Page 69: ...Master station and GW 7557 and enter data exchange mode please refer step 1 7 of section 4 9 for detail The RUN LED of GW 7557 is going to light at this time Figure 68 The connection of Utility and G...

Page 70: ...re shown in the below Baudrate 115200 bps Data bit 8 bits Stop bit 1 bit Parity None Figure 69 COM port settings of utility Step 4 Click Connect button GW 7557 PROFIBUS HART Gateway User Manual Versio...

Page 71: ...Click Connect button Step 5 Traffic light shows green in the utility now it means the connection is successful Figure 71 Connection status GW 7557 PROFIBUS HART Gateway User Manual Version 1 00 Dec 20...

Page 72: ...st It means the GW 7557 connects with Utility 4 ERR LED indication of the GW 7557 is flashing slow It means the GW 7557 has diagnostic messages Please check diagnostic messages in the PROFIBUS Master...

Page 73: ...7 Dimensions GW 7557 PROFIBUS HART Gateway User Manual Version 1 00 Dec 2011 PAGE 73...

Page 74: ...GW 7557 PROFIBUS HART Gateway User Manual Version 1 00 Dec 2011 PAGE 74...

Page 75: ...te 6 uint8 Command set revision number Byte 7 uint8 Transmitter specific revision code Byte 8 uint8 Software revision Byte 9 uint8 Hardware revision Byte 10 uint8 Flags Byte 11 13 uint24 Device ID num...

Page 76: ...ondary Variable Byte 16 uint8 Tertiary Variable Unit code Byte 17 20 float Tertiary Variable Byte 21 uint8 4th Variable Unit code Byte 22 25 float 4th Variable Command 6 Write Polling Address Request...

Page 77: ...0 uint8 Response code 1 Byte 1 uint8 Response code 2 Byte 2 25 PA24 Message Command 13 Read Tag Descriptor Date Request data bytes none Response data bytes 2 21 23 Index format description Byte 0 uint...

Page 78: ...value Byte 9 12 float Lower range value Byte 13 16 float Damping value Byte 17 uint8 Write protect code Byte 18 uint8 Private label distribution code Command 16 Read Final Assembly Number Request data...

Page 79: ...r Byte 20 uint8 Day of month Byte 21 uint8 Month of year Byte 22 uint8 Year as offset to 1900 Command 19 Write Final Assembly Number Request data bytes 3 Index format description Byte 0 2 uint24 Final...

Reviews: