5 - 1
SECTION 5
ADJUSTMENT PROCEDURE
5-1 PREPARATION
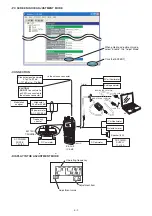
Most of adjustment must be adjusted in the "ADJUSTMENT MODE." CS-A24
CLONING SOFTWARE
(REV. 1.0 or later) and
OPC-478/U/UC
CLONING CABLE
are required.
■
REQUIRED TEST EQUIPMENT
EQUIPMENT
GRADE AND RANGE
EQUIPMENT
GRADE AND RANGE
DC power supply
Output voltage
Current capacity
: 7.2 V/11 V
: 5 A or more
Audio generator
Frequency range
Measuring range
: 300–3000 Hz
: 1–500 mV
RF power meter
(terminated type)
Measuring range
Frequency range
Impedance
SWR
: 0.1–10 W
: 100–200 MHz
: 50
Ω
: Less than 1.2 : 1
Attenuator
Power attenuation
Capacity
: 20 or 30 dB
: More than 10 W
Standard signal
generator (SSG)
Frequency range
Output level
: 0.1–300 MHz
: 0.1 µV to 32 mV
(–127 to –17 dBm)
Frequency counter
Frequency range
Frequency accuracy
Sensitivity
: 0.1–300 MHz
: ±1 ppm or better
: 100 mV or better
DC ammeter
Measuring range
: 100–500 mA
Modulation analyzer
Frequency range
Measuring range
: 30–300 MHz
: 0–100%
Distortion meter
Frequency range
Measuring range
: 1 kHz
±
5%
: 1–100%
DC voltmeter
Input impedance
: 10 M
Ω
/V DC or better
AC millivoltmeter
Measuring range
: 10mV to 10 V
External speaker
Input impedance
Capacity
: 8
Ω
: More than 1 W
DC Ammeter
Mesurring range
: 100 mA to 1 A
■
ENTERING ADJUSTMENT MODE
1. Turn transceiver’s power off. Connect IC-A24/A6 and PC
with the optional OPC-478/U/UC.
2. Right click the CS-24's icon on the desktop and select the
"Properties", then CS-24 propaties window appears.
3. Type "C:\Program File\Icom\CS-A24\CSA24.exe /expert"
on the "Target" box and double click CS-A24's icon, then
CS-A24 window appears.
4. Click [EXPERT] button, then "Expert window" appears.
Select "Enable" the "Adjust Mode" box, and then cloning.
5. Turn power OFF. Disconnect OPC-478/U/UC from the
transceiver.
6. Push and hold [CLR] and [SQL], then turn power ON.
■
OPERATING ON THE ADJUSTMENT MODE
Store the adjustment value
: [ENT]
Change the adjustment item [UP]
: [121.5]
Change the adjustment item [DOWN] : [MR]
Change the adjustment value
: [DIAL]
■
EXITING THE ADJUSTMENT MODE
When the adjustment is finished, the transceiver must be
cancelled adjustment mode to use normal operation, other-
wise the transceiver does not work properly.
1. Turn transceiver’s power OFF and then power ON again.
2. Select "Disable" the "Adjust Mode" box on cloning soft-
ware, and then cloning the original memory data.
3. Turn power OFF.
Microsoft and Windows are registered trademarks of Micro-
soft Corporation in the U.S.A. and other countries.
■
SYSTEM REQUIREMENT
• RS-232C serial port or USB port
• Microsoft
®
Windows
®
98/SE/ME/2000/XP
■
CLONING SOFTWARE INSTALLATION
1. Quit all applications when Windows is running.
2. Insert the CD into the appropriate CD drive.
3. Double-click the “Setup.exe” contained in the CD drive.
4. The “Welcome to the InstallShield Wizard for CS-A24” will
appear. Click [Next>].
5. The “User Information” will appear, then type your name,
your company name and the product ID number with the
following manner. Then click [Next >].
• ID number: 279201-(6 digit serial number)
•
e.g. the serial number on the CD is 000101, enter
“279201-000101” as the ID number.
6. The “Choose Destination Location” will appear. Then click
[Next>] to install the software to the destination folder. (e.g.
C:\Program Files\Icom\CS-A24)
7. After the installation is completed, the “InstallShield Wiz-
ard Complete” will appear. Then click [Finish].
8. Eject the CD.
9. Program group ‘CS-A24’ appears in the ‘Programs’ folder
of the start menu, and ‘CS-A24’ icon appears on the desk
top screen.
CAUTION!:
BACK UP
the originally programmed memory
data in the transceiver before starting the ad-
justment.


