background image

3

BASIC OPERATION

3-7

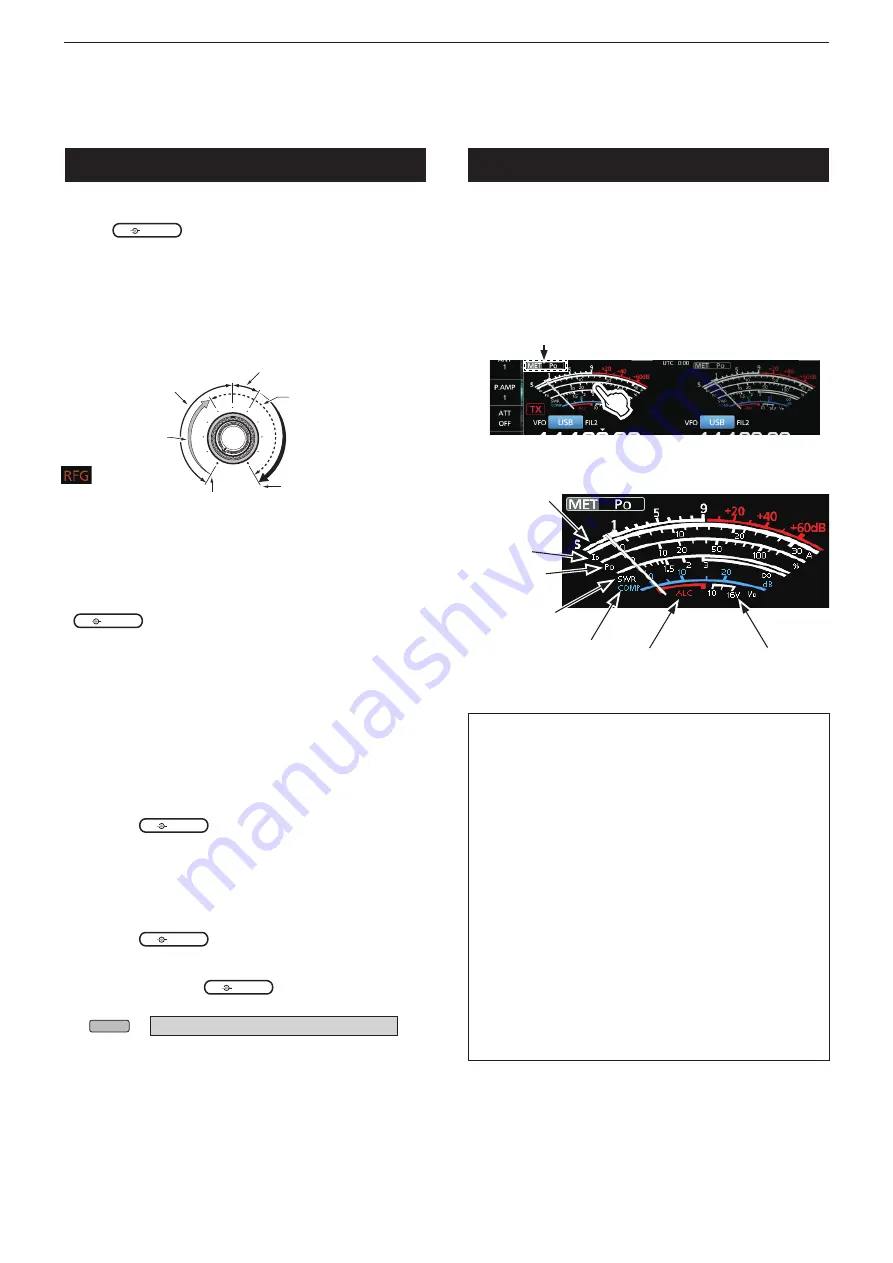
RF gain and SQL level

Noise squelch (FM mode)

Maximum RF gain

S-meter squelch 

adjustable range

Maximum S-meter 

squelch

Squelch is open

RF gain 

adjustable range

Minimum RF gain

 is displayed

 Rotate 

AF

RF/SQL

(outer) to adjust the RF gain and 

SQL level. 
By default, rotating to the left (when set to the 12 

o’clock position) adjusts the RF gain, and rotating to 

the right adjusts the squelch level, as described below.

RF gain

 You can adjust the receive sensitivity.

 •

 If a strong interfering signal is received, rotate 

AF

RF/SQL

 (outer) counterclockwise to reduce the 

RF gain.

L

 “RFG” is displayed to indicate that the gain is 

reduced.

L

 If a strong signal is received and “OVF” (Overflow) 

appears, reduce the RF gain until “OVF” disappears.

Squelch (SQL) level

 There are 2 types of squelch, depending on the 

operating mode.

 •

Noise squelch

 Rotate the


AF

RF/SQL

(outer) until the noise just 

disappears and the TX/RX indicator goes OFF.

 •

S-meter squelch

The S-meter squelch disables the audio output from 

the speaker or headphones when the received signal is 

weaker than the specified S-meter squelch level.
 Rotate the


AF

RF/SQL


clockwise from the 12 o’clock 

position to increase the S-meter threshold level. 

L

  You can change the


AF

RF/SQL


(outer) control type in 

“RF/SQL Control.” (p. 8-3)

MENU

 »

 SET > Function > 

RF/SQL Control


D

Selecting the Meter readout

Select one of the 6 different transmit parameters 

(Po, SWR, ALC, COMP, V

d

 and I

d

) to display during 

transmit.
 Touch the meter to display one of the meters.

The selected meter’s icon is displayed.

V

d

ALC level

Signal strength

I

d

Power level

SWR

Compression level


D

About the Multi-function meter

S: 

Displays the receiving signal strength level.

Po: 

Displays the relative RF output power.

SWR:  

Displays the SWR of the antenna at the 

selected frequency.

ALC

 Displays the ALC level. When the meter 

movement shows the input signal level 

exceeds the allowed level, the ALC limits the 

RF power to suppress signal distortion. In 

such cases, decrease the microphone gain 

level.

COMP:  

Displays the compression level when the 

speech compressor is used.

 V

d

:  

Displays the drain voltage of the final amplifier


MOS-FETs.

I

d

:


Displays the drain current of the final amplifier 

MOS-FETs.

TEMP:  

Displays the temperature of the final amplifier 

MOS-FETs.

Meter display

Summary of Contents for IC-7610

Page 1: ...BASIC MANUAL i7610 HF 50 MHz TRANSCEIVER...

Page 2: ...ics IP remote control capability with the optional RS BA1 ip remote control software Remote encoder capability with the optional RC 28 remote encoder Dualwatch operation SUPPLIED ACCESSORIES L Differe...

Page 3: ...tions FCC INFORMATION TRADEMARKS Icom Icom Inc and the Icom logo are registered trademarks of Icom Incorporated Japan in Japan the United States the United Kingdom Germany France Spain Russia Australi...

Page 4: ...anced operations in English Basic manual Multi language Instructions for basic operations in multiple languages Schematic diagram Includes the schematic and block diagrams HAM radio Terms English A gl...

Page 5: ...ced manual is on the CD that is supplied with the transceiver or can be downloaded from the Icom website http www icom co jp world support User Band Edge IP Plus function Main Sub Band Tracking functi...

Page 6: ...anner Quotation marks Used to indicate icons setting items and screen titles displayed on the screen The screen titles are also indicated in uppercase letters Example FUNCTION screen brackets Used to...

Page 7: ...ating mode 3 3 Setting the frequency 3 4 D D Using the Main Dial 3 4 D D Setting the Tuning Step function 3 4 D D Changing the Tuning Step 3 4 D D Using the 1 Hz step Fine Tuning function 3 4 D D Usin...

Page 8: ...er start 7 3 About an external antenna tuner 7 3 D D Using the AH 4 or AH 740 7 3 D D Using an external antenna tuner 7 4 Emergency mode Tuner 7 4 8 SET MODE 8 1 Set mode description 8 1 D D Entering...

Page 9: ...advice R WARNING NEVER put the transceiver on an unstable place where the transceiver may suddenly move or fall This could cause an injury or damage the transceiver R WARNING NEVER operate the transc...

Page 10: ...ol is for the Main band and the lower control is for the Sub band Push to turn the Mute function ON or OFF The TX RX indicator lights orange when the Mute function is ON Adjusts the audio output level...

Page 11: ...T or TX shift frequency 4RIT KEY RIT p 4 1 Turns the Receiver Incremental Tuning RIT function ON or OFF 5 KEY SPEED KEY SPEED PITCH CONTROL p 4 11 Adjusts the internal electronic CW keyer speed CW PIT...

Page 12: ...nitor 2ETHERNET CONNECTOR LAN Connects to a PC network through a LAN 3 TRANSVERTER CONNECTOR X VERTER Connects to an external transverter for input output 4 REFERENCE SIGNAL INPUT REF IN Input for a 1...

Page 13: ...p 6 1 Displayed while a USB flashed drive is inserted 1LAN INDICATOR Displayed while the transceiver and the optional RS BA1 are connected through the LAN for remote control operation 2BK IN F BKIN I...

Page 14: ...TOR p 4 8 Displays AUTOTUNE when the Auto Tuning function is ON Touch screen display Continued 0SPLIT ICON p 4 9 Displayed when the Split function is ON 1DUALWATCH ICON p 3 2 Displayed when using Dual...

Page 15: ...red item and rotate MULTI to adjust the value L You can open other menus by holding down NB or NR for 1 second or touching ATT VOX BK IN or COMP in the Multi function key group for 1 second Multi func...

Page 16: ...ion key group Touch to turn ON or OFF or to set z z Touch a key to turn the function ON or OFF z z Touching ATT VOX BK IN or COMP for 1 second opens the ATT menu VOX menu BK IN menu or COMP menu L See...

Page 17: ...USER 1 PASSWORD NETWORK USER 2 PASSWORD NTP SERVER ADDRESS CLOCK2 NAME KEYER MEMORY PSK MEMORY RTTY MEMORY VOICE TX RECORD T1 T8 MEMORY NAME D DKeyboard types You can select the Full Keyboard or Tenk...

Page 18: ...3 Touch Edit Name The MEMORY NAME screen is displayed 4 Touch and then touch D L Touching changes between uppercase and lowercase letter 5 Touch again and then touch X 6 Touch SPACE to enter a space 7...

Page 19: ...n Heat dissipation may be reduced and the transceiver may be damaged DO NOT place the transceiver against walls or put anything on top of the transceiver This may block airflow and overheat the transc...

Page 20: ...cable 50 GND AH 4 GND ANT 1 TUNER HF band long wire antenna Connecting a Transverter Connect your transverter unit as described below L You may need to connect to ALC depending on the transverter Set...

Page 21: ...imum signal level of the SEND jack is 16 V 0 5 A DC and 250 V 200 mA with the MOSFET setting p 13 2 Use an external unit if your non Icom linear amplifier requires a control voltage and or current gre...

Page 22: ...an set a frequency by rotating MAIN DIAL L Using the VFO mode may be easier for the first initial operation Memory mode You can recall a frequency that you have memorized on the MEMORY list Selecting...

Page 23: ...as described below MAIN SUB Lit Not lit L You can also push MAIN SUB to select the Main band or Sub band Dualwatch operation Dualwatch simultaneously monitors two frequencies The IC 7610 has 2 indepe...

Page 24: ...yed 2 Touch the mode key L In the SSB AM or FM mode the DATA key is displayed Operating mode selection list Selecting the operating band D D Selecting the operating band on the keypad Example Selectin...

Page 25: ...ncy and TX with a border of short dashes is displayed when you set a frequency outside the Ham band or outside your set Band Edges The Tuning Step function is ON D D Using the 1 Hz step Fine Tuning fu...

Page 26: ...ank Entry examples 14 025 MHz 1 4 0 2 5 ENT 18 0725 MHz 1 8 0 7 2 5 ENT 730 kHz 0 7 3 ENT 5 100 MHz 5 1 ENT 7 000 MHz 7 ENT Changing from 21 280 MHz to 21 245 MHz 2 4 5 ENT Setting the frequency Conti...

Page 27: ...ed ON 3 Touch the MHz digits 4 Touch F INP Touch for Split SPLIT or SPLIT is displayed Memory mode 5 Enter a Memory channel number between 1 and 99 Example Memory channel 5 L If you want to set a Prog...

Page 28: ...eived signal is weaker than the specified S meter squelch level Rotate the AF RF SQL clockwise from the 12 o clock position to increase the S meter threshold level L You can change the AF RF SQL outer...

Page 29: ...erence to other stations on the same frequency It is good amateur practice to listen first and then even if nothing is heard ask if the frequency is in use once or twice before you start operating D D...

Page 30: ...30 to 50 of the ALC scale when speaking into the microphone at your normal voice level In the AM or FM mode check the audio clarity with another station or use the Monitor function p 4 7 4 Hold down P...

Page 31: ...asting station Touch ATT to sequentially set the Attenuator up to 18 dB in 6 dB steps RIT function The RIT Receive Increment Tuning function compensates for differences in the transmit frequencies of...

Page 32: ...Rotate MAIN DIAL to set the time constant L You can reset to the default settings by touching DEF for 1 second 5 To close the AGC screen push EXIT Selectable AGC Time constant unit seconds Mode Defau...

Page 33: ...T2 filters before operating the Twin PBT Rejects interference of both higher and lower passbands If you rotate the control too much the received audio may not be heard because the passband width is to...

Page 34: ...o 3 6 kHz 100 Hz FIL 2 500 Hz FIL 3 250 Hz RTTY FIL 1 2 4 kHz 50 Hz to 500 Hz 50 Hz 600 Hz to 2 7 kHz 100 Hz FIL 2 500 Hz FIL 3 250 Hz AM AM D FIL 1 9 0 kHz 200 Hz to 10 0 kHz 200 Hz FIL 2 6 0 kHz FIL...

Page 35: ...MULTI to adjust the item Example 8 LEVEL Default 50 Adjust the level where the Noise Blanker activates between 0 and 100 DEPTH Default 8 Adjust the noise attenuation depth between 1 and 10 WIDTH Defa...

Page 36: ...l Selector adjustment is automatically selected 2 Rotate MULTI to adjust the center frequency 3 To close the Multi function menu push EXIT NOTE When you rotate MAIN DIAL while the Digital Selector is...

Page 37: ...and NAR Monitor function The Monitor function enables you to monitor your transmit audio Use this function to check the voice characteristics while adjusting the transmit audio parameters L You can h...

Page 38: ...ouch COMP for 1 second to turn the Speech Compressor ON and to display the COMP menu The Speech Compressor Level setting is automatically selected COMP zone 8 While speaking into the microphone at you...

Page 39: ...ion is turned ON and the Split icon is displayed The Main band settings are set to the Sub band 3 While holding down XFC set the operating frequency offset between transmit and receive D D Using the r...

Page 40: ...ing TBW sets the filter width to WIDE MID or NAR L The transmit filter widths are set to the following values by default WIDE 100 Hz to 2900 Hz MID 300 Hz to 2700 Hz NAR 500 Hz to 2500 Hz You can chan...

Page 41: ...and then automatically returns to receive after a preset time after you stop keying 1 Select the CW mode 2 Touch BK IN in the function menu to select SEMI L Touching BK IN changes between BKIN Semi B...

Page 42: ...the Break in function is OFF to practice CW sending You can adjust the CW side tone level in Side Tone Level MENU KEYER EDIT SET CW KEY SET Side Tone Level D DAPF Audio Peak Filter operation The APF...

Page 43: ...nly in the CW mode 2 Touch EDIT SET Opens the EDIT SET screen 3 Touch to select the item to set KEYER MEMORY edit menu You can edit the keyer memories M1 to M8 KEYER SEND screen EDIT 001 SET CW KEY SE...

Page 44: ...the Reference level window L Rotate MAIN DIAL to adjust the Reference level SPEED Selects the sweep speed FAST MID or SLOW RBW Selects the Resolution Band Width from NAR narrow MID and WIDE L This se...

Page 45: ...io scope enables you to display the received signal s frequency components on the FFT scope and its waveform components on the Oscilloscope The FFT scope also has a waterfall display AUDIO SCOPE scree...

Page 46: ...Default Fill Select the type of waveform for the FFT scope Line Only the waveform outline is drawn Fill The full waveform is drawn in color FFT Scope Waveform Color Default R 51 G 153 B 255 Set the wa...

Page 47: ...e a new one We recommend that you make a separate backup file of the important data onto your PC Icom will not be responsible for any damage caused by data corruption on a card or USB flash drive You...

Page 48: ...from the screen 3 Touch YES to unmount 4 Remove the card from the transceiver 3 Touch YES to start formatting LTo cancel formatting touch NO After formatting returns to the SD CARD set screen 4 To cl...

Page 49: ...he originally saved antenna setting in the memory This key can be used when ANT SW is set to Auto ANT MW Touch for 1 second Saves the current antenna connector setting in the antenna memory TEMP M Tur...

Page 50: ...condition In that case push TUNER to turn OFF the tuner then turn it ON again to reset all latching relays About the Antenna memory settings Continued D DSelecting the antenna type Select the antenna...

Page 51: ...a multiple of that frequency Using the Internal antenna tuner 1 Push TUNER to turn ON the internal antenna tuner The indicator on the TUNER key lights 2 Tune the antenna L To tune the antenna see Manu...

Page 52: ...th antenna tuners internal and external will simultaneously start tuning See the antenna tuner s instruction manual for details NOTE Be sure not to connect the antenna tuner without an antenna connect...

Page 53: ...ou want to select 4 Push or to scroll through the items L You can also rotate MULTI to scroll through the items 5 Touch the item to open the item s setting screen or to open its next tree level LTo go...

Page 54: ...X HPF LPF Default Sets the cut off frequencies for the receive audio high pass filter or low pass filter in 100 Hz steps in the CW RTTY and PSK modes MENU SET Tone Control TX SSB TX Bass Default 0 TX...

Page 55: ...s the RTTY mark frequency L When the internal RTTY decoder is used 2125 Hz is automatically selected RTTY Shift Width Default 170 Selects the RTTY shift width L When the internal RTTY decoder is used...

Page 56: ...Selects the notch function used in the SSB or AM mode FILTER Screen MAIN SUB Select Default Auto by FILTER PBT Operation Selects whether or not to automatically switch the IF filter or Twin PBT setti...

Page 57: ...The beep level is limited when the Beep Level Limit item is ON ACC IF Output Level Default 50 Sets the IF output level of ACC MENU SET Connectors USB AF IF Output Output Select Default AF Selects the...

Page 58: ...he PC through the USB port Selects the control port to be used for communication between the IC 7610 and PC L You cannot select the terminal which is already selected in the USB SEND or USB Keying CW...

Page 59: ...transfer rate when remotely controlling the IC 7610 through the USB CI V port L When Auto is selected the baud rate is automatically set according to the data rate of external device L This setting is...

Page 60: ...remote station MENU SET Network Network User1 MENU SET Network Network User2 Network User1 ID Default Network User2 ID Default lf you are operating the IC 7610 using the optional RS BA1 enter a user n...

Page 61: ...source for a long period of time the battery will discharge In that case the transceiver resets the internal clock If you do not use the transceiver for a long period of time we recommend that you co...

Page 62: ...card Before you remove a card when the transceiver is ON be sure to electrically unmount it Otherwise the data may be corrupted or deleted Others MENU SET Others Information Version Displays the trans...

Page 63: ...U SET Time Set D DSetting the UTC offset 1 Display the TIME SET screen 2 Touch UTC Offset Displays the UTC offset editing screen 3 Touch or to set the UTC offset 4 Touch to set the UTC offset Returns...

Page 64: ...rns to the previous screen MENU SET Time Set D DEditing the CLOCK2 name You can edit CLOCK2 s 3 character name The default name is UTC 1 Display the TIME SET screen 2 Touch CLOCK2 Name Displays the na...

Page 65: ...contents Fixed Edges on the Spectrum Scope Network settings in the set mode MY Call REF Adjust After performing an All reset All reset clears all data and returns all settings to their factory default...

Page 66: ...n OFF the Mute function on whichever band is selected Main or Sub p 1 1 The external speaker cable is defective Check the external speaker cable and repair it Sensitivity is too low and only strong si...

Page 67: ...to turn the Dial Lock function OFF p 3 6 Programmed scan does not start The same frequencies have been set in scan edge memory channels P1 and P2 Set different frequencies in scan edge memory channels...

Page 68: ...0 Unbalanced Power supply requirement 13 8 V DC 15 Operating temperature range 0 C to 50 C 32 F to 122 F Frequency stability Less than 0 5 ppm 0 C to 50 C 32 F to 122 F Frequency resolution 1 Hz minim...

Page 69: ...han 6 dB V emf P AMP 1 ON 50 MHz band Less than 0 dB V emf P AMP 2 ON FM BW 7 kHz 60 Modulation 12 dB SINAD 28 0 29 7 MHz Less than 0 dB V emf P AMP 1 ON 50 MHz band Less than 6 dB V emf P AMP 2 ON Sq...

Page 70: ...speaker with high and low frequency cut functions 3 W 8 AH 2b antenna element A 2 5 m 8 2 ft long antenna element for mobile operation with the AH 4 AH 4 antenna tuner Automatic antenna tuner to tune...

Page 71: ...3 RX ANT OUT p 13 6 BNC connector 50 RX ANT IN p 13 6 BNC connector 50 X VERTER p 13 6 BNC connector 50 REF IN p 13 5 BNC connector 50 REMOTE p 13 4 3 5 mm in d METER p 13 4 3 5 mm in d ACC 2 p 13 2...

Page 72: ...than 0 6 V Less than 2 mA 2 GND Connects to ground Connected in parallel with ACC 2 pin 2 3 SEND 1 Input output pin Connected in parallel with ACC 2 pin 3 An external unit controls the transceiver Whe...

Page 73: ...send the memory information z z Hold down the switch for 1 second to repeatedly send the memory information L To use the external keypad turn ON the following items MENU SET Connectors External Keypad...

Page 74: ...T8 RTTY Memory RT1 RT8 PSK memory PT1 PT8 to be transmitted z z Push a switch to send the memory information z z Hold down the switch for 1 second to repeatedly send the memory information L To use t...

Page 75: ...om web site USB 1 MENU SET Connectors USB Output Select MENU SET Connectors USB AF Output Level MENU SET Connectors USB IF Output Level USB 1 1 2 0 type B Connect to the PC when Outputting the decoded...

Page 76: ...operation MENU SET Function Transverter Offset ANT 1 ANT 2 Connect a 50 antenna for the HF to 50 MHz frequency band Input Output impedance 50 unbalanced LIf you are using the AH 4 connect it to ANT 1...

Page 77: ...rward and that radiation vertically downwards is at unity gain sidelobe suppression is equal to main lobe gain This is true of almost every gain antenna today Exposed persons are assumed to be beneath...

Page 78: ...CW Operating 4 10 Pitch control 4 10 Side tone 4 12 D Data mode Selecting 3 3 Date Setting 9 1 DC power supply Connecting 2 1 Dial Lock function 3 6 DIGI SEL 4 6 Digital Selector 4 6 Display 1 4 Disp...

Page 79: ...ction 4 1 S SD card 6 1 Formatting 6 2 Inserting 6 1 Saving data 6 1 Set mode 8 9 Unmounting 6 2 Semi Break in 4 11 Set mode Connectors 8 5 Description 8 1 Display 8 8 Function 8 2 Network 8 7 Others...

Page 80: ...i Hirano ku Osaka 547 0003 Japan A7380D 1EX Printed in Japan 2017 Icom Inc Intended Country of Use AT FI IT PL GB RO BE FR LV PT IS TR CY DE LT SK LI HR CZ GR LU SI NO DK HU MT ES CH EE IE NL SE BG IC...

Reviews: