background image

TIPS FOR THE USB PORT SETTINGS 


SECTION 2  ABOUT LINK SETTING FOR BETWEEN USB 

PORT AND REMOTE JACK 


Applicable products: IC-7300, IC-7851 (as of March 2016)


You can switch USB port and [REMOTE] link ON and OFF in the above Icom’s amateur base transceivers. 
In case the transceivers that two COM ports are recognized, the link setting is available for only USB1. 


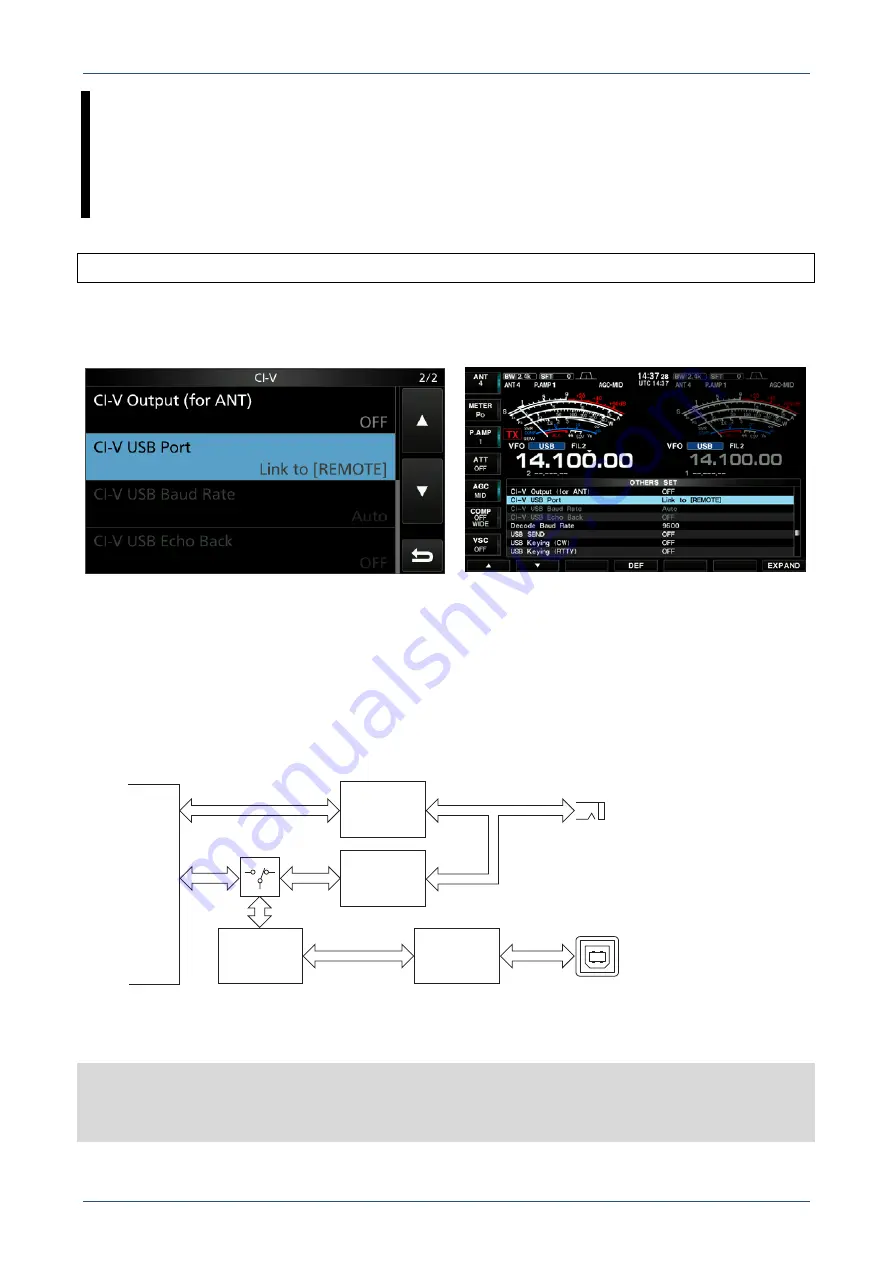
Figure 2-1 Set mode screen for IC-7300  


Figure 2-2 Set mode screen for IC-7851 


The default setting of this item is “Link to [REMOTE].” 
This setting is selected when using the Transceive function by outputting the control signal from [REMOTE] 
after converting the communicating data at the USB port to CI-V data, or when operating the existing remote 
control system with the optional CT-17. In this case, the USB port communication speed is limited to 19,200 
bps because the [REMOTE] jack’s maximum communication speed is 19,200 bps. 
 
Thus, Icom strongly recommends the setting of "Unlink to [REMOTE]" in cases other than those above.  
By using “Unlink to [REMOTE],” you can operate the USB port with a speed of up to 115,200 bps. 


Figure 2-3 USB port and [REMOTE] 


IMPORTANT:

 Set to “Unlink to [REMOTE]” when using the spectrum scope function of RS-BA1 with the IC-

7300, or IC-7851 through a USB cable. Otherwise RS-BA1 spectrum scope will not function since the data 
transfer speed of the USB port is insufficient for the amount of data required by the spectrum scope. 


[USB]

Linked =  19,200 bps
Unlinked = 115,200 bps

CPU

Serial-USB

Converter

CI-V

Converter

CI-V

Converter

USB
HUB

CI-V USB Link switch

[REMOTE]

19,200 bps

Summary of Contents for IC-7100

Page 1: ...Reference MANUAL Tips for the USB port settings Version 1 0 March 2016 RMX USB_PORT_SETTING ENG V1 0...

Page 2: ...plicable transceivers described in this document are as follows As of March 2016 IC 7100 IC 7300 IC 7850 IC 7851 Referred to as the IC 7851 IC 9100 Note that a USB driver installation is required to c...

Page 3: ...OUT DTR AND RTS 4 SECTION 2 ABOUT LINK SETTING FOR BETWEEN USB PORT AND REMOTE JACK 6 SECTION 3 WHY TWO VIRTUAL COM PORTS ARE RECOGNIZED ON ONE PHYSICAL USB PORT 7 3 1 How to check the internal circui...

Page 4: ...They originated from the RS 232C standard which is a unified standard for the control signal line The SEND and CW RTTY keying signals from the PC through the DTR and RTS terminals of the RS 232C port...

Page 5: ...er to capture SEND CW RTTY keying signal respectively Except OFF Therefore the settings will succeed when the same terminal is set between the transceiver s USB SEND USB keying CW and USB keying RTTY...

Page 6: ...operating the existing remote control system with the optional CT 17 In this case the USB port communication speed is limited to 19 200 bps because the REMOTE jack s maximum communication speed is 19...

Page 7: ...cted through a built in USB HUB Therefore these two internal circuits have been recognized as two ports on the PC For example the optional RS BA1 automatically selects USB1 and uses the circuit for re...

Page 8: ...to your OS version or settings Refer to your PC s instruction manual or help file for details 1 Click Start menu and then Control Panel 2 Click Hardware and Sound 3 Click Device Manager in Device and...

Page 9: ...st 5 Check the contents displayed in Value If the end of the displayed contents is A the COM port is for USB 1 If the end of the displayed contents is B the COM port is for USB 2 6 Click Cancel to clo...

Page 10: ...tion manual or help file for details 1 Click Start menu and then Control Panel 2 Click Hardware and Sound 3 Click Device Manager in Device and Printer group Click the triangle mark of Ports COM LPT to...

Page 11: ...your PC is marked in use 6 Click OK to set The Advanced Settings for COM screen closes at the same time is the COM port number After changing the COM port number you may not be able to immediately us...

Page 12: ......

Page 13: ......

Reviews: